We always strive to make the service even more convenient and intuitive for users. That is why it’s high time we updated and improved the email campaign wizard.
First of all, navigation through the email campaign wizard has become more flexible. Now you can easily go to any of the completed steps and then return to where you left off, simply by clicking on the name of the corresponding stage.
 Email campaign wizard navigation
We have also reorganized and structured the whole process to make it easier to go through. Let’s find out what has changed in the email campaign wizard step by step.
Step 1. Information about the email campaign
“Mailing list” field
Choosing a mailing list has become easier to manage due to our adding the “Ok” and “Clear All” buttons. “Ok” confirms the selection and closes the drop-down list. “Clear All” deselects all mailing lists at once if, for example, you have checked several books and now want to uncheck them without scrolling the entire list again.
 Mailing list selection. “Ok” and “Clear all” buttons
Variable selection
Searching for variables now is easier — they are grouped by mailing lists. First displayed are the variables common to all selected lists then go the unique ones for each list.
 Combining variables by mailing lists
The variable criteria settings now open under the subject line, in the same window as the variable selection.
 Variable selection
Step 2. Message content
Template selection
If you have prepared a template in advance, you can simply select it in the “My templates” section without going to the template layout editor. To do this, click on the “Select” button and proceed to the next settings. If you want to make any changes, click “Edit” and the template will open in the editor.
 Email template selection
Besides, it is now easy to find the desired template in the “My templates” section as we have added a search field. Enter a name or even a part of the name in the search field and the templates matching your request will be displayed on the screen.
 Search in the “My templates” section
Preheader
It is a fact that a well-composed preheader has a positive effect on the opening of emails.
With the new email campaign wizard, you can add and edit an email preheader yourself. To set a preheader, simply enter the desired text in the “Preheader” field and click “Save.”
 Email preheader
Attachments
In the same window, you can attach files to the message.
 “Attach file” option
Thus, you can set up the entire content of the email within a single step, which is very convenient.
Step 3. Campaign parameters
This step presupposes the following settings:
“Collect statistics” — collect statistics based on the recipients’ actions.
“Unsubscribe page” and “Language of the unsubscribe form” — attach a custom unsubscribe page or the default one to the email and set the language of the unsubscribe form depending on the language of your target audience.
“Subscription category” — add a category for the subscription and provide the customers who are subscribed to several subscriptions with an opportunity to unsubscribe only from one of them, but not from all at once.
“Email archiving” — check the “Add this email to archive” and get access to the subscription after deleting data from your account.
“Automation 360 email flow” — use this option to enable an automated email flow upon trigger actions. As soon as recipients open the email or follow the link, they will automatically receive subsequent emails of the series which you have set up.
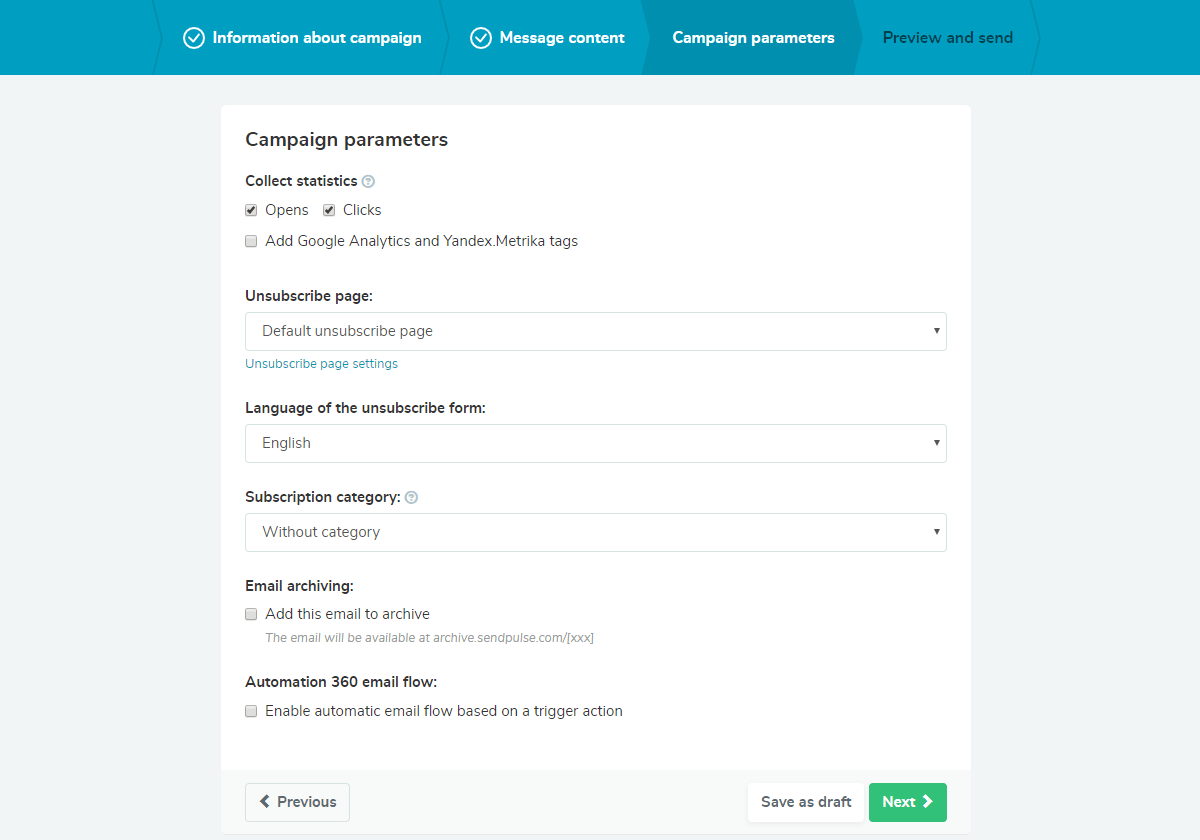 Email campaign parameters
Step 4. Preview and send
At this step, as before, you can view the details of the email and send a test message to your email address.
 Information about the campaign
However, we have added the preview of the message in the inbox. Now you can check how subscribers will see your email in their inbox and correct the subject, preheader, or sender name if needed.
 Email preview in the email service
Besides, now you can send emails by the time zone for scheduled messages.
 Sending email by the time zone
Finally, we have optimized the work of the email campaign wizard to make it faster and added a number of minor changes to the interface, which improved both the usability of the service and its appearance.
Future plans
We do not limit ourselves with the achieved results and continue to work on other updates. So, in the next release, you will already get access to the following features:
- A/B tests directly from the email campaign wizard;
- follow up to unopened messages if the email campaign was sent to several mailing lists;
- emails to a dynamically changing mailing list.
Use SendPulse and promote your business with email campaigns!