Someone has just given you their email address. That’s usually when they’re most curious about your brand, and when a welcome email that arrives late, lands in spam, or greets them with “Hi, !” costs you the most. Our support team has heard about all of these problems.
The setup itself is fairly short. Basically, you connect a pop-up or subscription form to a mailing list, open the “Automation” section (formerly Automation 360), and create a flow with the “New subscriber” trigger for that same list. Add an “Email” element for each message, set the timing and conditions, and launch. The core series takes an hour or two to build, and about 30 minutes more if you also track purchases from your online store
In this guide, we build the whole process for Fernway, a fictional plant shop: a pop-up, a series that adapts to each subscriber’s answer, and purchase tracking, all tested in a real SendPulse account. We also cover the six most common reasons a welcome email fails to reach a new subscriber, plus seven reasons subscriber data goes missing, and how to fix each one.
TL;DR What we learned while testing
We built and tested a welcome flow in a real SendPulse account with a Shopify store in October–November 2026. Here’s what to get right from the start:
- Use one mailing list for everything. The pop-up and the “New subscriber” trigger must share a list. A mismatch is the most common reason our support team finds behind missing welcome emails.
- Set email 1 to “Right away.” New “Email” elements wait 30 minutes by default, which is long enough for subscribers to think the email never came.
- Count delays in calendar days. “After 2 days at 09:00” means 9 a.m. on the second calendar day in your account’s time zone, so the actual wait ranges from about 33 to 57 hours.
- Publish your pop-up after the flow goes live. “Restart” only catches contacts who joined in the last two hours, so anyone who signs up earlier never enters the flow.
- Keep links alive where you don’t track clicks. Flow links expire after six months unless you turn on “Prevent link expirations,” which also stops click tracking, so leave it off only before a “Clicks” condition.
- Send Shopify orders through a webhook. The SendPulse app for Shopify syncs contacts, not purchases, so connect a Purchase event and send it only paid orders.

Turn conversations into conversions
Build targeted automation flows with emails, chatbots, SMS, and more — powered by CRM data and real user behavior.
Get started for free
Meet Fernway and the welcome series we’ll build
Fernway is a fictional houseplant shop we set up on Shopify for this guide. Its pop-up offers a free 14-day plant care checklist and asks one question: how much light does your room get? The series delivers the checklist, recommends plants that suit the subscriber’s light, and ends with a first-order offer.
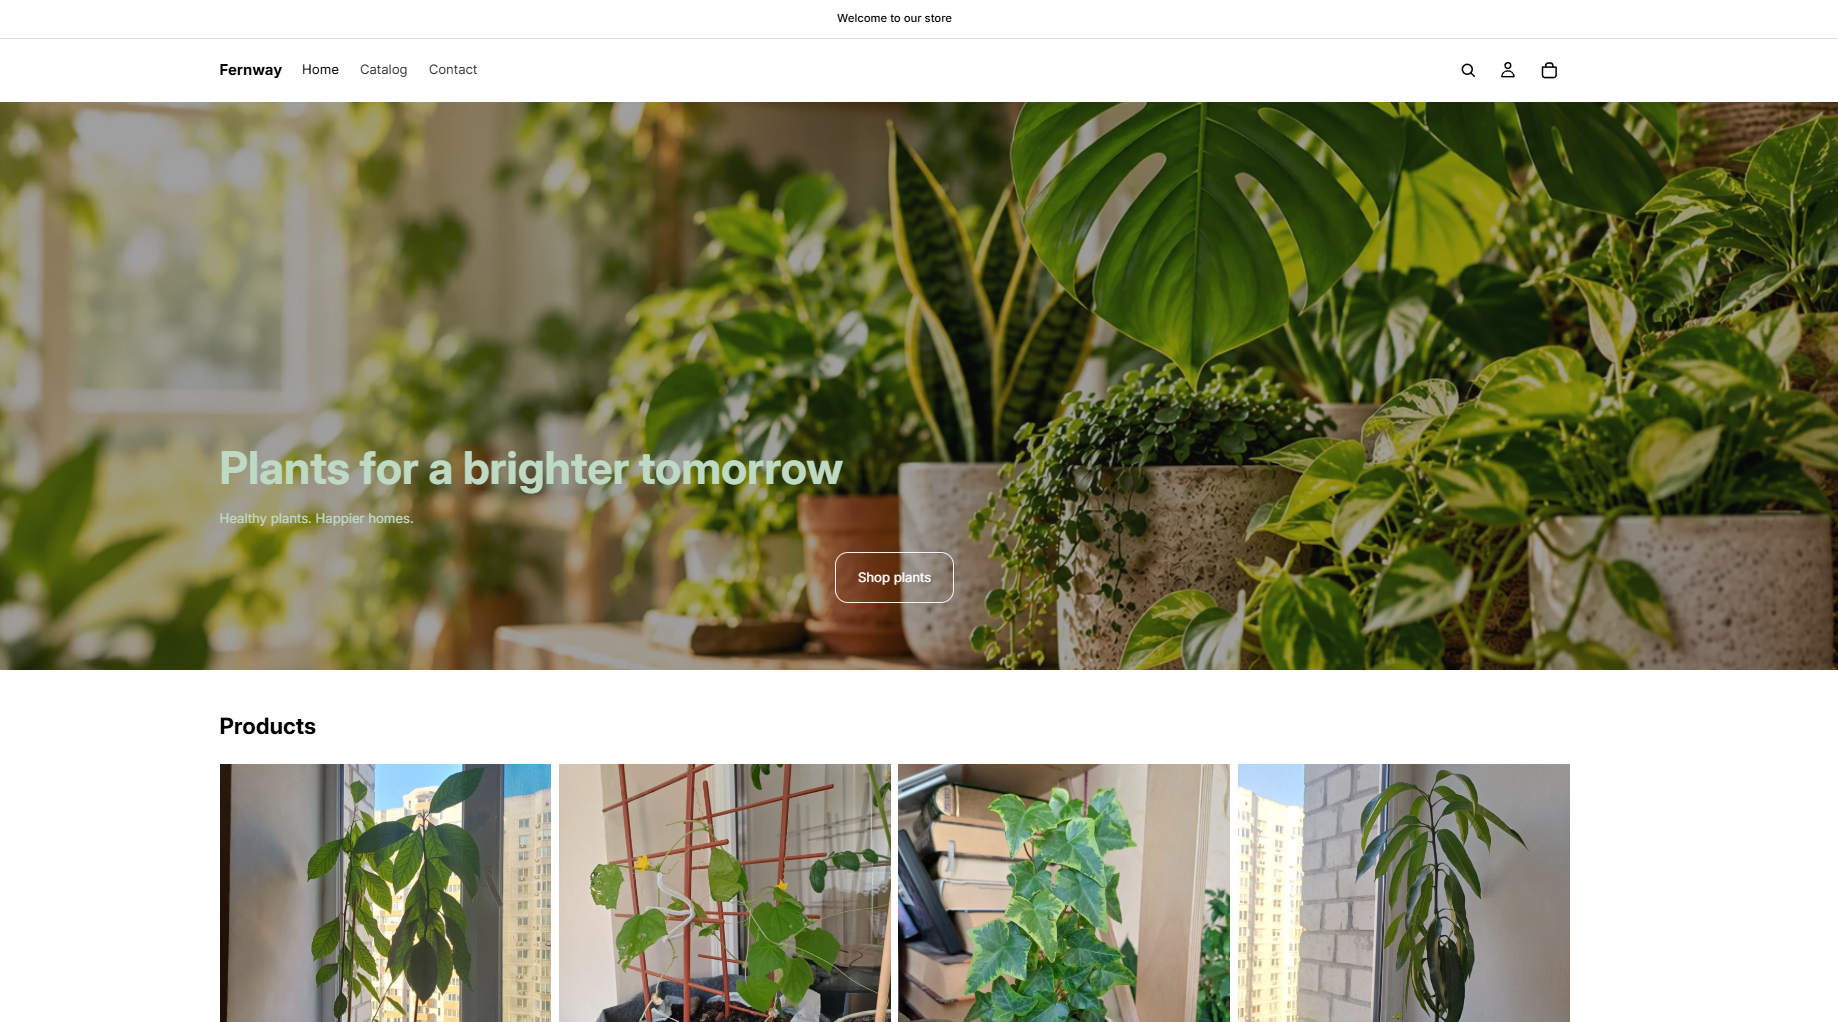 Fernway, the Shopify test store we use throughout this guide
Here’s how the whole welcome series looks in the builder once it’s done:
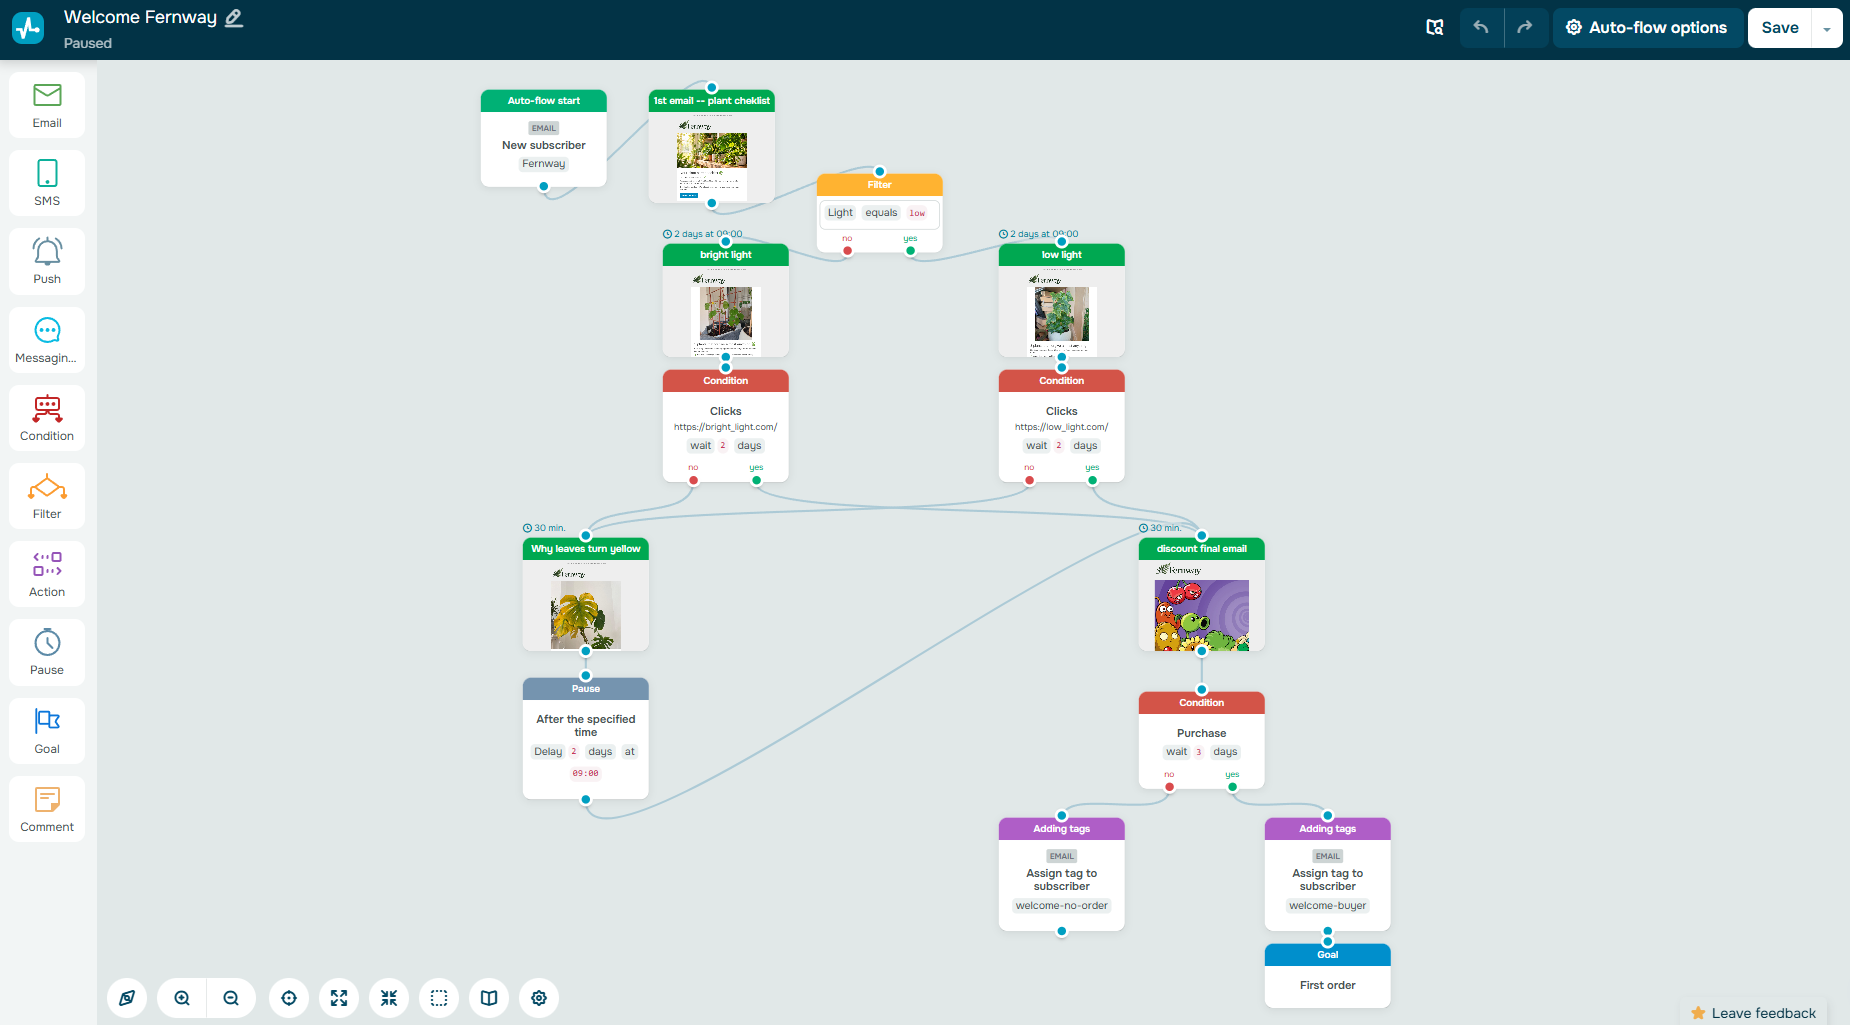 The full welcome flow built in SendPulse
You don’t need to sell plants to follow the same setup. The checklist can be any signup incentive, and you can replace the light question with whatever helps you segment your audience, such as skin type, experience level, budget, or another preference relevant to your business. Let’s get building!
Before you build, decide what subscribers get in their first five minutes
People subscribe for the thing you promised, so email 1 has to hand it over. A “thank you” on its own feels like a receipt for a delivery that never came.
Fernway promised a checklist, so the download button sits at the top of email 1, above anything about the shop. The same goes for a promo code, course access, or a guide: give subscribers what the form promised first, and save the brand story for later.
Once you know what email 1 delivers, set up where those subscribers will be stored: the mailing list.
The mailing list stores the subscriber data your welcome flow uses, including their email address, name, and any answers collected at signup. The pop-up saves that information to the list, and the flow tracks it from there.
That’s why the mailing list comes first: a pop-up can only save an answer to a variable that already exists in the list. The welcome flow is also tied to one specific mailing list, so your signup form needs to save new subscribers to exactly that list.
Fernway collects subscribers with a SendPulse pop-up on its Shopify store, so that’s the setup we’ll follow here: first the list, its variables, and tags, then the pop-up and its saving settings.
Add a mailing list
Head to “Email” in the top menu and select “Mailing lists” on the left. Click “Create mailing list,” type in a name, and hit “Create.”
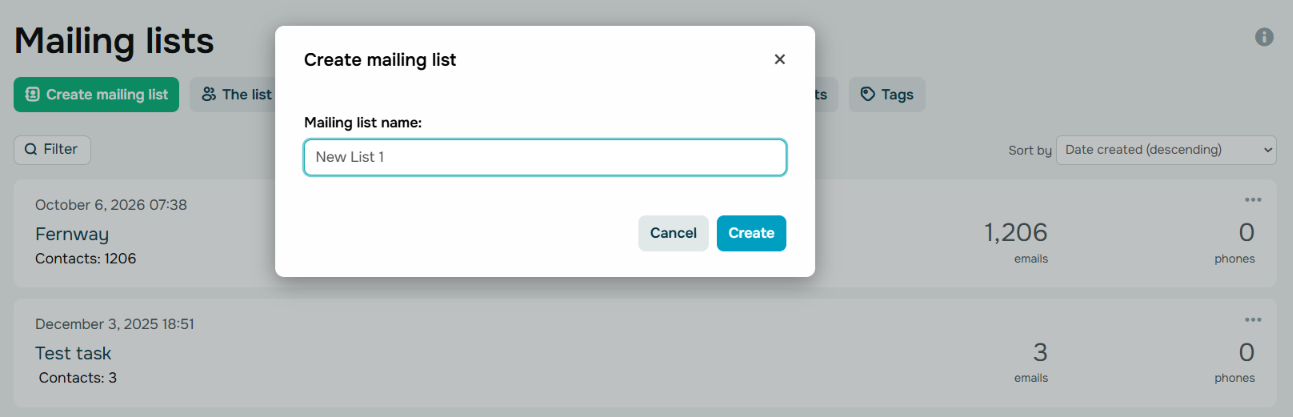 Creating a new mailing list in SendPulse
Give your list a clear name from the start. Once you add another pop-up, import contacts, or create a second signup source, names like “List 2” become hard to manage. A source-based name such as “Blog pop-up signups” makes it easier to see where those contacts came from.
Fernway only has one signup source for now, so we kept it simple and named the list “Fernway.”
Create variables
Next, create the variables your pop-up will use to save subscriber information. Each variable stores one type of data and appears as a column in the mailing list, and a list can hold up to 50 of them.
Keep this part simple. Every extra field adds friction to the signup process, so only collect information you’ll actually use later, either to personalize an email or to decide which branch a subscriber should follow.
For Fernway, we only need two variables besides the email address. Name is used in the greeting in email 1. Light stores the answer to the pop-up question and is later used by a “Filter” to choose between the low-light and bright-light versions of email 2.
To create a variable, open your mailing list and click “Create variable” above the contact table. In the window that opens, give the variable a name and choose its type. For Light, we selected “String” because the saved answer is text. “Number” works for values such as a budget, and “Date” is for things like birthdays. If your list doesn’t have a Name variable yet, add it the same way.
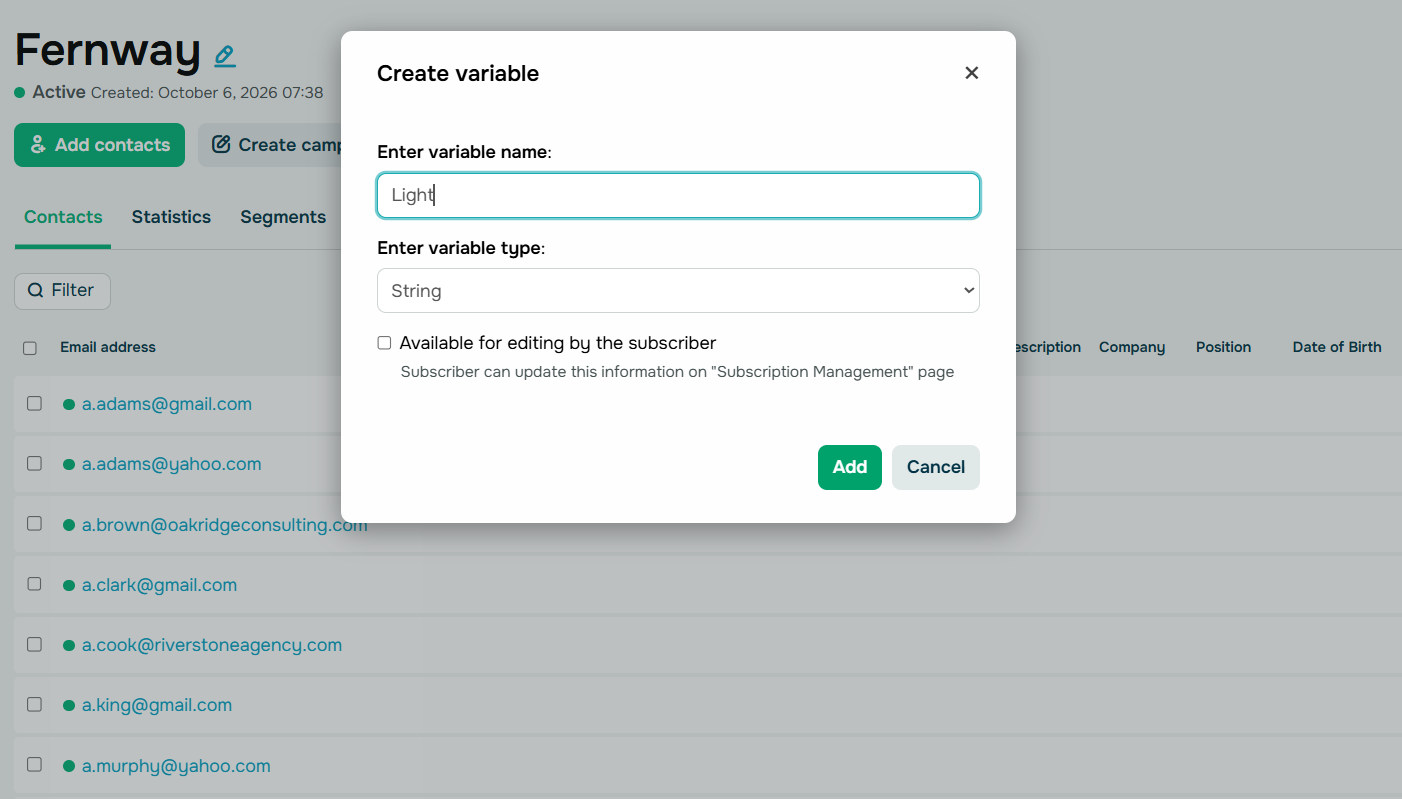 Naming the “Light” variable and choosing the “String” type
A few details are worth getting right now, because they can cause issues later. Variable names are case-sensitive, so “Light” and “light” are treated as different variables. Choose one spelling and use it consistently in your mailing list, pop-up, and flow.
It also helps to keep saved values short. Fernway stores low and bright instead of the full answer text (we’ll set the values in the pop-up), which makes those values easier to match later in the “Filter” element.
Note: Create the variables in the mailing list itself, even though the pop-up collects them. A variable created only in the pop-up builder stays in the “Pop-ups” section, not in the list, and the flow later reports that the needed variable doesn’t exist.
Create tags
One last bit of prep while you’re still in the mailing list settings: create the tags you’ll use at the end of the welcome series. They’ll show how each subscriber finished the flow, so you can later track who responded to the offer or use those groups to start other flows.
For Fernway, we need two tags: welcome-buyer for subscribers who place an order within three days of the welcome offer and welcome-no-order for those who don’t. Starting each tag with the flow name also makes it easier to see where it came from once you have more flows running.
You could create the tags while building the flow, but it’s easier to do it now. In our test, a new tag didn’t appear in the flow builder until we saved the flow and reloaded the page.
Go to “Email” > “Mailing lists,” open the “Tags” tab, and click “Create tag.” Enter a name for each tag and save it.
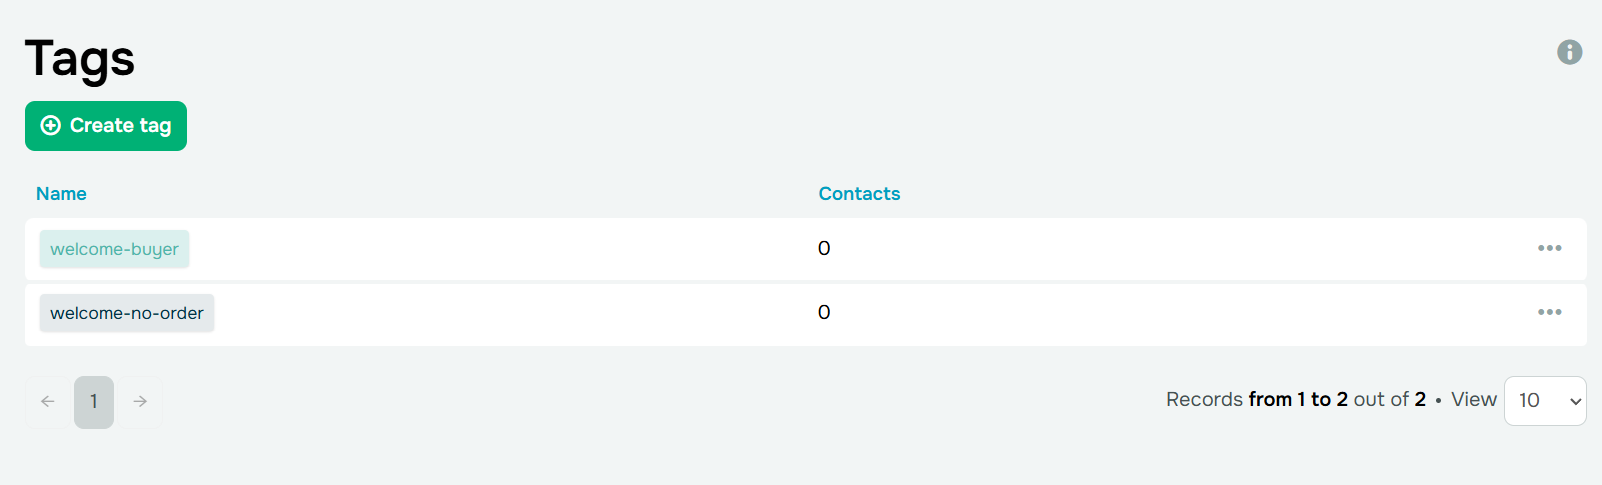 Creating the end-of-series tags in “Tags”
SendPulse stores mailing list tags and CRM tags separately, and the flow’s email actions can only use mailing list tags, so create yours in the “Email” section.
Tags require the Pro plan or higher. They’re shared across all mailing lists, and each contact can have up to 100. If your plan doesn’t include tags, skip this part and the tagging step later on. The series still works without them; you just won’t have different audience groups at the end.
Step 2. Set up a pop-up that saves data to your list
With the mailing list ready, you can move on to the pop-up that will collect new subscribers. Before you build it, SendPulse needs to know which website it will appear on.
Connect your website to SendPulse
A pop-up only appears on a website that has SendPulse’s installation code, and each site gets its own code. So start by adding your website.
In the top menu, choose “Pop-ups” and click “Add website.” Enter your store’s URL exactly as visitors see it, then select your platform from the list. SendPulse supports popular CMSs, site builders, and eCommerce platforms. If yours isn’t listed, choose “Any.”
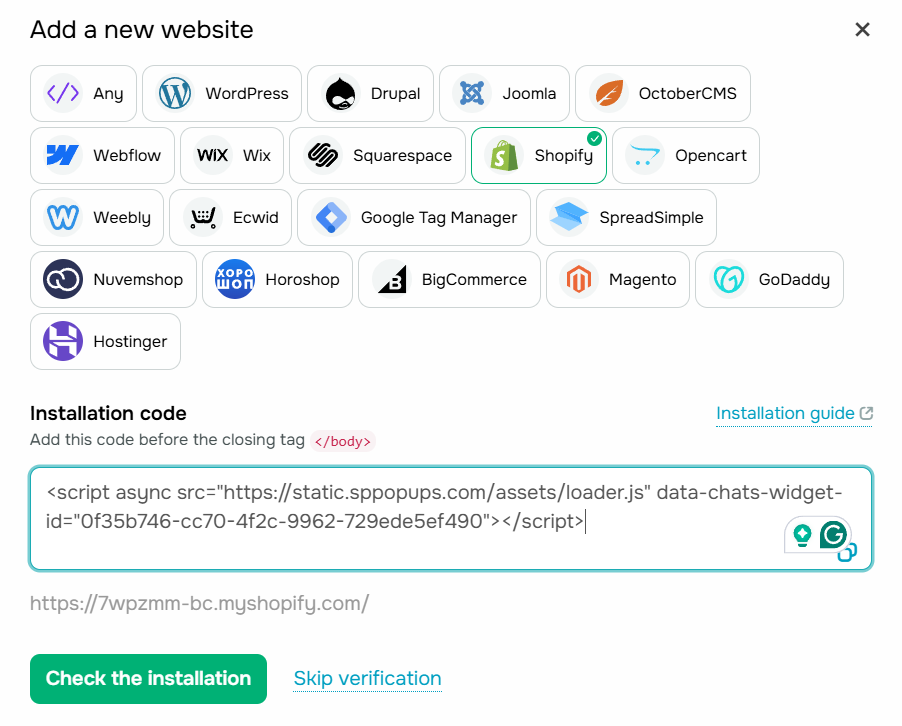 Adding a new Shopify website in the “Pop-ups” section
Once the website is added, copy its installation code. SendPulse shows it right away, and you can always find it later under your website’s “Settings” > “Website installation code.” That page also has a Google Tag Manager version, which you add as a “Custom HTML” tag. Use it only if your site manages scripts through GTM; everyone else needs the plain script.
Fernway runs on Shopify, so we’ll add the script to the store theme. If you prefer not to edit the theme code, the SendPulse app for Shopify can add pop-ups without this step. We’re using the code method here so you can see how the installation works without relying on the app.
In your Shopify admin panel, open “Online Store” in the left menu. Hover over the pencil icon and click “Edit theme.” In the theme editor, open the three-dot menu at the top and select “</> Edit code.”
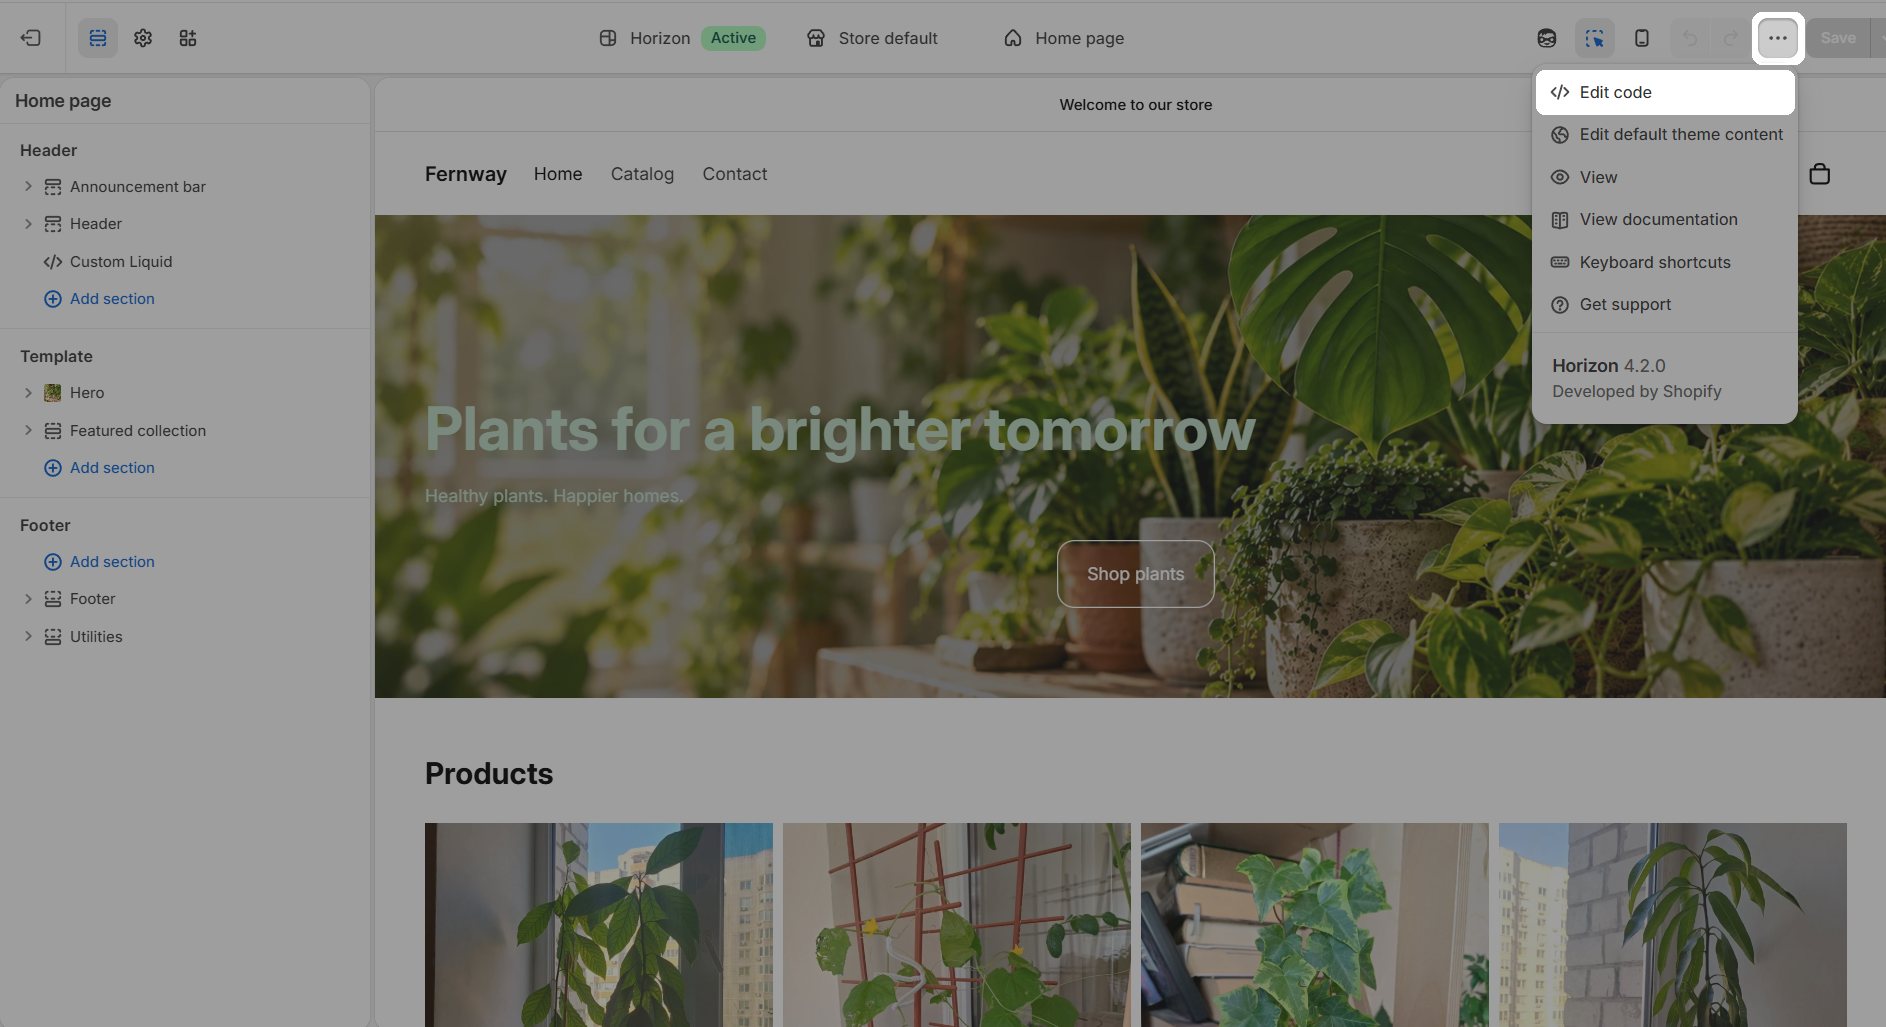 Selecting “</> Edit code” from the drop-down menu in the theme editor
In the code editor, expand your theme’s folder (“HORIZON” in Fernway’s case), open “layout,” and click “theme.liquid.” Find the closing </body> tag near the end of the file, paste the code just above it, and save your changes.
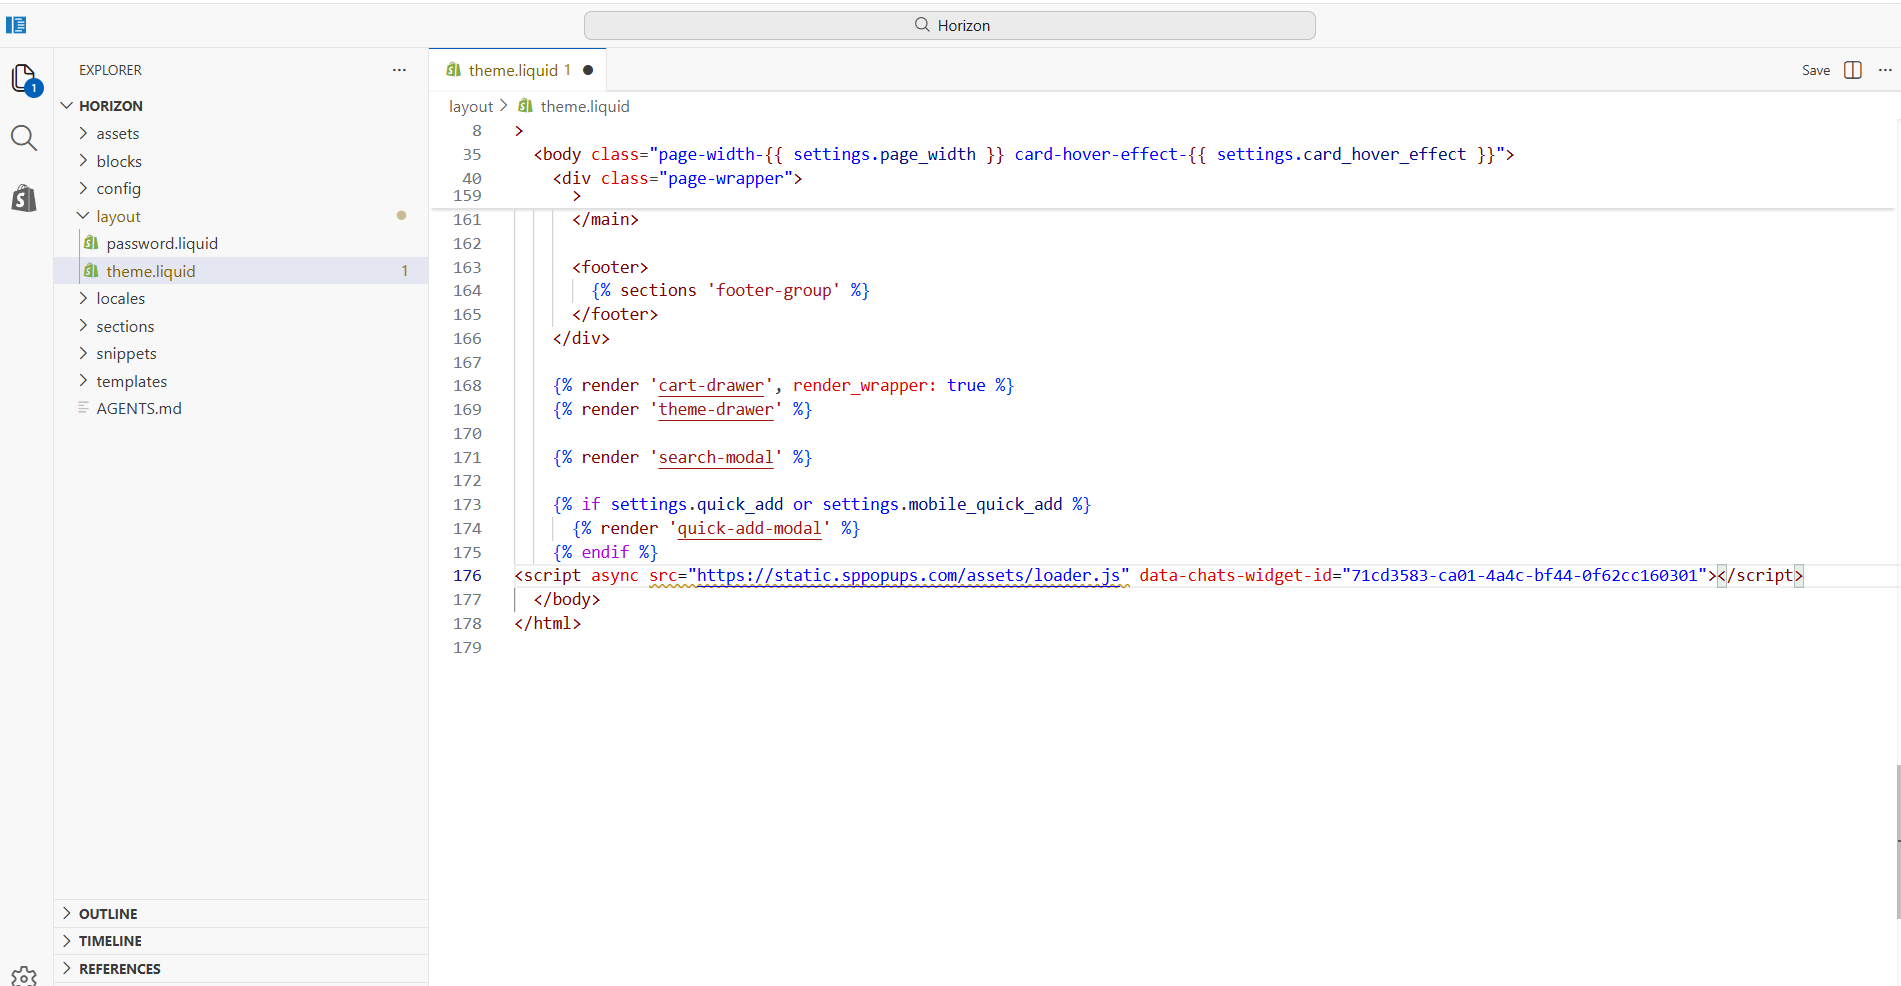 Adding the SendPulse installation code above the closing body tag in theme. liquidliquid
Before editing a Shopify theme, it’s worth taking two precautions:
- Back up the theme. Shopify recommends duplicating a theme before changing its code so you have a clean copy to restore if needed.
- Check the code after theme changes. If you switch to a new theme or update the current one, ensure that the SendPulse script is still there. A new theme won’t include your previous edits, and an update may remove them.
Back in SendPulse, click “Check the installation.” If the code is in place, SendPulse confirms that the script is installed on your site. If the check fails, first make sure you edited the theme that is currently active in Shopify and that your changes to theme.liquid were saved. Then run the installation check again.
Build your pop-up and connect its fields to variables
To create the pop-up, go to “Pop-ups,” choose your website, and click “Add pop-up.” Select the format: a pop-up or an inline form embedded in the page. Whatever you choose, you’ll land on the “Select a template” page, where you can start from a ready-made design or from scratch.
For Fernway, we went with “New pop-up” > “Create from scratch” and added only what the welcome series needs: an email field, a name field, the light question, and a button to submit them. Above the fields, we added a short line with the offer, “Get our free 14-day plant care checklist,” so visitors know what they’re signing up for.
We kept the name field optional by leaving “Make required” unticked in its settings. Every required field is one more reason to close the form, so the fewer you have, the more signups you get. On the other hand, that means that some subscribers will leave their name blank, so your welcome emails need a fallback greeting.
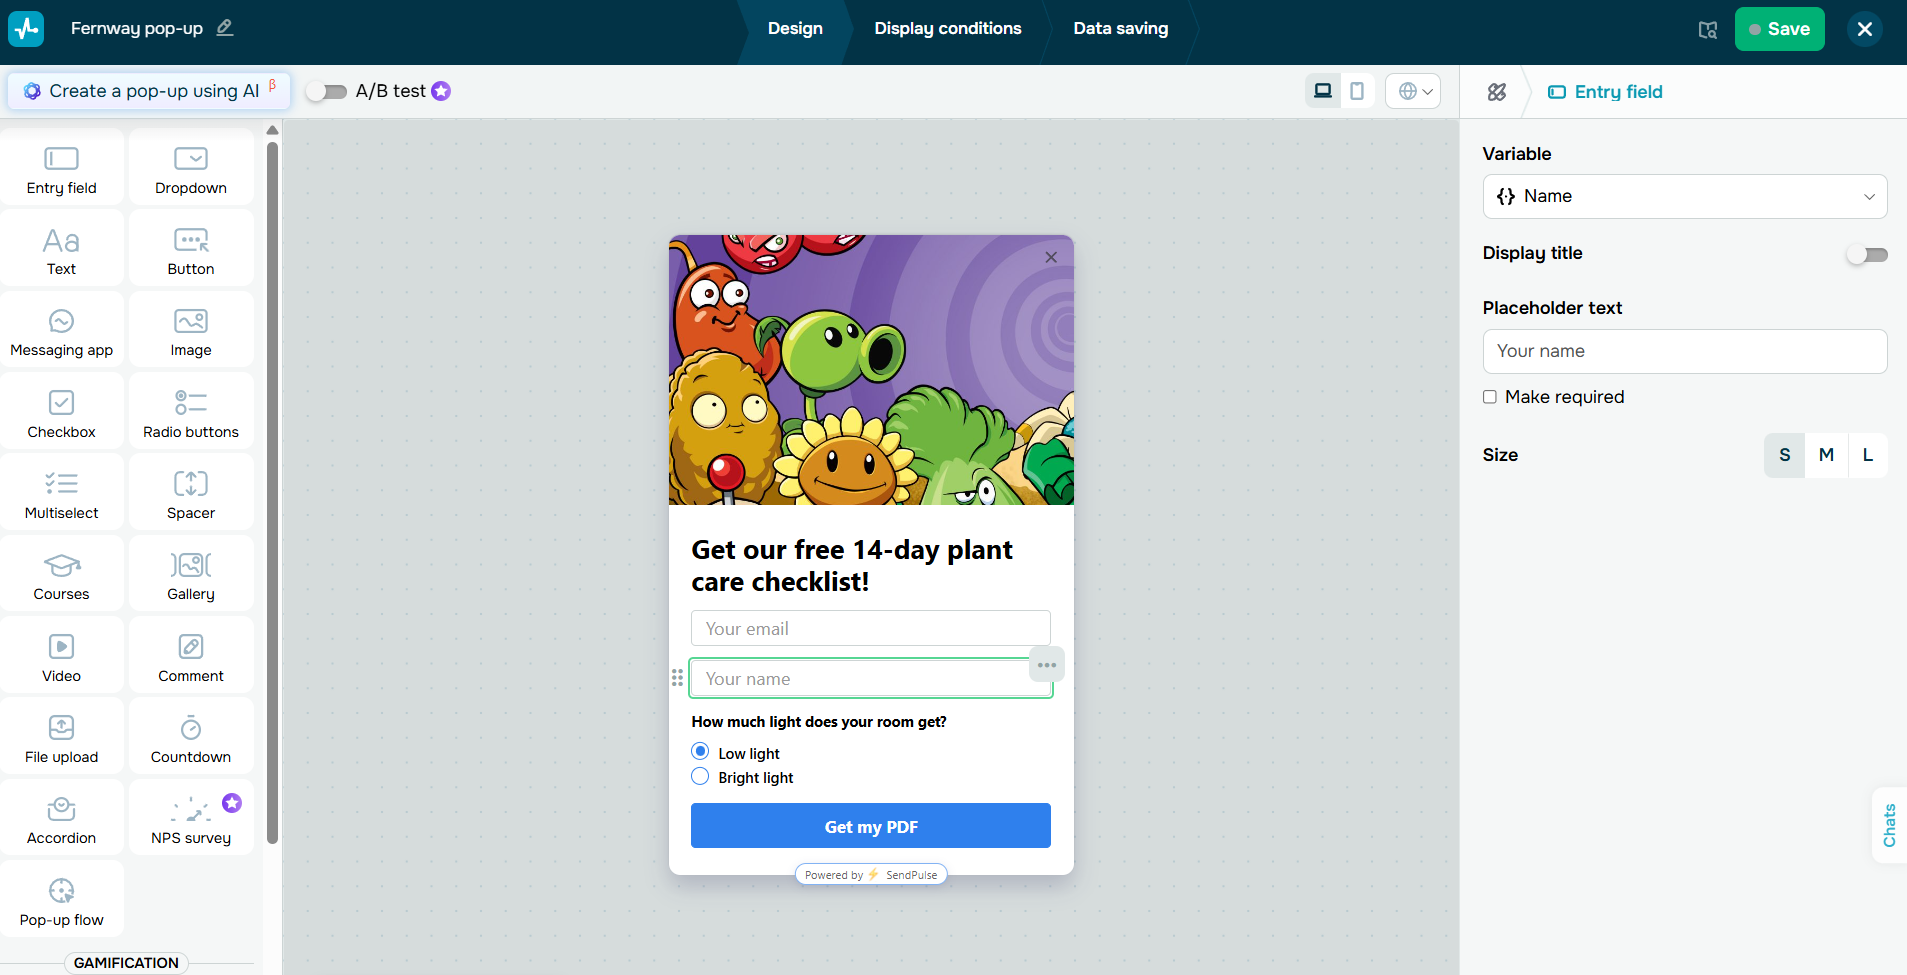 Setting up the name field for a signup form in SendPulse pop-up builder
For the light question, we used “Radio buttons.” In its “Variable” setting, we chose Light, so the answer lands in the variable created in Step 1. Then we turned on “Display title” and entered the question: “How much light does your room get?”
Each option has two parts: the option text visitors see and the “Value” saved to the variable. Fernway’s “Low light” saves low, and “Bright light” saves bright.
One option in radio buttons is always selected by default, so choose it deliberately. We left “Low light” as the default because low-light plants also do well in brighter rooms, so anyone who skips the question still gets a sensible recommendation. If none of your answers works as a safe default, add a neutral option such as “Not sure.”
Decide on double opt-in
While you’re still in the “Design” tab, decide whether new subscribers should confirm their email addresses. To enable double opt-in, click the email entry field in your pop-up and turn on “Request subscription confirmation” at the bottom of its settings. The subscriber then needs to click the link in the confirmation message before their data is saved.
This means the confirmation message goes out first, followed by your automated welcome email. Keep it in mind when planning your email 1: by the time it lands in your subscriber’s inbox, they’ve already received and opened one email from you.
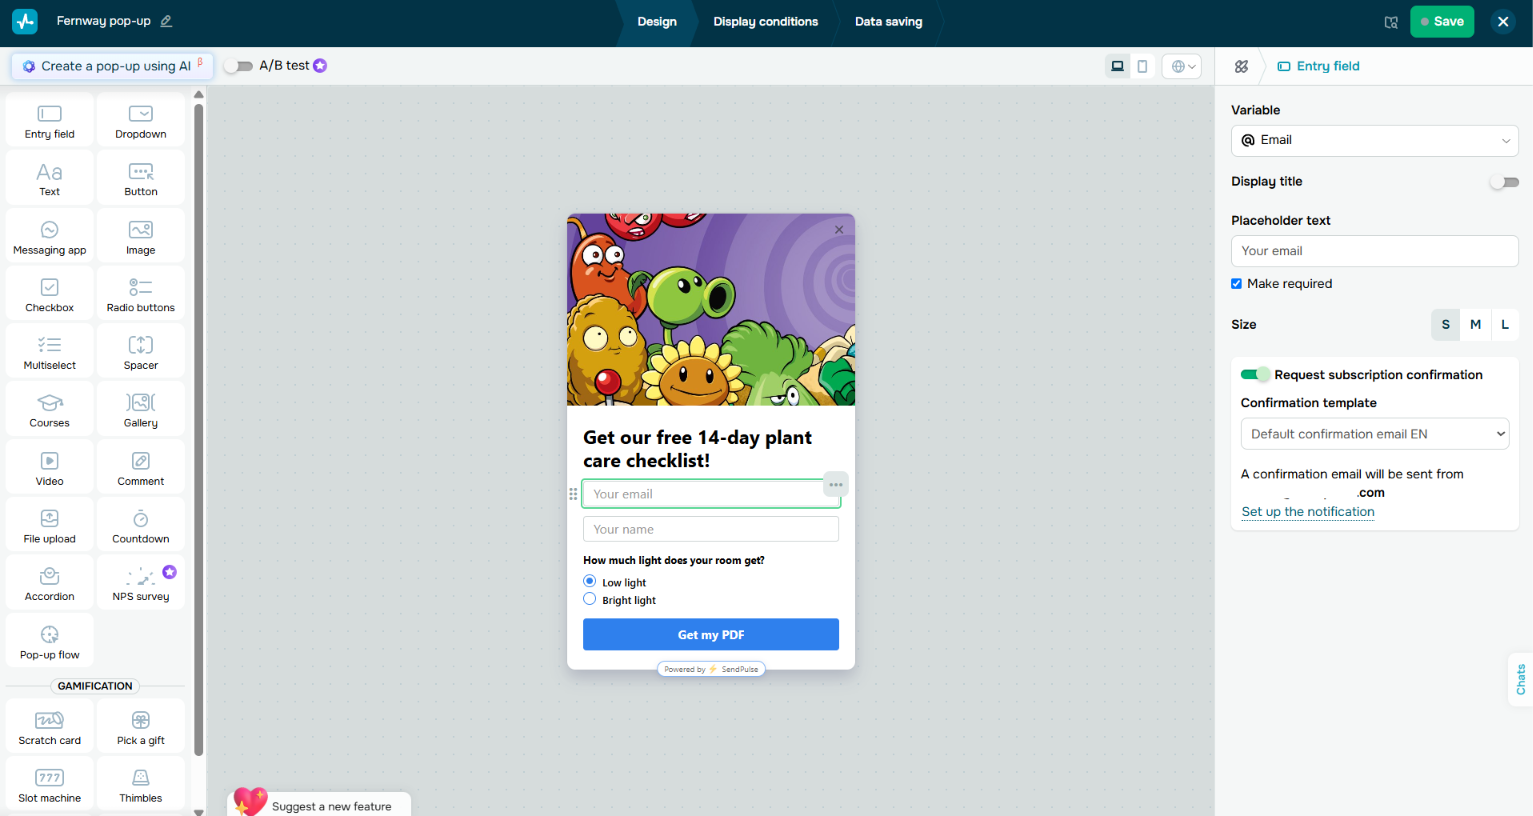 Enabling double opt-in for the pop-up form
Double opt-in generally gives you a cleaner list. Mistyped and fake email addresses or signups made in someone else’s name don’t make it through, which can reduce bounces and spam complaints.
The confirmation click also gives you a record of consent. Double opt-in isn’t legally required everywhere, but it’s a safer choice if any of your subscribers live in the EU or Canada, where marketing emails generally require consent before the first send. For a country-by-country breakdown, check our guide to email marketing laws.
The main downside is that some people never confirm. The message may land in spam or simply go unopened, so your list can grow more slowly than with single opt-in.
If you enable it, click “Set up the notification” and change the message people see after submitting the pop-up, for instance, “Check your inbox and confirm your email to get the checklist.” You can also choose a custom email under “Confirmation template” that reminds people what they signed up for. Custom confirmation emails require a paid plan.
Set display conditions and data saving
In the next tab, “Display conditions,” you choose when the pop-up appears and who sees it. For Fernway, we set four conditions and selected “Performed all of these conditions,” so the pop-up shows only when every one of them is true. With “any,” a single condition would be enough, and people who have already subscribed would keep seeing the pop-up.
- “Upon exit intent”: the pop-up appears when the visitor is about to leave, so it doesn’t interrupt their browsing. To catch people earlier, use “Page visited during the current session” set to more than 1, which shows it from the second page on.
- “Until form is submitted”: once someone signs up, they don’t see the pop-up again.
- “Current page URL” doesn’t contain “/cart”: the pop-up never distracts people who are about to place an order.
- “Periodically” set to “Once a week”: visitors who close the pop-up without signing up won’t see it again for a week.
Exit intent relies on mouse movement, so it doesn’t fire on phones. Click the sync icon so it shows “Display conditions not synced,” then set a separate mobile trigger, such as “After scrolling 50% of a page,” and add the other three conditions there too. A smaller floating pop-up is also a better fit for mobile than a full-screen one, since Google advises against intrusive pop-ups that cover most of the page.
Once the display rules are set, open the “Data saving” tab. Turn on “Save to a mailing list” and choose the same list used by your welcome flow. Each field saves to the variable selected in its “Variable” setting, so Fernway’s email address, name, and light preference go to the Email, Name, and Light variables in the “Fernway” list. Then save the pop-up, but don’t publish it yet. Publish it once your welcome flow is active.
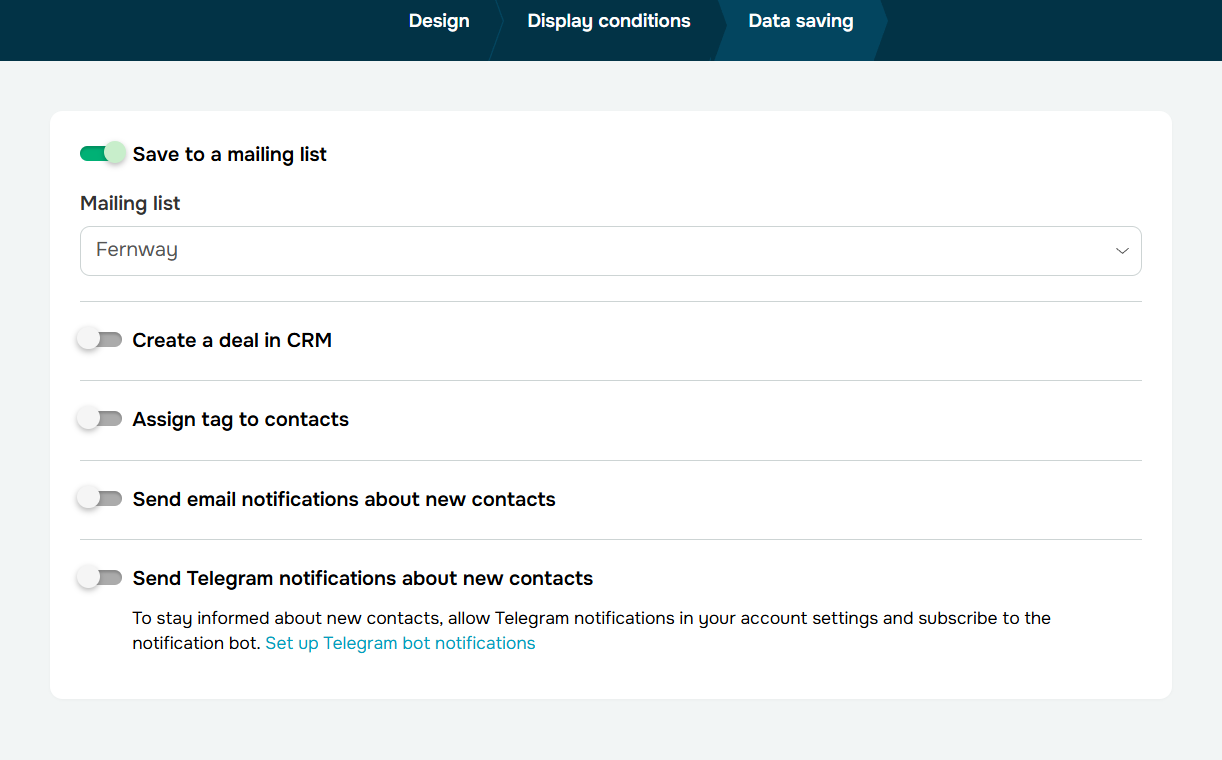 Saving data gathered with our pop-up to the correct mailing list
Pop-ups are a separate SendPulse product with their own pricing plans. The Free plan includes 5,000 pop-up views per month, one website, and up to five active pop-ups per account, with the SendPulse logo. The Pro plan raises those limits, removes the logo, and unlocks features such as A/B testing and video pop-ups. In our case, Fernway’s single pop-up fits within the Free plan.
The full flow in this guide relies on more than one SendPulse product, though. Besides the Pro plan for the tags from Step 1, the “Condition” element and the event log need a paid Email plan. You don’t have to buy them one by one: the pricing plan builder lets you combine several products in one payment for the same billing period. And if you’d like to try the whole flow before paying, activate a free trial and build it end to end first.
Step 3. Set up the “New subscriber” trigger for your flow
Now for the flow itself. Go to “Automation” > “Create flow.” You can start from scratch or from a pre-made template. A template is only a starting layout: any element in the working area can be deleted, added, or swapped later.
What does shape your options is the first element, “Auto-flow start,” because it decides who enters the flow and what the other elements can do. For example, templates built for courses or CRM start with their own triggers, and their actions apply to students or CRM contacts rather than mailing list subscribers.
For a welcome series, open the “Email” group under “Monitor event” and select “New subscriber.” If you started from a template, make sure its first element uses this trigger. It starts the flow whenever someone is added to the mailing list you select below it, so pick the list your pop-up saves data to. Choose carefully: once the flow is active, the list can’t be changed. You’d have to copy the flow and select a different list in the copy.
In our case, the list is “Fernway,” the same one we chose on the pop-up’s “Data saving” tab.
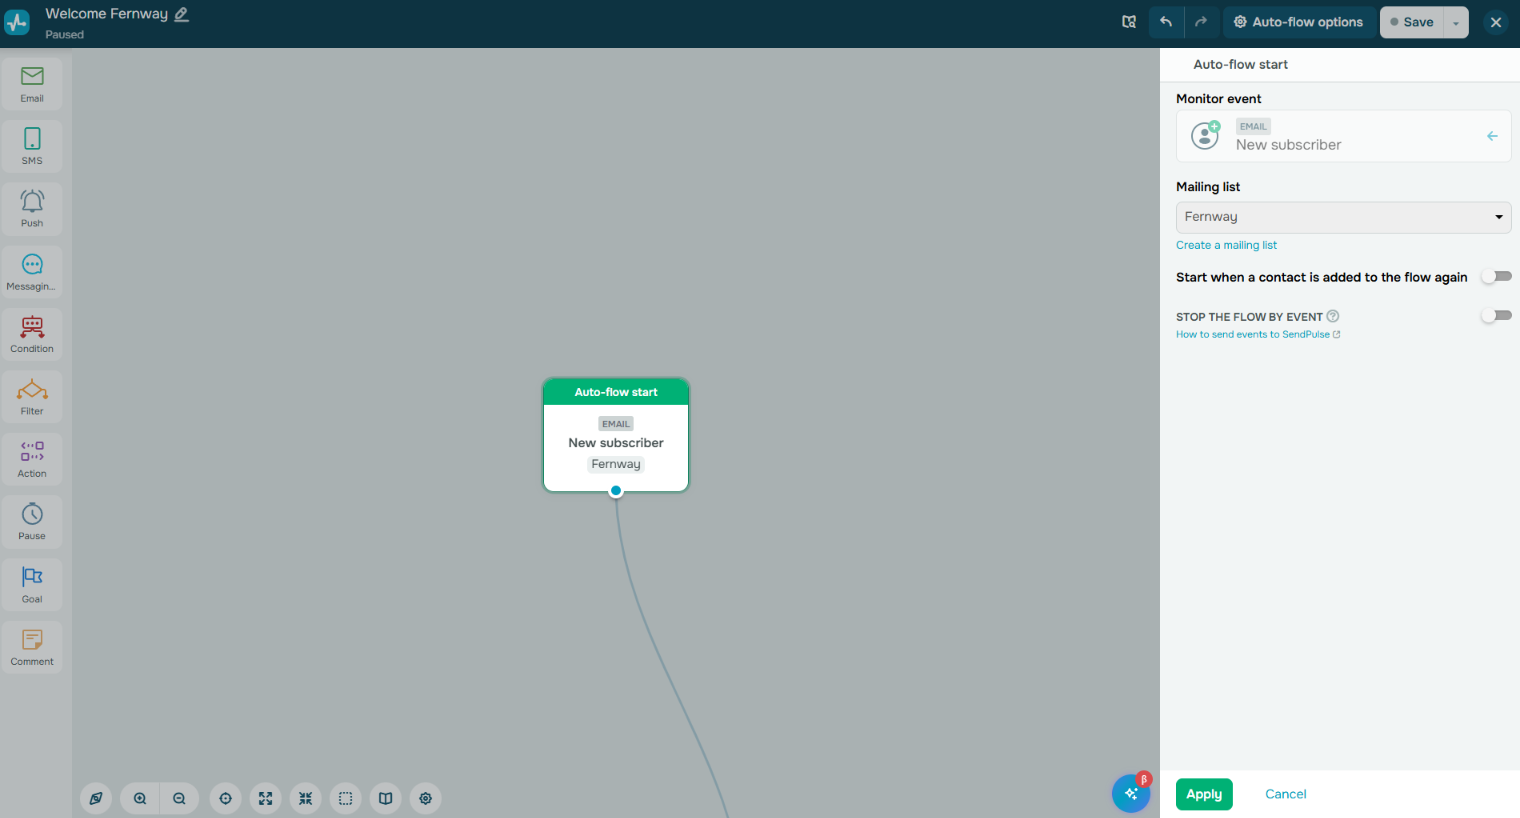 Setting up “Auto-flow start” for new Fernway subscribers
The trigger fires for contacts added through pop-ups and forms, the API method “Add emails to a mailing list,” integrations, chatbot subscribers, “Copy subscriber” and “Move subscriber” actions in other flows, and manual adding. Each contact needs an email or phone variable.
Next, decide whether contacts can go through the flow more than once. The “Start when a contact is added to the flow again” toggle lets them re-enter “Everytime,” “Once a week,” “Once a month,” “Once a year,” or on a “Custom” schedule. Fernway leaves it off, since someone who subscribes again doesn’t need the checklist twice.
Step 4. Send email 1 with what you promised
Now add the first email. Each email in the series is a separate “Email” element. Drag “Email” from the left panel into the working area and connect it to “Auto-flow start.” Its settings open on the right. Start by giving the element a clear name, such as “1st email – plant checklist,” so you can easily recognize it later in your flow and statistics.
Then set “Complete action,” which controls when the email goes out. A new email element is set to send 30 minutes after the previous step, so for the first welcome email, switch it to “Right away.” Otherwise, new subscribers wait half an hour for what they signed up for and may decide it never came.
Next comes the sender. By default, the email uses the sender from the flow settings, and “Change sender for this email” lets you pick a different one for this message only. Keep in mind that if you later change the sender in the flow settings, it’s replaced in every email of the flow. For the sender name itself, use your brand name or a person’s name with the brand, such as “Anna from Fernway,” so subscribers recognize you instantly in their inbox.
The email address should be on your own domain, like hello@yourshop.com, rather than a free one like Gmail or Yahoo. Emails sent from a free email address through a service like SendPulse often fail authentication checks, so they’re more likely to be rejected or filtered to spam. Once you’re on your own domain, authenticate it too, so mailbox providers can verify that your emails really come from you.
Then fill in “Email subject” and the preheader, the short line inboxes show next to or below the subject. If you skip the preheader, the first words of the email show up there instead. Make the two work together rather than repeat each other: the subject says what’s inside, and the preheader adds a reason to open. For Fernway, the subject is “Your plant care checklist is here,” and the preheader is “14 days, one page, and a much happier plant.”
Finally, open “Select template” and choose how to build the email: “Drag and drop builder” for a visual editor, “HTML editor” for your own code, or “Import” to bring in a ready-made template. You can also pick one of your saved templates. In that case, the flow gets its own copy, so changes you make later in “Email” > “Email templates” won’t reach it. Edit the email inside the flow instead.
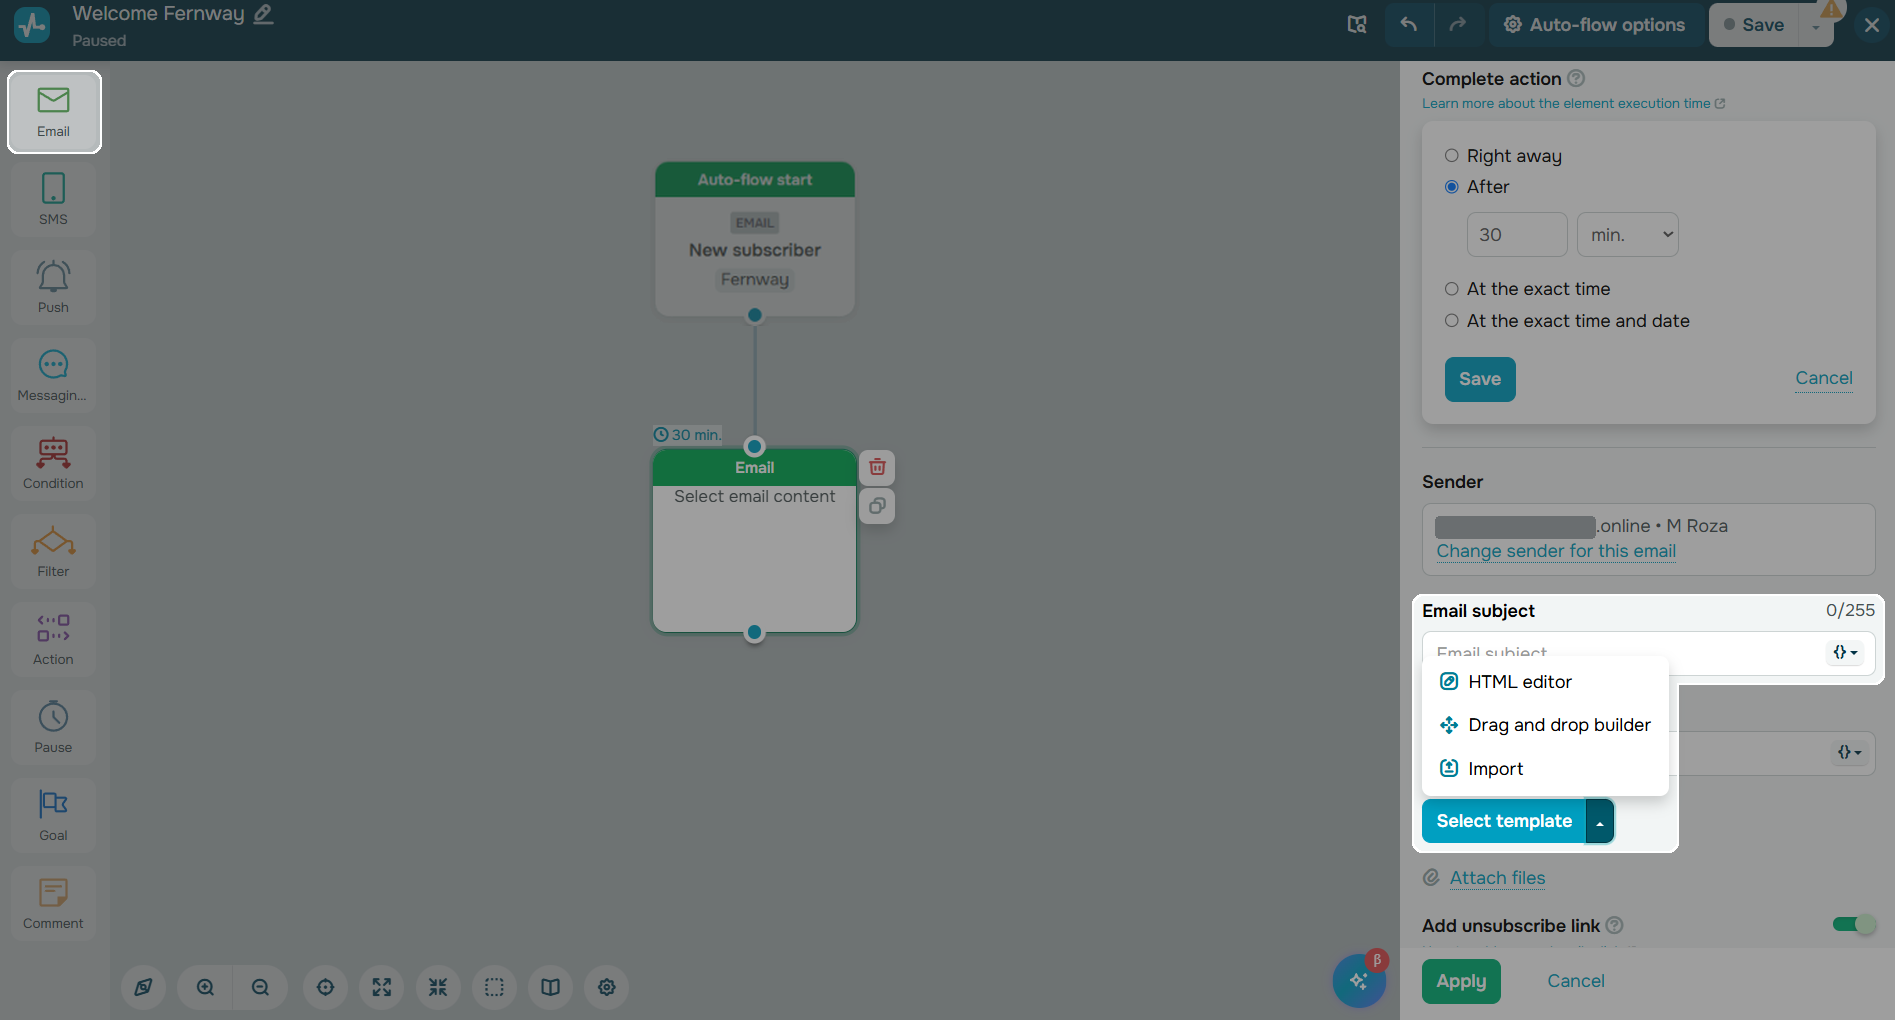 Setting up the first “Email” element in the flow
Before you click “Apply,” check “Prevent link expirations.” Links in flow emails stay valid for six months by default, and a welcome series usually runs much longer, so the checklist link would quietly stop working. With this option on, links never expire, but SendPulse stops tracking clicks in that email. So turn it on for emails where you don’t track clicks, like email 1, and leave it off only for emails followed by a “Clicks” condition, like email 2, which we’ll build next.
The first email in a welcome series should deliver whatever you promised at signup. Keep your message simple so subscribers get what they expect right away. Lead with the promised resource or benefit, add a brief introduction, and give them one clear next step.
In our Fernway example, the first email delivers a checklist for keeping new plants healthy and blooming, as promised in the pop-up. We also add a short sentence about the shop and include a single CTA button.
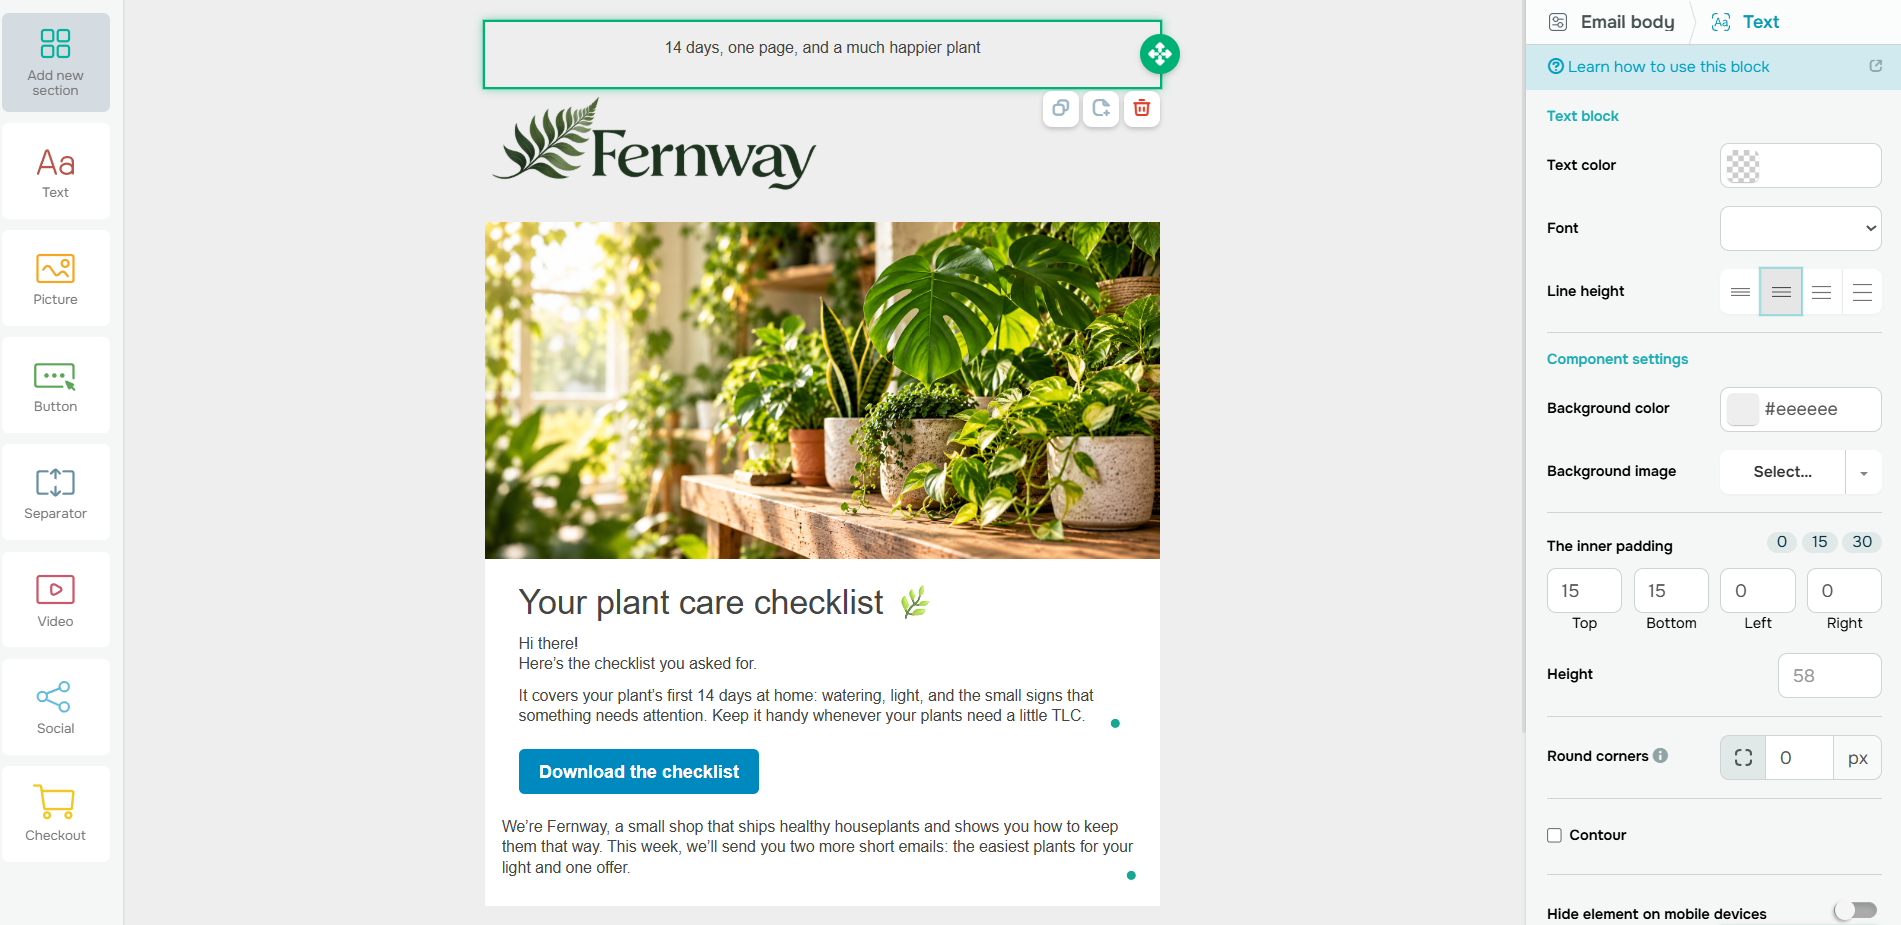 Creating the first email with the promised checklist
The email opens with “Hi there!” Since the pop-up also asks for a name, we can make the greeting personal.
To greet subscribers by name, insert the name variable into the email text. It appears as {{Name}}, and SendPulse replaces it with each subscriber’s name when the email goes out. The name field in our pop-up is optional, though, so some people will leave it blank and get an awkward “Hi, !” instead of a greeting.
Smart personalization fixes this: it shows one greeting to people who gave their name and another to everyone else. In Fernway’s email, the first line looks like this:
|[IF:{{Name}}]|Hi, {{Name}}!|[ELSE]|Hi there!|[ENDIF]|
Subscribers who left their name see something like “Hi, Maya!” and the rest get “Hi there!” Before saving, check that the variable in the template is spelled exactly as in your mailing list, including capital letters. Otherwise, even people who filled in their name get “Hi there!”

Create and send high-performing emails
Use an AI assistant, pre-made templates, advanced segmentation, and feature-rich automation to run campaigns without coding. Send up to 15,000 monthly emails at no cost.
Get started for free
Step 5. Send email 2 based on the subscriber’s answer
Email 2 shouldn’t sell yet. Its job is to bring more value and make the next email worth opening. If you asked a question at signup, this is the place to use the answer: content that matches what the subscriber told you feels personal and gets more clicks.
For Fernway, email 2 is “3 plants that forgive almost anything,” and this is where the light question from the pop-up pays off. Subscribers with low light get the ZZ plant, snake plant, and pothos. Those with bright light get the fiddle-leaf fig, rubber plant, and string of pearls.
To send each group its own version, a “Filter” element goes between email 1 and email 2.
Split subscribers by their answer with a “Filter”
Use the “Filter” element here, not “Condition.” “Condition” waits for something the subscriber does, such as an open or a click. “Filter” checks what’s already stored: a variable, a tag, or a date. As a bonus, “Filter” is available on the Free plan, while “Condition” needs a paid one.
Add a “Filter” element after email 1 and keep its “Complete action” set to “Right away,” the default. Then add the condition the filter will check: open “Select option,” choose “Variable,” and pick the variable that stores the answer. The drop-down below sets how the subscriber’s saved value is compared with the value you type:
- “variable value existence” checks only whether the variable has any value;
- “equal” looks for an exact match;
- “not equal” matches anything except the value you specify;
- “contains,” “does not contain,” “starts with,” and “ends with” are more useful when you’re working with longer text answers.
Type the value exactly as it’s set in the pop-up’s “Value” field, in the same case, and click “Save” to apply the condition. To check more than one thing at once, use “Add condition” and choose whether contacts must match all of the conditions or any of them.
For Fernway, one condition is enough. We pick the Light variable, choose “equal,” and type low.
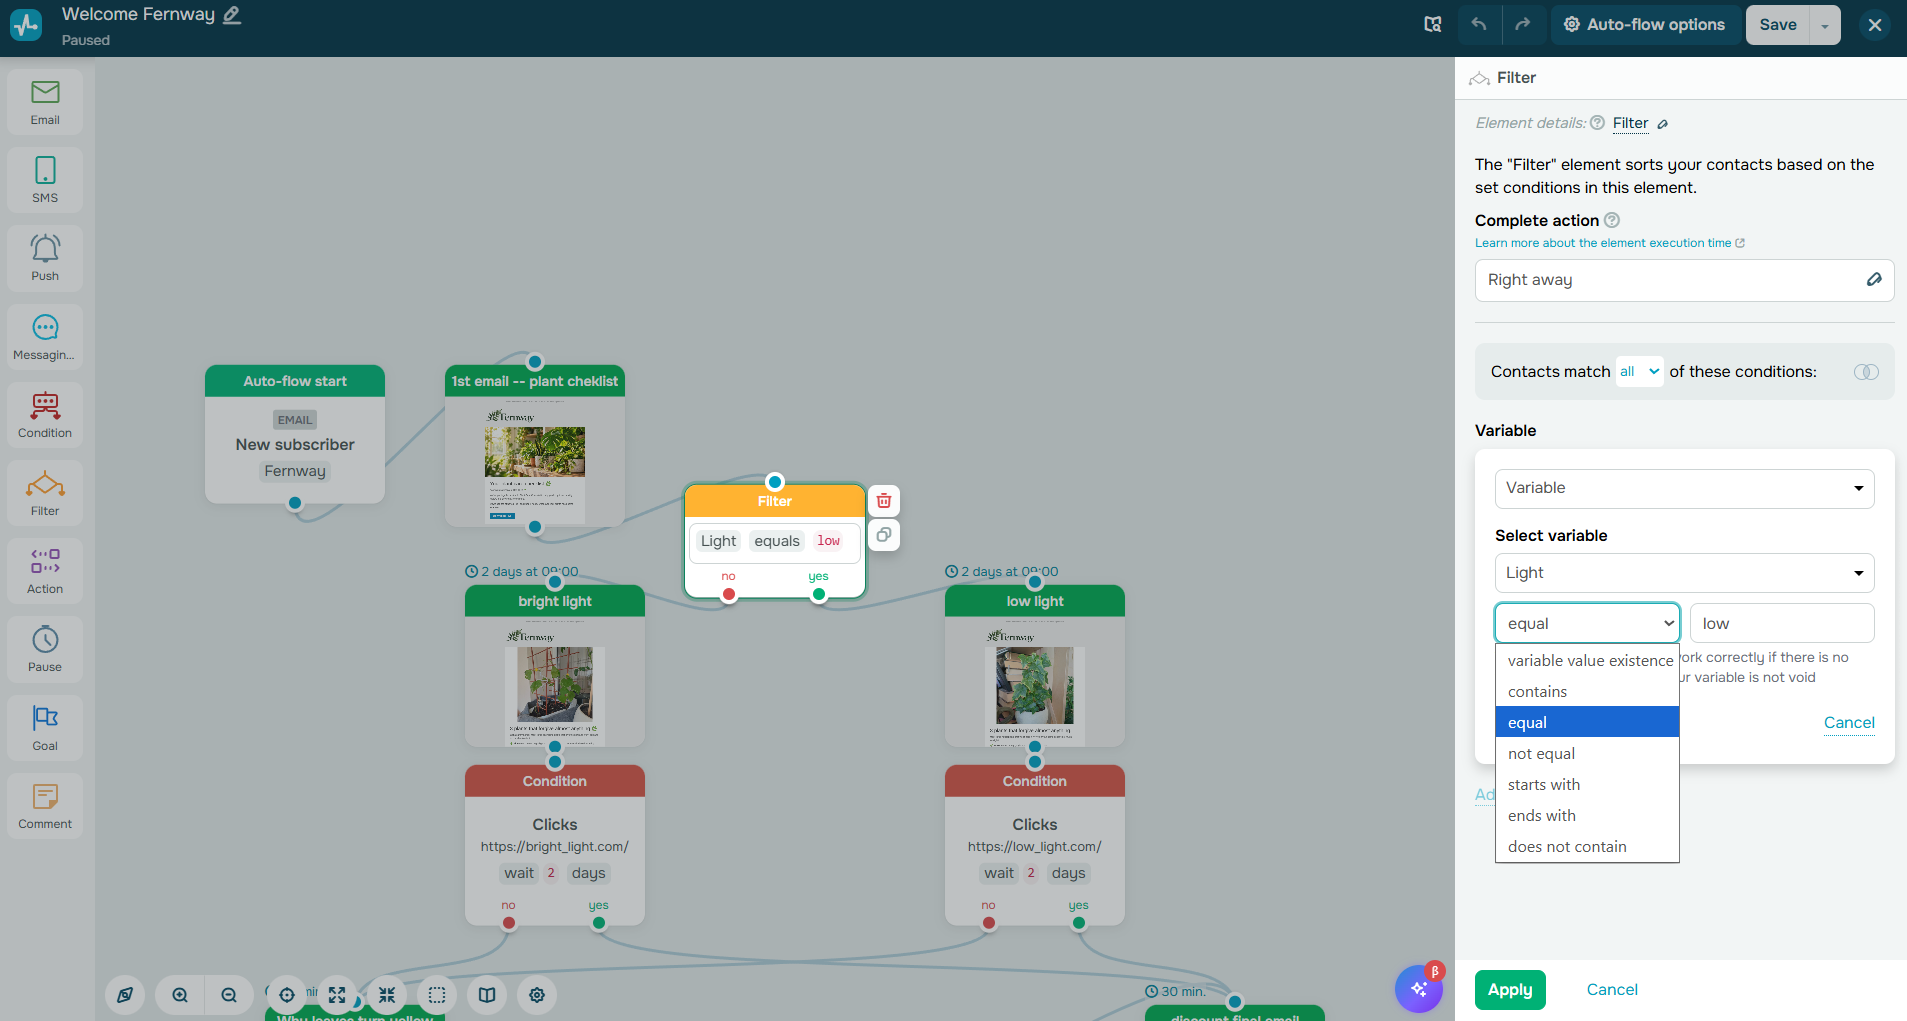 Comparing the Light variable with low in the “Filter” element
That gives us two branches:
- “Yes” means the saved value is low, so we connect the low-light version of email 2 to it.
- “No” covers everything else, including bright and contacts with no saved answer, so we connect the bright-light version to it.
We set up both versions as “Email” elements, the same way as email 1, except for the timing below and “Prevent link expirations.” It stays off here: with it on, SendPulse doesn’t track clicks in the email, and the “Clicks” condition won’t apply to it. If you have three or more answer options, add another “Filter” to the “No” branch and keep narrowing the audience from there.
Add the two-day delay
For a simple delay, use the same “Complete action” setting you switched to “Right away” in email 1. This time, choose “After,” then set the number of days and the sending time. Note that “After 2 days at 09:00” doesn’t mean exactly 48 hours. The email goes out at 9 a.m. on the second calendar day after the contact reaches it. Someone who gets there at 12:05 a.m. waits almost 57 hours, and someone who gets there at 11:55 p.m. waits about 33 hours.
If the timing depends on a specific day or time window, add a “Pause” element before the email instead. You can choose “After the specified time,” “At the exact time,” “At the exact time and date,” or “Within the specified time interval.” The “At the exact time” option also lets you select days of the week. If you use a pause, set the email itself to “Right away” so the two delays don’t add up.
Keep in mind that both email timing and pauses follow the account time zone set under “Account settings” > “General” > “Time zone,” not the subscriber’s local time. Finalize all timings before launch: contacts already waiting in the flow keep the timing that was in place when they reached that step.
Applied to Fernway, both versions of email 2 go out at 9 a.m. on the second day after subscribing. If we wanted to tie the message to a specific routine instead, we could place a “Pause” element before it and send it on Saturday morning, when people are more likely to water their plants.
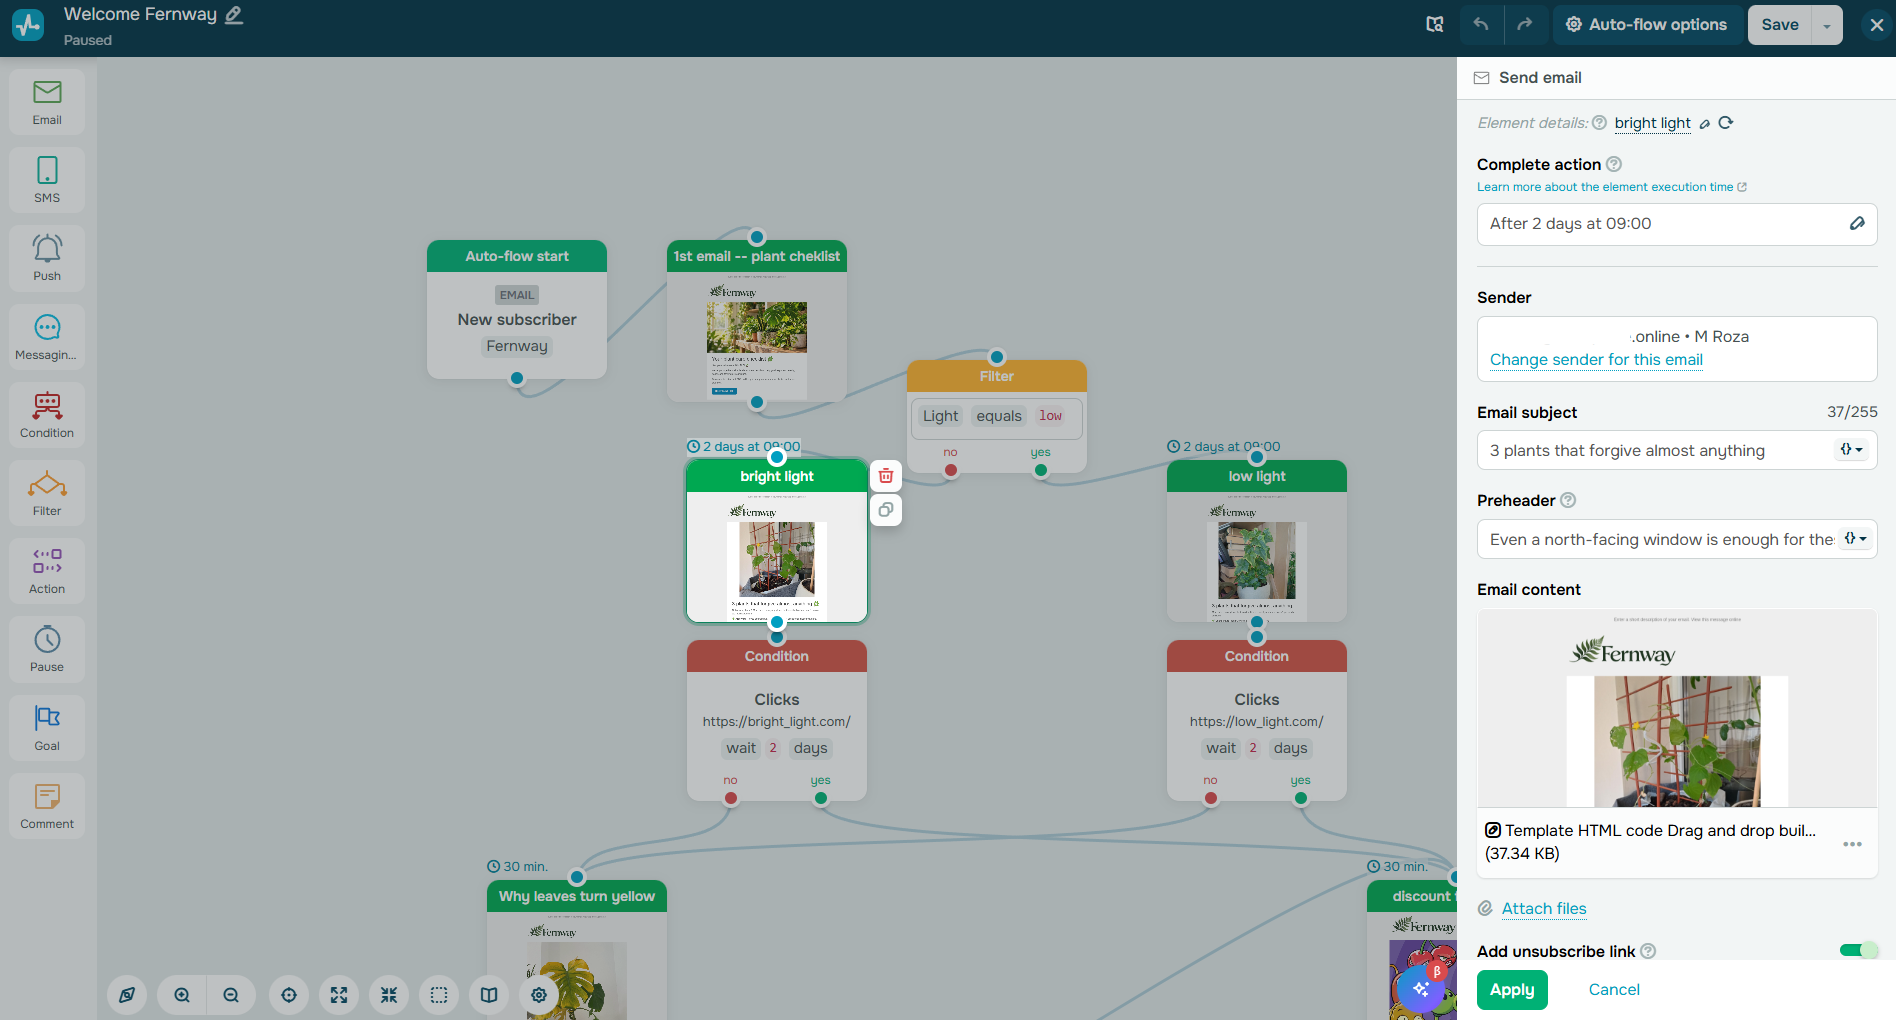 Setting up both versions of email 2 to go out “After 2 days at 09:00”
Step 6. Split subscribers by clicks in email 2
A click in email 2 is the clearest sign someone is ready for an offer, so clickers get it sooner, and quiet subscribers get one more helpful email first.
This time, the split depends on what subscribers do, so it needs a “Condition” element. To add it, drag “Condition” from the left panel and connect it right after the email it should track. In “Trigger condition,” choose “Clicks,” then turn on “Set specific URL” and paste the link that signals buying interest into “Page URL,” such as a product or catalog page. Otherwise, any click counts, including clicks on the logo or your social media icons.
Since a “Condition” tracks clicks in the email right before it, each version of an email needs its own condition. In our case, email 2 has two versions with different links, so “bright light” and “low light” each get their own “Condition” with their own URL.
Then set the “Condition waiting period.” Anyone who clicks during it moves to “Yes” right away, and the rest go to “No” when it ends. We chose two days: most people who click do it within a day or two, so a shorter wait misses those who check email later, while a longer one only delays the next email for those who don’t click.
Here’s where each branch leads in Fernway’s flow:
- “Yes” → discount email.
- “No” → “Why leaves turn yellow” → “Pause” for two days at 9 a.m. → the same discount email.
Don’t send the offer the instant someone clicks, because it feels intrusive. Keep the “Email” element’s default 30-minute delay.
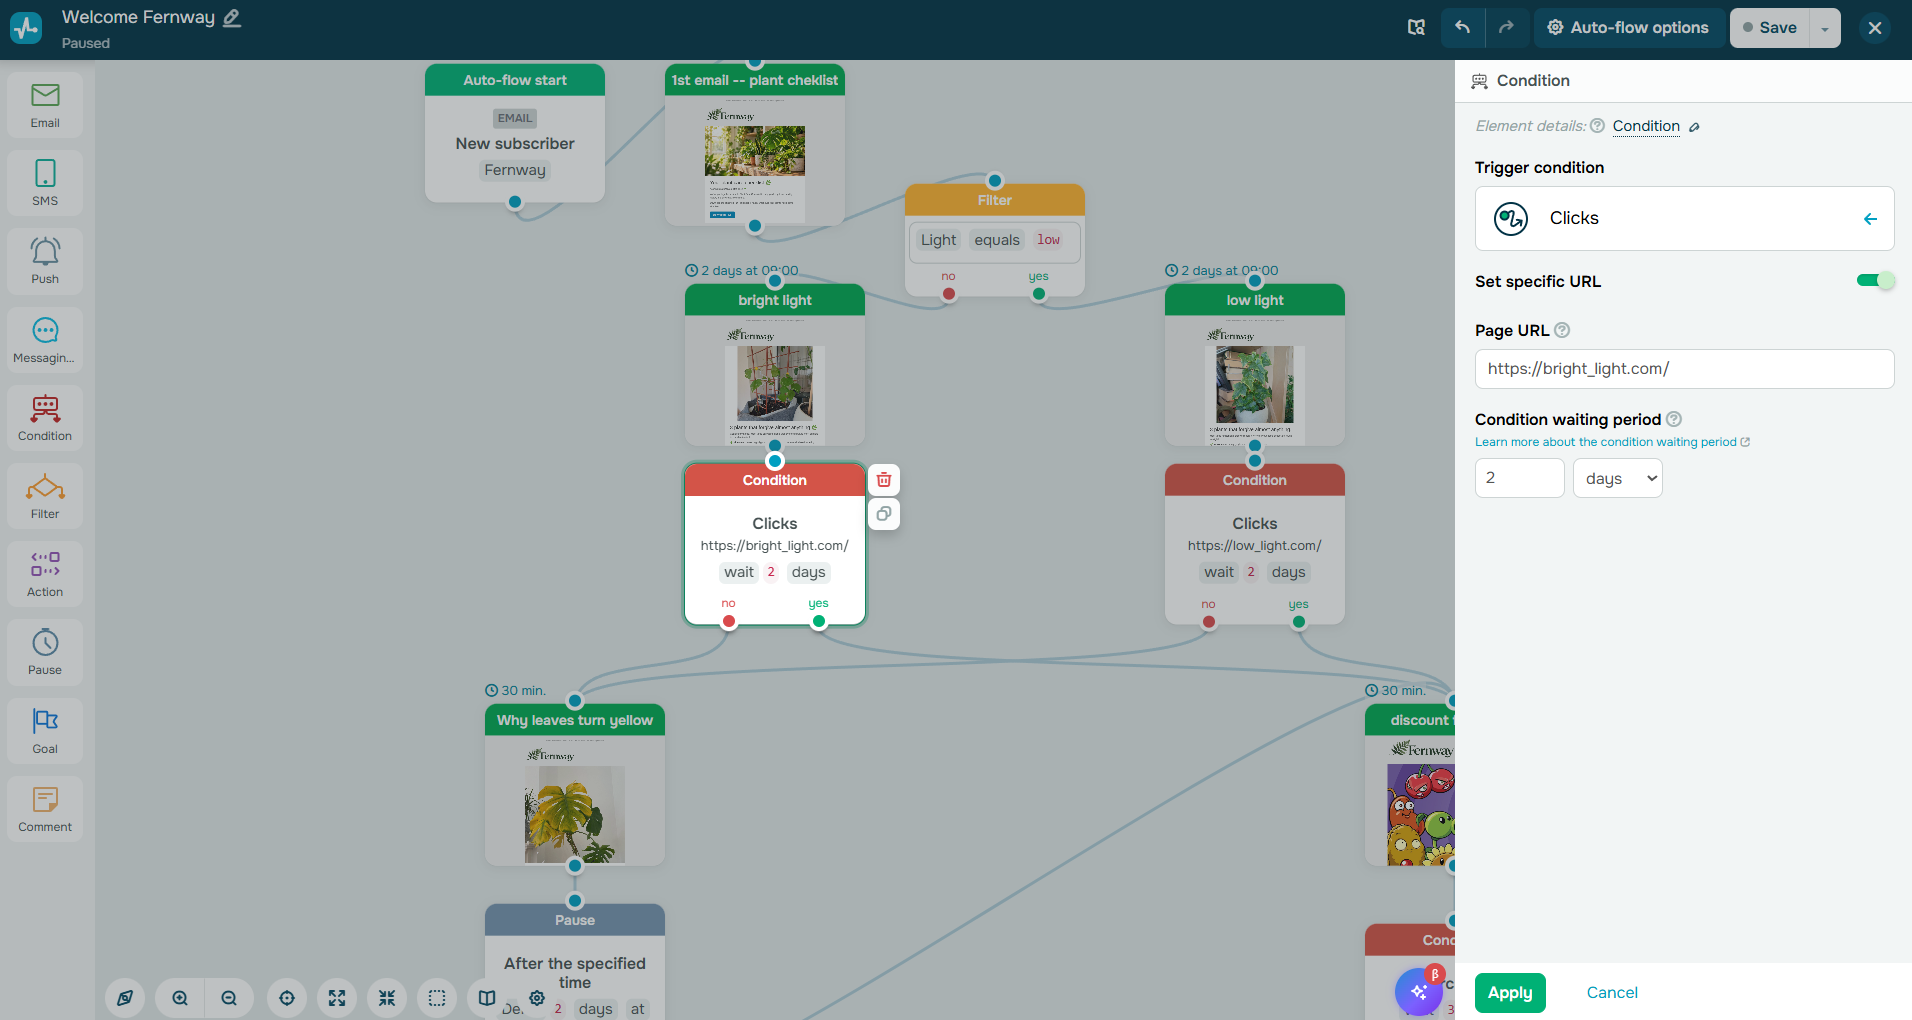 Splitting subscribers by clicks in each version of email 2
Step 7. Send email 3 with your offer
Email 3 is where the welcome series can start driving sales. By this point, the subscriber has already received what they signed up for and some useful follow-up content, so an offer feels more natural. The strongest offers usually have a clear reason to act now. That might be a seasonal moment, new arrivals, a restock, or another timely reason to buy. A discount can help, but it doesn’t have to carry the whole message.
Keep the email focused on one action. Use the subject line to name the occasion and the benefit, explain briefly why the timing matters, make the discount code easy to find and copy, and state how long it’s valid. End with one clear button that reinforces the offer.
In our case, the occasion is spring. Plants grow faster, and many need larger pots, so repotting season gives the offer natural context. The subject line is “Repotting season: 15% off your first order.” The body explains why now and highlights the code FIRSTPOT, which is valid for three days. The button says “Shop now and save 15%!” and links to Fernway’s Shopify store, where the catalog and checkout already are.
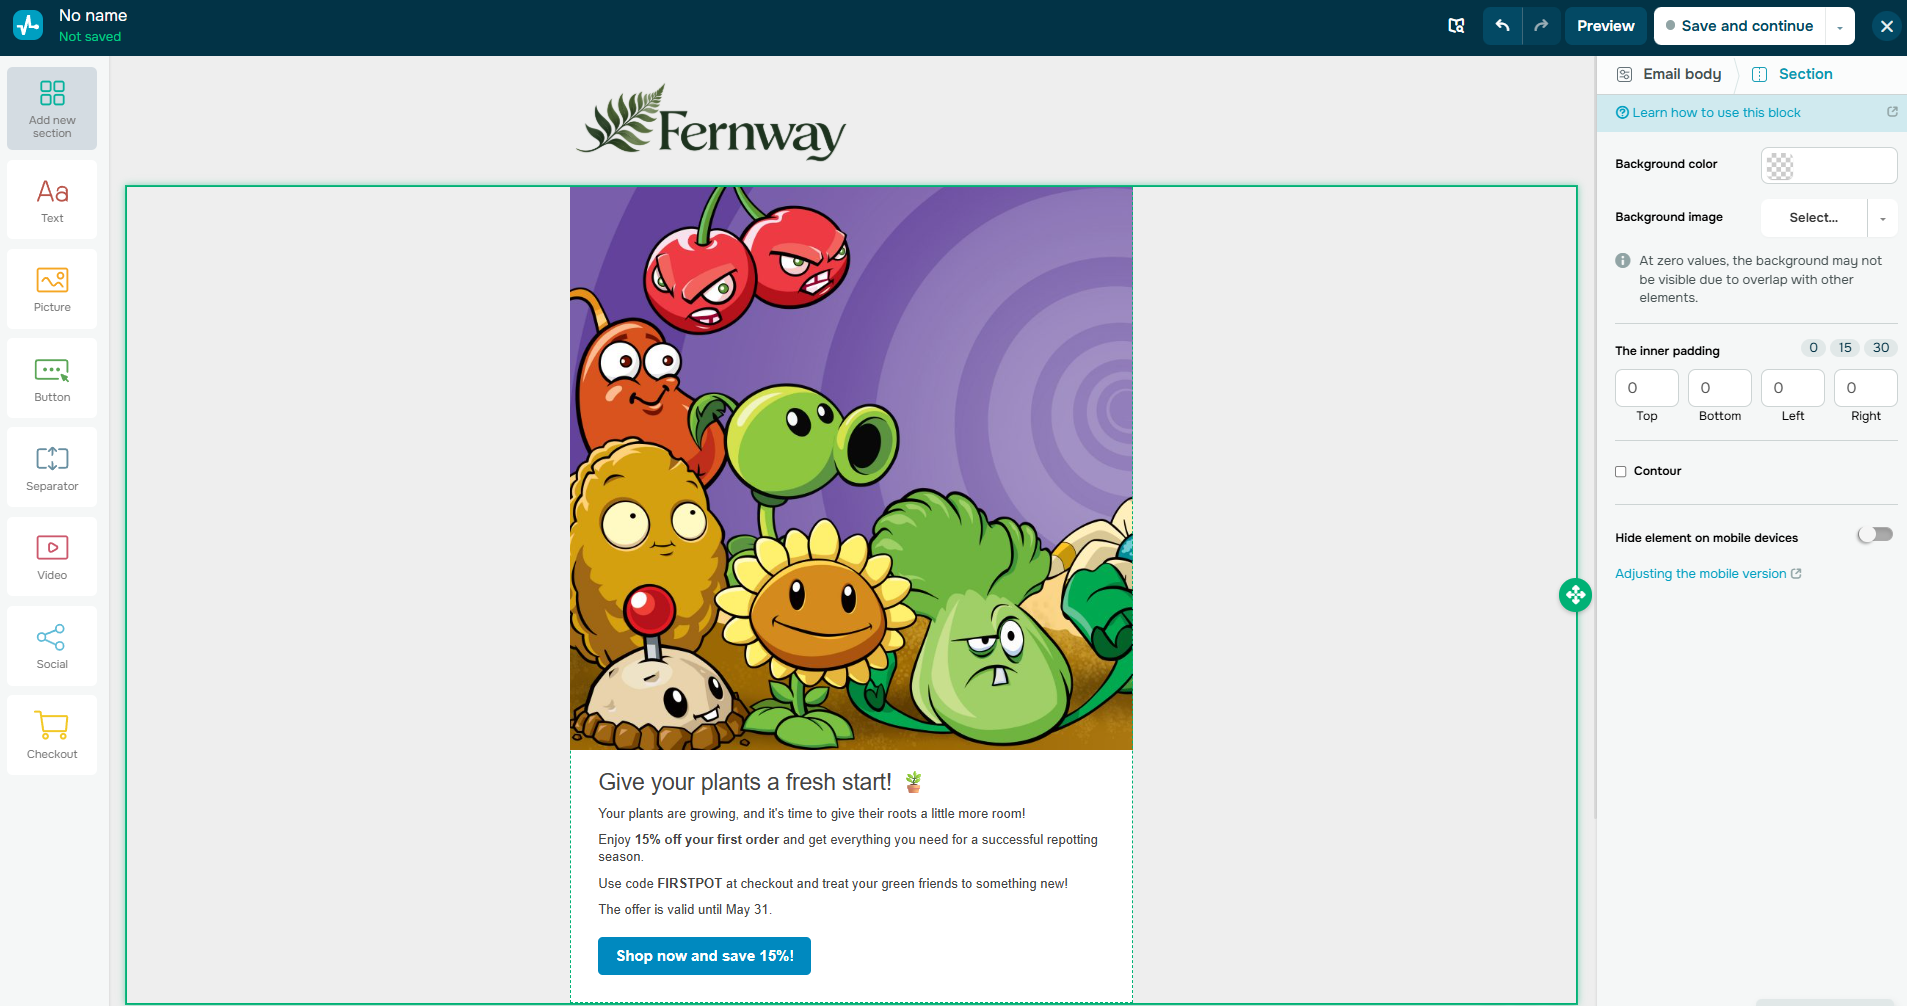 Building the final discount email
Note: If you sell directly through SendPulse instead of an online store, you can use the “Checkout” element in the email builder to add a payment button. The payment itself happens on a separate page, and you need a connected payment method and a Standard email plan or higher. Keep in mind that the purchase tracking in the next step is built for online stores, so it isn’t set up to track “Checkout” payments.
Step 8. Track purchases after email 3
After the offer goes out, it’s time to see who placed an order. To do that, SendPulse needs to receive purchase data from your store. The flow can then separate buyers from everyone else, apply the right tags, and count those purchases as conversions so you can measure how many orders the welcome series generates.
Send purchases from your store to SendPulse
To pass order data to SendPulse, you need two things: a purchase event in SendPulse with its own URL, and a webhook in your store that sends each paid order to that URL. Most eCommerce platforms support webhooks, so the same setup works with Shopify, WooCommerce, and other stores.
We’ll use Fernway’s Shopify store as an example. If you already use the SendPulse app for Shopify, keep in mind that the app doesn’t send order data to the “Automation” section. It only exports customers’ email addresses and phone numbers to a mailing list, so you still need a webhook for purchases.
Start on the SendPulse side, where the event lives. Save your flow first, so nothing gets lost, then go to “Automation” > “Event manager” > “Add new event” and select “Purchase” from the list of ready-made types.
Next, choose the data structure. Keep “Standard” and make sure email remains one of the event variables. SendPulse uses the email address to match each purchase with the right contact. Shopify includes the buyer’s email at the top level of its order data, so you don’t need any additional mapping.
After you save the event, two URLs appear. Copy the “POST URL.” It accepts webhook requests without authorization, which means your store can send order data to it directly. The “REST API” URL is for developers who send events through the API using an access token, so you don’t need it for this setup. Keep the POST URL private. Anyone with access to it could send false purchase events to your account.
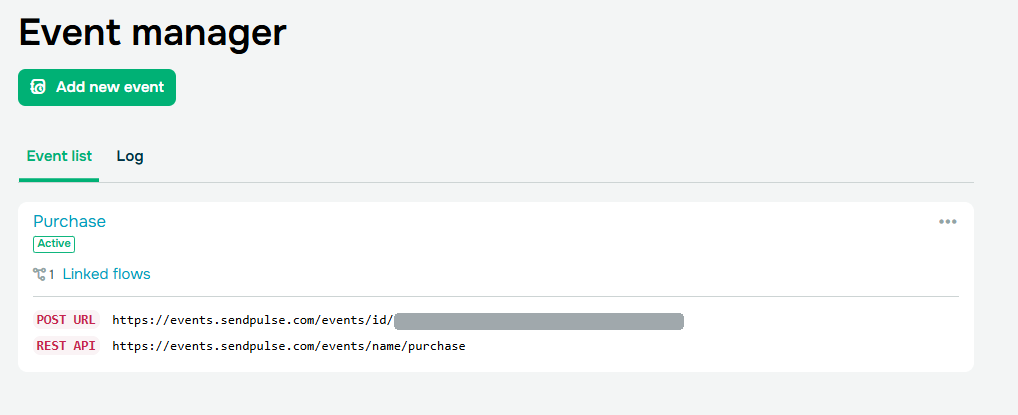 Copying the POST URL of the purchase event in “Event manager”
Then add the POST URL to Shopify by creating a webhook. In your Shopify admin panel, open “Settings” in the bottom-left corner, go to “Notifications,” and scroll down to “Webhooks.” Click “Create webhook” to open the setup form.
For “Event,” select “Order payment.” This sends data only after an order has been paid, not when it’s simply created. That way, the purchase check and “Goal” count actual buyers rather than unpaid or abandoned orders.
Set “Format” to “JSON,” paste the POST URL into “URL,” and keep the latest “Webhook API version” suggested by Shopify. Click “Save.” From that point on, Shopify sends data for each paid order to the “Purchase” event in SendPulse.
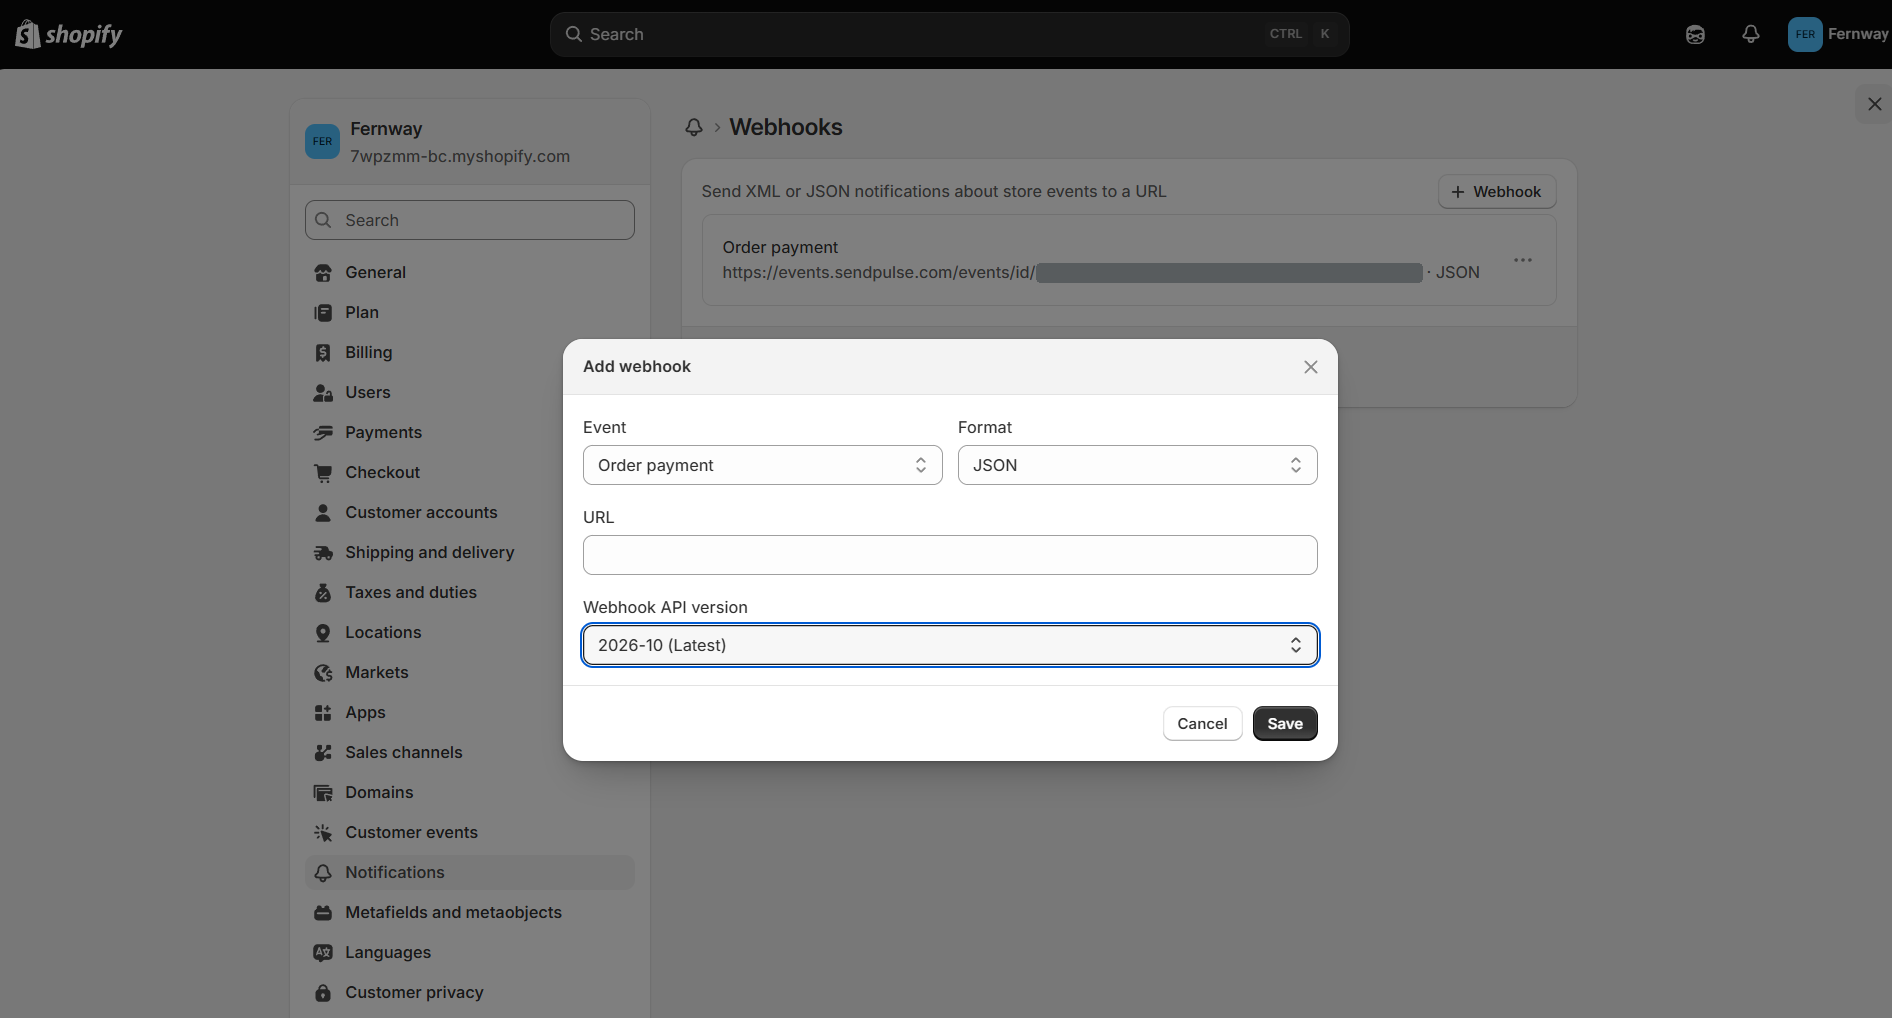 Adding a webhook in Shopify
If you use another eCommerce platform, the setup follows the same principle. Open its webhook settings, select the event that represents a paid order, and use the same POST URL as the destination.
Test that purchases reach SendPulse
You’ll run two tests here. The first checks that the “Purchase” event can receive data at all, and the second checks that Shopify sends it.
Let’s start with SendPulse. Go to “Automation” > “Event manager,” open your “Purchase” event, and switch to the “Test request” tab. At the top is the “Request method.” Leave it on “POST raw,” since that’s the format Shopify uses. Below it are the event’s POST URL and a sample request with an email, a phone number, product details, and an order date. It’s a dummy order in the same format as a real one.
Click “Run test request” to send this dummy order to the event as if someone had just bought something. If the event works, the request appears in the “Log” tab, where you’ll also check the Shopify order later.
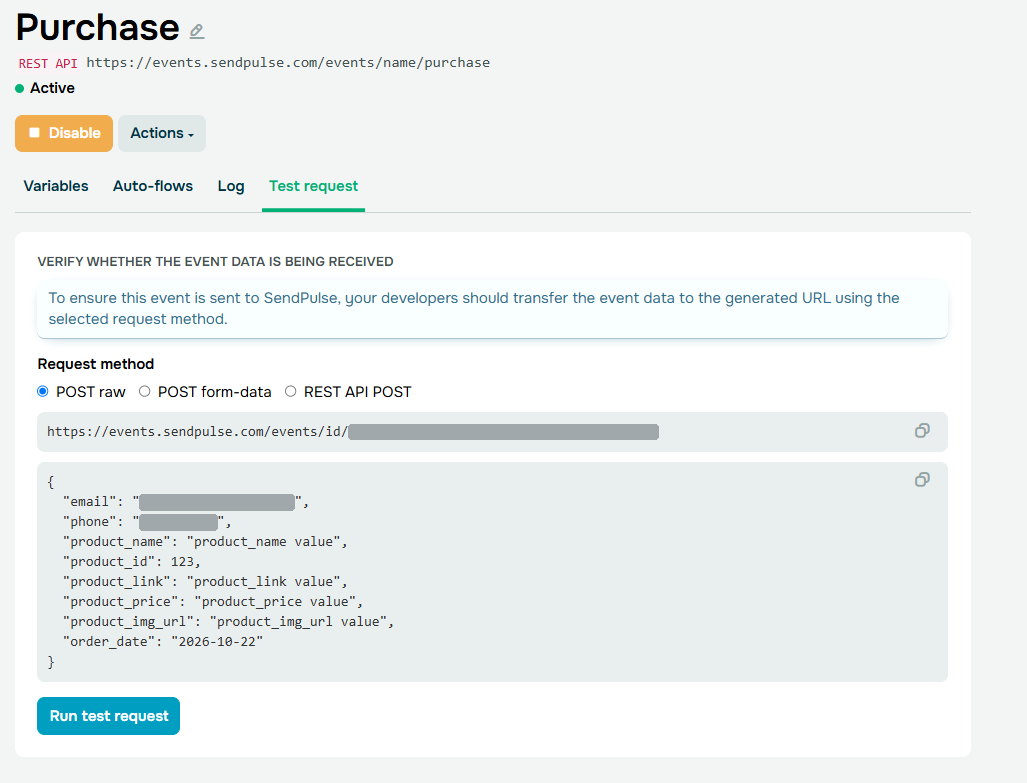 Running a test request for the purchase event
Now let’s check that Shopify actually sends orders. For that, you need a purchase, but not a real one. Shopify has a built-in “Test payment gateway” for exactly this: orders placed with it look like real ones but cost nothing.
To turn it on, go to “Settings” > “Payments” in your Shopify admin panel. Deactivate your current card provider first, since the test gateway can’t run alongside it. Then open the list of providers, pick “Test payment gateway,” activate it, and click “Save.” This works only on a paid Shopify plan. The exact clicks depend on your setup, so if you get stuck, follow Shopify’s guide on activating a payment gateway in test mode.
Next, place a test order. Open your store, add any product to the cart, and go to checkout. For the email, use your own one that’s already in your mailing list, so SendPulse can match the purchase to a contact without affecting real subscribers. In our case, that’s a test email address from the Fernway list. At the payment step, enter “Test payment gateway” as the name on the card and 1 as the card number to simulate an approved payment. Any three digits work for the CVV, and any future date works for the expiry date. Complete the order with the “Pay now” button.
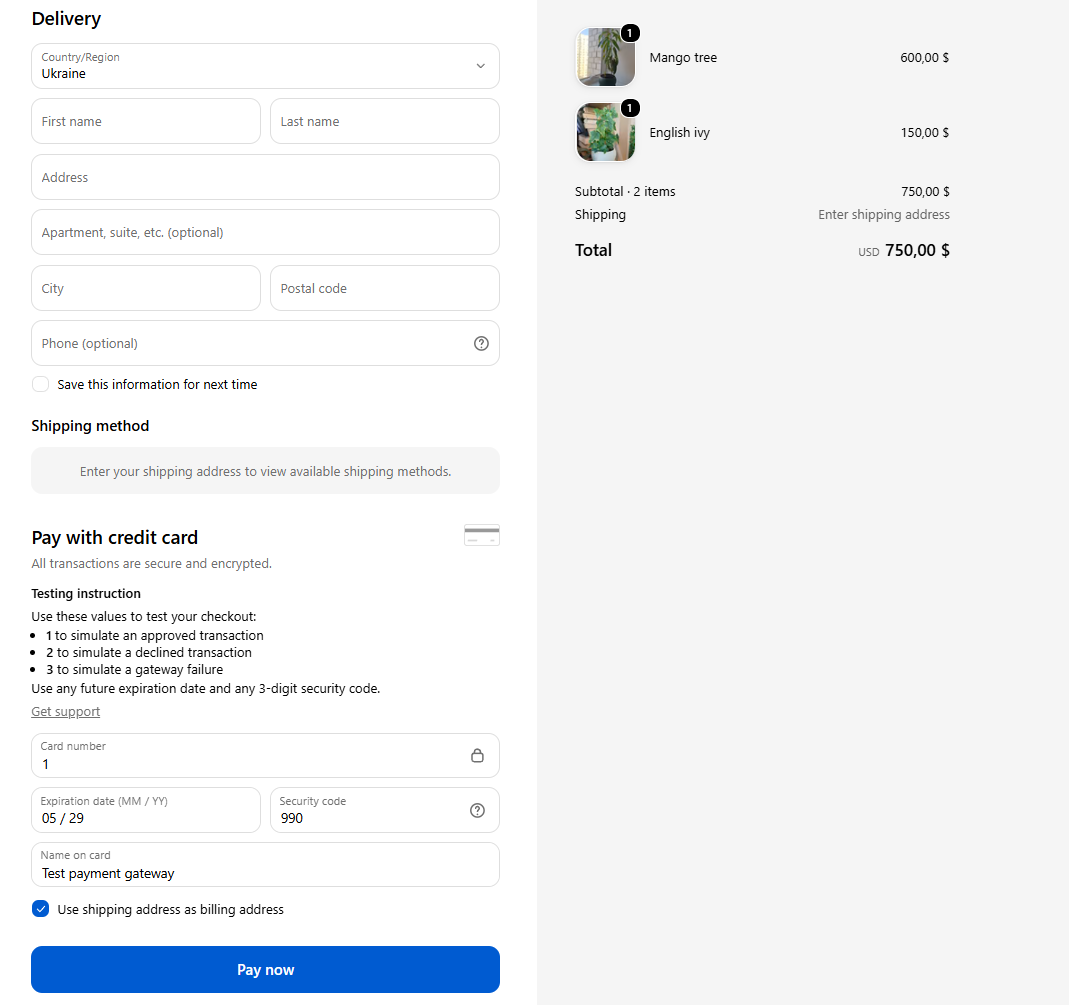 Placing a test order with the “Test payment gateway”
Then go back to SendPulse, open “Automation” > “Event manager,” choose your “Purchase” event, and switch to the “Log” tab. Your test order should be there. Click it to see everything Shopify sent: the order number, the buyer’s email, the products, and more.
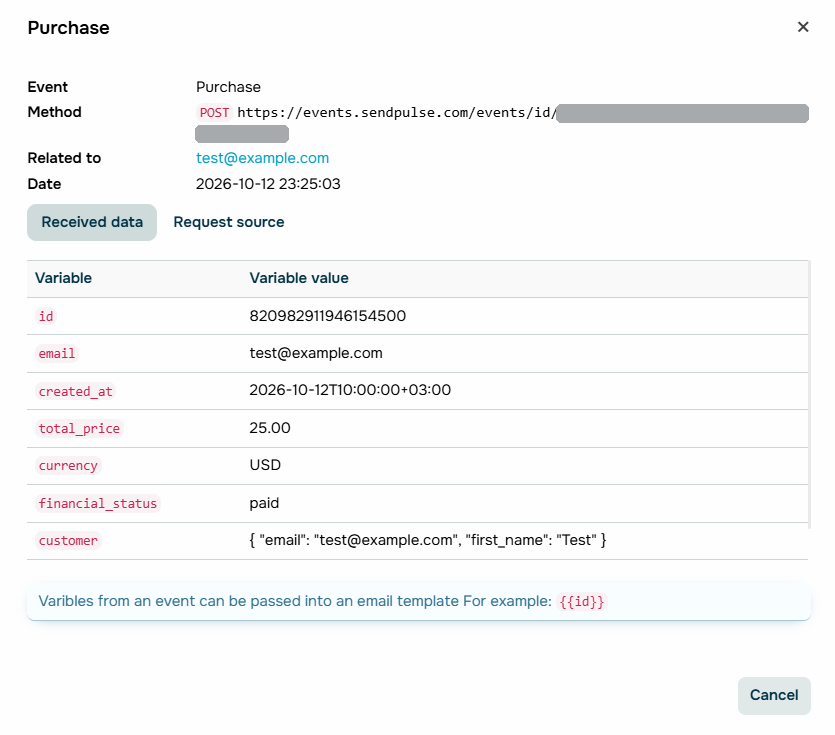 Checking the test order in the “Log” tab
Once you’re done, switch everything back. While the test gateway is active, real customers can’t pay by card, so go to “Settings” > “Payments,” deactivate the test gateway, and reactivate your usual payment provider.
Add the purchase check, tags, and “Goal”
With purchases coming in, go back to your flow and add a “Condition” after email 3. In “Trigger condition,” choose your “Purchase” event. Then set the “Condition waiting period,” which is how long the flow waits for an order. Match it to how long your customers usually think before buying and, if your offer has a discount code, to how long the code is valid. There’s no point in waiting a week for a code that expires in two days. In our case, the FIRSTPOT code is valid for three days, so Fernway’s flow waits for the same period.
Now add the tags with an “Action” element on each branch. Choose the email action “Assign tag to subscriber” and select the tag you created in Step 1. On the “Yes” branch, add the tag for buyers, and on the “No” branch, the one for everyone else. In Fernway’s flow, buyers get welcome-buyer, and the rest get welcome-no-order.
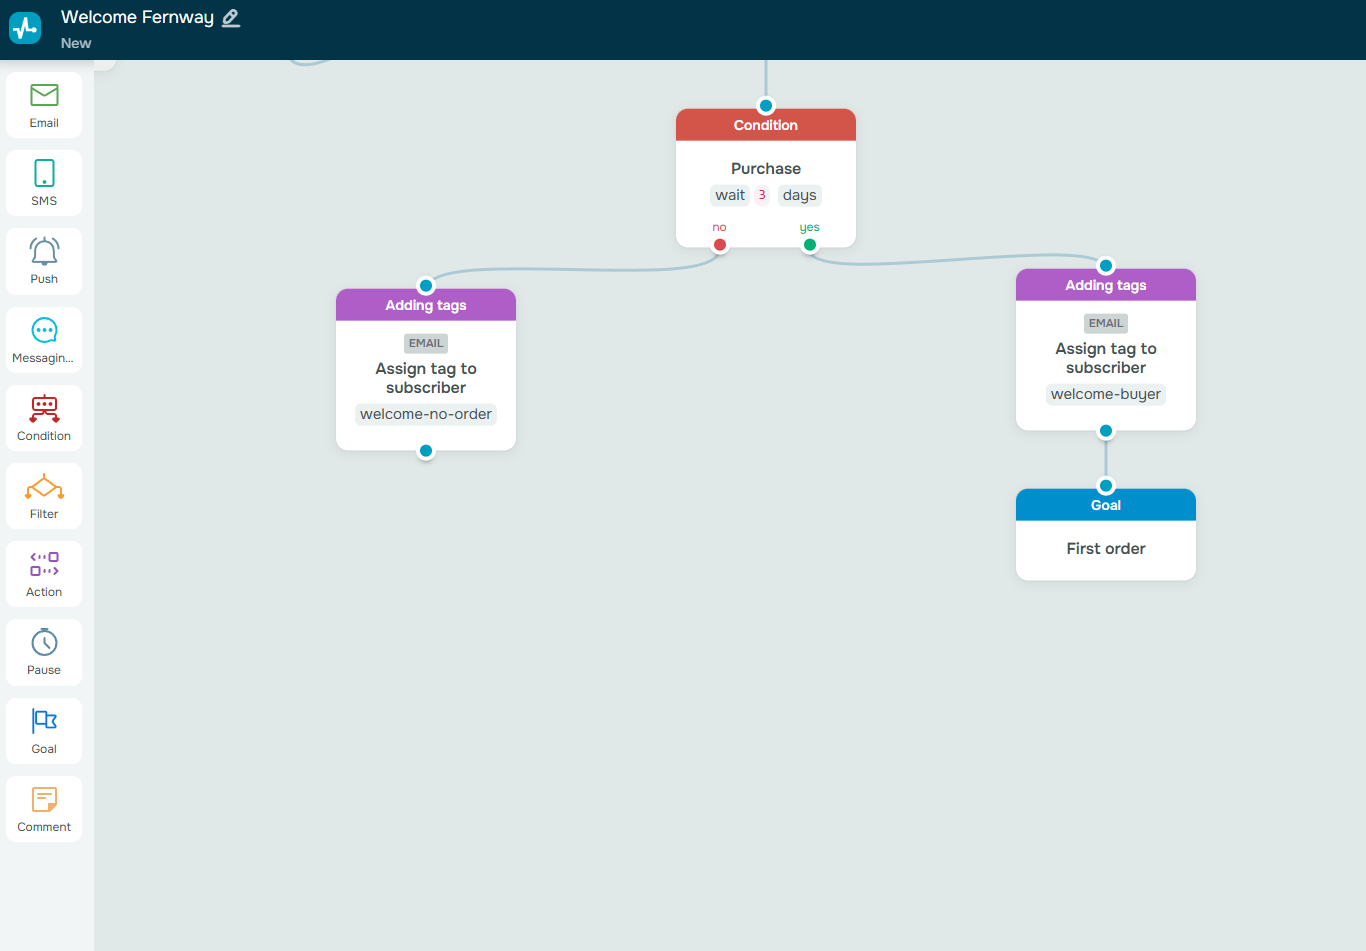 Adding a tag to each branch of the purchase condition
Finally, add a “Goal” after the buyer’s tag and give it a name in “Goal name.” We called ours “First order.” A “Goal” counts everyone who reaches it as a conversion, so where you place it defines what counts. Placed after the purchase check, it counts buyers.
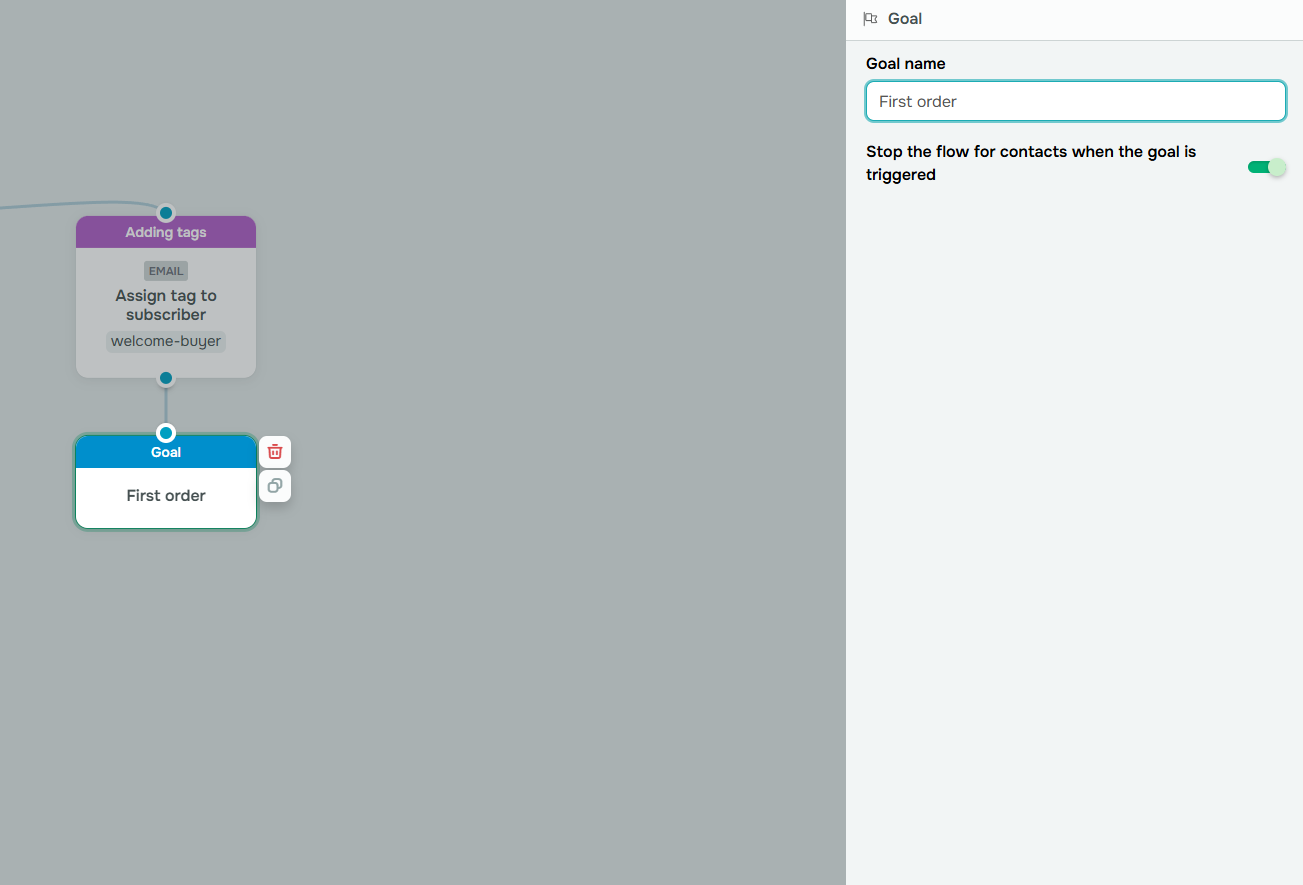 Naming the “Goal” “First order” and turning on the stop option
Also, turn on “Stop the flow for contacts when the goal is triggered.” It doesn’t change the path here since the “Goal” is the last element, but without it, conversions won’t display once the series is complete. The “Goal” has two statuses, “Expects” and “Done,” and the total appears in the “Conversion amount” column of your flow.
Note: To ensure subscribers who have already bought don’t get any more emails, especially the discount, go back to “Auto-flow start” now that the “Purchase” event exists. Turn on “Stop the flow by event,” choose “Purchase” in “Event type,” and turn on “Count as conversion.” Buyers then leave the flow as soon as they order, and their purchases count as conversions either way. The only catch is that some of them may not get the welcome-buyer tag.
Step 9. Activate and test your flow
Now it’s time to launch the flow and run it yourself. A test run through the real pop-up catches most mistakes: the pop-up saving to the wrong list, a variable that doesn’t save values, a broken link, or an email still set to the default 30-minute delay when it should be sent right away.
First, make sure the flow is running. Click “Launch” at the top of the flow builder and check that its status changes to “Active.” New flows go through moderation first, which takes about 30 minutes, so the status may not change right away. A flow can be “New,” “Active,” or “Paused,” and only an active one starts for new subscribers, so signups made before launch won’t count. Once the flow is “Active,” publish your pop-up.
If you need to fix something later, you can pause the flow, but keep the pause short. New contacts stop entering, and anyone whose next step comes due while the flow is paused is removed from it.
Subscribe through the real pop-up
Open your store in a private browser window with extensions turned off. Depending on its display conditions, the pop-up may stop showing to someone who has already closed or submitted it, and ad blockers can hide it altogether. A fresh private window gives you a cleaner test of what a new visitor sees.
Run the test twice, with answers that cover every path your flow can take, and use a different email address you can access each time. If re-entry is off in “Auto-flow start,” a reused email address won’t start the flow again. In one of the signups, leave the optional fields empty to verify what subscribers get without them. In our case, the first signup includes a name and “Low light,” and the second skips the name and picks “Bright light.” Together, they check the fallback greeting and both versions of email 2.
If your pop-up uses double opt-in, open the confirmation email and click the link for each signup. Until you do, the subscriber isn’t saved, and the flow won’t start.
Find your test contact in the flow
Once you’ve signed up, verify two things: that the pop-up saved the answers correctly and that the subscriber entered the flow. If something goes wrong later, this is also where troubleshooting starts.
Start with the saved data. Open your mailing list, find the test contact, and look at the variables. In our case, that’s the “Fernway” list, where the “Light” column should contain low or bright. If the value is empty, the problem is likely in the pop-up setup rather than the flow, so check its “Variable” and “Data saving” settings first.
Then check that the subscriber entered the flow: open the flow, click “Auto-flow start,” and look for their email under “Executed.” If it isn’t there, the troubleshooting section below helps you find out why.
Check each email in the series
Now review the emails from the subscriber’s side. Each light answer should lead to the right version of email 2, and every link should work, from the checklist download to the shop. The sender and subject line should look right in the inbox, and every email needs its unsubscribe link. To verify both paths after email 2, click the link you set in the “Condition” in one test and ignore it in the other. The first contact should get the discount email, and the second should get “Why leaves turn yellow” first.
Then check that a purchase stops the series. Sign up once more with a third test email and place a test order with it through the test payment gateway. That contact shouldn’t receive any later emails. “Show path” should end when the purchase stops the flow, and the order should appear as a conversion in the flow statistics. Don’t forget to switch your payment settings back afterward.
Timing is the hardest part to test because a normal run spans several days. You can speed it up with a copy of the flow that uses delays of minutes instead of days, but set it up carefully. A copy with the same trigger for the same list would also start for real new subscribers, and they’d get the whole series within minutes. Connect the copy to a separate test mailing list with the same variables instead, and add contacts through a test pop-up or manually. Keep in mind that the copy goes through moderation just like the original flow, so give it about 30 minutes before testing. When you’re done, pause the copy or delete it.
Catch anyone who signed up before launch
If your pop-up went live before the flow did, some people may have signed up in that gap, and the flow won’t start for them on its own. “Restart” on the active flow can catch them, but only recent ones. With the re-entry setting in “Auto-flow start” turned off, it adds just the contacts who joined the list in the last two hours, and you can run it once every five minutes. Check the re-entry setting before you click, though: with it on, contacts who already got the series receive it again from the start.
If the gap was longer than two hours, email the checklist to those earlier signups directly, so they still get what they signed up for.
What about the subscribers you already had before this series existed? Don’t push them through it. They never asked for the checklist, and some have probably bought from you already, so a first-order discount would feel out of place. Send them a regular campaign instead, without the first-purchase offer.
And if something doesn’t go as planned — say, a new subscriber never gets the welcome email — the troubleshooting section below covers six common reasons and how to fix them.
Power up your business with smart tools
Emails, chatbots, automation, CRM, and more — everything you need to connect with your audience.
Get started for free
6 reasons a welcome email doesn’t arrive and how to fix them
Start with the simplest check, the one that’s easiest to skip: is your flow running? Look at the status under the flow’s name. If it says “New” or “Paused,” new subscribers don’t enter it at all, so launch or resume it first.
If the flow is active, check whether the subscriber made it inside. Open your welcome flow and click the first element, “Auto-flow start.” Its panel lists everyone who has entered the flow under “Executed,” with the date. Don’t be surprised if you don’t see this list at first: it only appears once at least one contact has entered. If it’s missing, nobody has entered the flow yet, and that’s a clue in itself.
Found your subscriber? Next to the email address, there’s a tiny branching icon with no label. Hover over it to see “Show path,” then click it. You can also open the contact’s card in the mailing list and click “Show path” next to the flow under “In automation flows.”
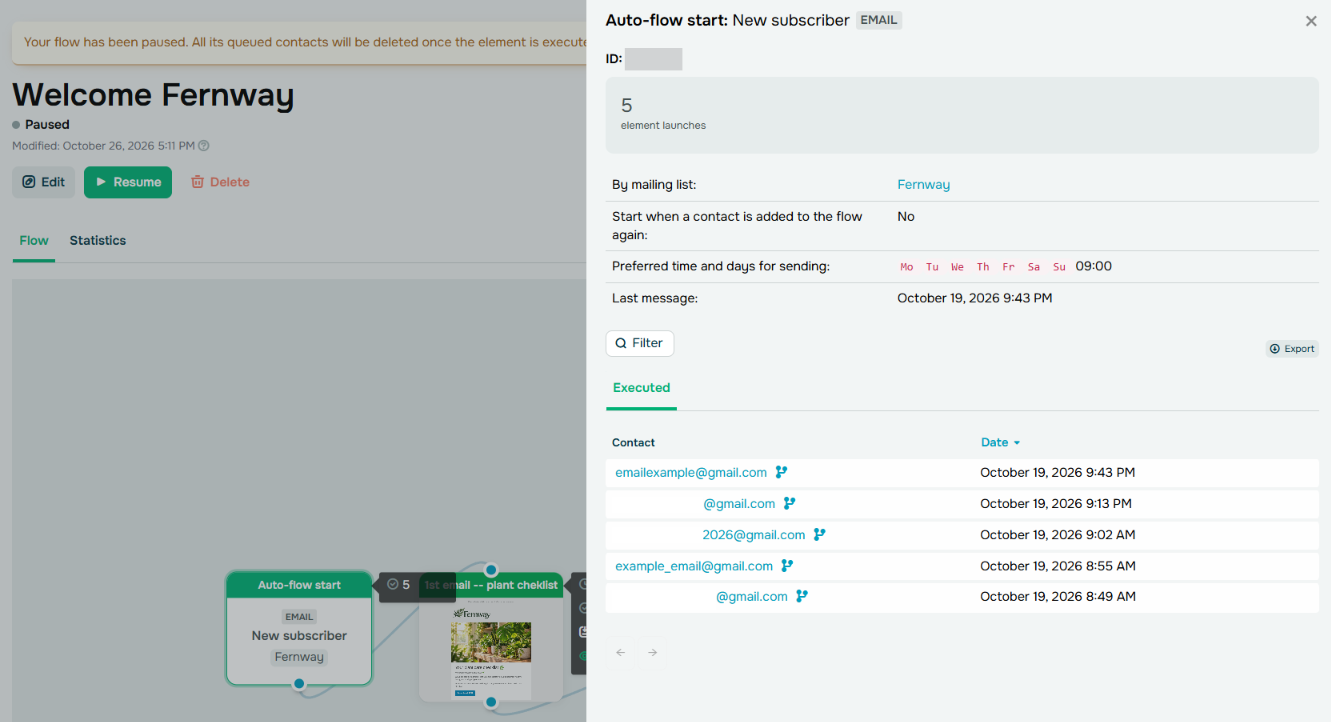 Finding “Show path” next to the subscriber’s email
The working area highlights the route this subscriber took, and the counter next to each element shows how many contacts reached it, so you can see exactly which email they’re waiting for or where they stopped. In the example below, the subscriber got email 1, passed the “Filter,” and is now waiting for email 2, due at 9 a.m. two days after they signed up.
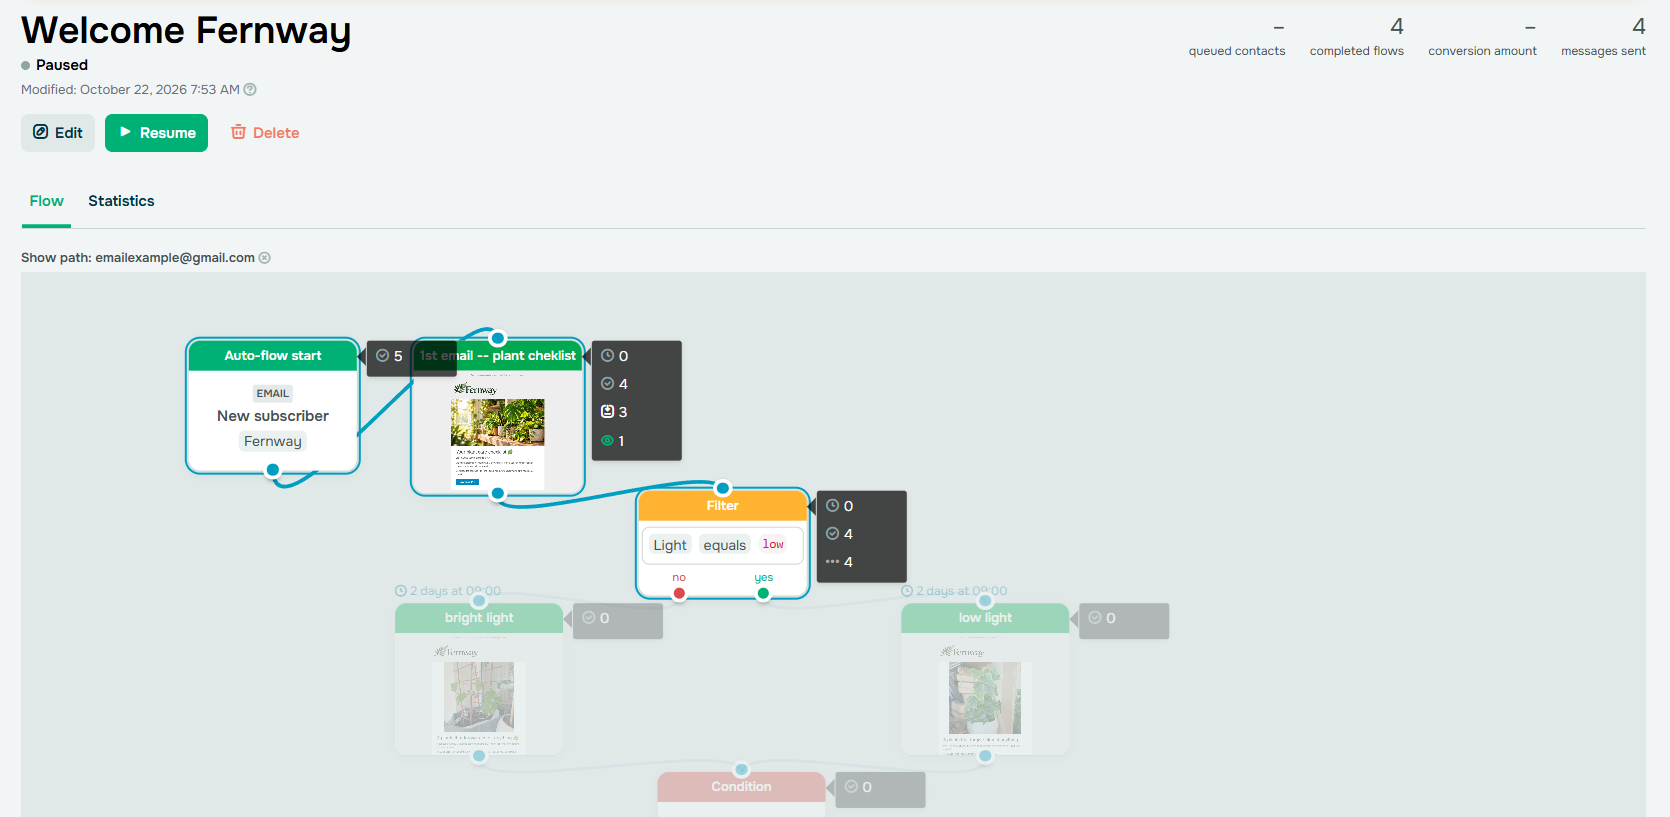 Showing the path of a new subscriber in the flow
Can’t find the subscriber in “Executed”? Then they never entered the flow. Look them up in your mailing list too, and use what you find to select the reason:
- Not in the mailing list at all: new signups aren’t being saved (reason 1), or the subscriber hasn’t confirmed their subscription yet (reason 2).
- In the mailing list, but not in “Executed”: the pop-up and the flow use different lists (reason 3), or the subscriber joined the list before the flow became active (reason 4).
- In “Executed,” with the path stopped before an email: the email is delayed in the flow (reason 5).
- In “Executed,” with the path past the email: the flow processed it, but the subscriber can’t find it (reason 6).
Whatever you fix, test it with a new email address. One that has already been through the flow, or is waiting in it, won’t show the change.
New signups don’t appear in the mailing list
People say they signed up, but their email addresses never show up in your mailing list. Start by checking whether your pop-up appears at all. Open your store in a private browser window with extensions turned off, as a new visitor would, and wait for it. Then follow the case that matches what happens.
The pop-up doesn’t appear. First, verify that the pop-up is published. Then check its display conditions. For example, with “Upon exit intent,” the pop-up shows only when your cursor is about to leave the page, and mobile devices have their own display settings. On the Free plan, pop-ups also stop showing after 5,000 views a month.
If none of that applies, the pop-up may not be properly connected to your store. If you added the installation code yourself, make sure it’s in “theme.liquid” of your live theme, right before the closing </body> tag, and that the file was saved. The ID in the code should also match the one in your SendPulse pop-up settings. Keep in mind that switching or updating your theme can remove code you added manually.
If you connected the pop-up through the SendPulse app for Shopify, open the app’s “Pop-up Widgets” tab and make sure “Active project” is ticked. Then check your theme: either the “SendPulse Pop-up” toggle in “App embeds” should be on, or, if you show the pop-up only on specific pages, the app block with your “Pop-up ID” should be added and saved.
To confirm the connection, open the pop-up’s settings in SendPulse and check “Integration status” under “Website installation code.” The status should be “Connected.”
The pop-up appears, but nothing is saved. Then the problem is in its settings. Open the pop-up’s “Data saving” tab and make sure “Save to a mailing list” is on and the correct list is selected. Also, check that the pop-up has a “Button” element: without it, the data people enter is never submitted. If the pop-up uses double opt-in, new signups only appear in the list after they confirm their subscription.
A subscriber hasn’t confirmed their subscription
Someone says they signed up but never got your welcome email, or it arrived hours or days later. Their email address isn’t in the “Executed” list of “Auto-flow start,” and it isn’t in the mailing list either.
This usually means the pop-up uses double opt-in. After filling it out, people get a confirmation email and have to click the link in it. Until they do, they aren’t added to the mailing list, so the welcome flow can’t start for them. Many miss the confirmation email because it lands in spam or they simply don’t notice it, and those who click it later get the welcome email later too.
To check, open your pop-up, click the email field, and look at the “Request subscription confirmation” toggle. If it’s on, everything works as intended. Double opt-in proves each subscriber really wants your emails and keeps fake or mistyped email addresses off your list. So rather than turning it off, make confirming as easy as possible.
Start with the confirmation email. It should be recognizable at a glance and ask for one thing only: use a sender name your subscribers know, a subject line that says what to do, such as “Confirm your subscription to get your guide,” and a single clear button. SendPulse’s default confirmation email works on any plan. A custom one with your own design needs a paid plan: you create it in “Email” > “Settings” > “Subscription tools” and select it in the “Confirmation template” drop-down in the email field settings.
Then repeat the request where people look right after signing up: the pop-up’s notification. In the email field settings, click “Set up the notification” and edit the “Notification text.” The default only says that a confirmation email was sent to %email%. Add a short line asking people to check their inbox and spam folder and click the link, so they don’t close the tab and forget about it. Keep %email% in the text: it shows the email address they entered, so anyone who made a typo can spot it right away.
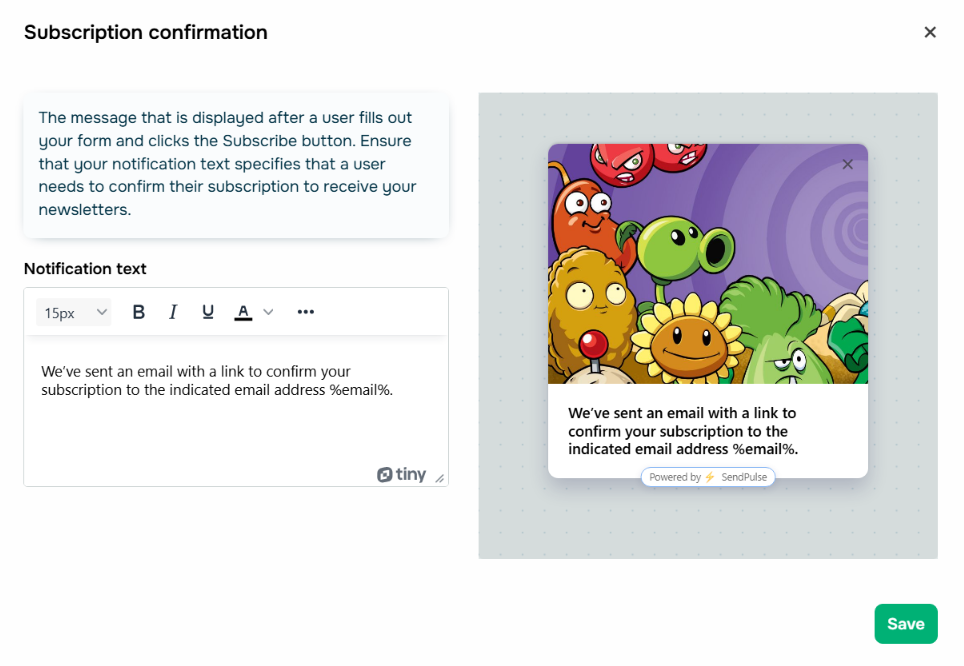 Editing the “Notification text” that appears after signup
If someone writes that the welcome email never arrived, ask them to find the confirmation email, checking spam too, and click the link. Their email address then appears in the mailing list and in “Executed,” and the welcome email goes out.
New subscribers are in the mailing list, but not in the flow
People fill in your pop-up, and their email addresses appear in a mailing list. But when you open the flow, they aren’t in the “Executed” list of “Auto-flow start,” and they don’t receive the welcome email. If they joined after the flow became active, the pop-up and the flow are most likely connected to different mailing lists. If they joined before, move on to reason 4.
Like every trigger in the “Email” group, “New subscriber” tracks one mailing list, the one selected in “Auto-flow start,” and starts the flow only for contacts added to that list. Say the pop-up saves new subscribers to the “Test task” list, while the flow is set to track the “Fernway” list. Every subscriber is added to “Test task,” so the flow doesn’t start for them. Our support team sees this issue more often than any other, and it usually happens after creating a second list, copying a pop-up or form, or renaming lists.
To find out whether this is your case, compare the two lists. Start with the flow: click “Auto-flow start” and look at “By mailing list.” That’s the only list the flow reacts to. Then open your pop-up and switch to the “Data saving” tab. “Save to a mailing list” shows which list receives new signups.
If the two lists differ, switch the pop-up or form to the flow’s list. It’s quicker than changing the flow, and in an active flow, you can’t change the list anyway. You’d have to copy the flow and select the right list in the copy.
That fixes new signups, but what about the people who subscribed while the lists didn’t match? They’re real new subscribers who got lost, so it’s worth bringing them in. Export them from the wrong list and upload the file to the flow’s list with “Add contacts” > “Upload File.” Contacts added by upload can start the flow just like pop-up signups, so make sure the flow is active and the file contains only these subscribers, not everyone from the wrong list. Otherwise, the whole list gets your welcome series.
A subscriber joined the list before the flow became active
It may look like contacts added from a file, manually, or from CRM don’t get the welcome email: they’re in the mailing list the flow tracks but not in the “Executed” list of “Auto-flow start.” The adding method isn’t the problem, though. Check when they were added. The “New subscriber” trigger starts the flow only for contacts added while the flow is active, so anyone who joined earlier won’t enter it, including contacts added while the flow was still in moderation.
In our test, every way of adding contacts to the list started the flow:
| How the contact was added |
Started the flow? |
| Pop-up signup |
Yes |
| Upload file |
Yes |
| Copy and paste |
Yes |
| Individual entry |
Yes |
| CRM: Export to mailing list |
Yes |
What to do depends on when these contacts joined. Those who were on the list long before launch should stay out. They never asked for the welcome series, so reach them with a separate one-time email instead.
For people who signed up shortly before launch, click “Restart” on the active flow, next to “Pause.” With re-entry turned off in “Auto-flow start,” it adds only contacts who joined in the last two hours. With re-entry on, it restarts the series for everyone on the list, so check the setting first. For anyone who joined earlier than that, send what you promised in a one-time email.
One more thing: because every way of adding contacts starts the flow, be careful with imports too. If you import an old list into the mailing list used by the welcome flow, those contacts can enter the series as well. Import old contacts into a separate list instead.
A welcome email is delayed in the flow
The subscriber is in “Executed,” but “Show path” stops before an email, and the email shows “Expects.” It does arrive, just 30 minutes late, the next day, or later than you planned. Our support team hears about this often, and it usually comes down to one of four things:
- The email still has the default timing. New “Email” elements are set to go out 30 minutes after the previous step. If email 1 should arrive right after signup, open it and set “Complete action” to “Right away.”
- The flow or email is still in moderation. New and edited flows and templates are reviewed before they go out, which usually takes about 30 minutes.
- The timing changed after contacts entered the queue. When a contact gets to the “Email” element, SendPulse schedules the email using the timing set at that moment, and later changes don’t apply to that contact. Say email 1 was set to “After 30 minutes” and someone signed up at 10 a.m. Their email is scheduled for 10:30 a.m., and switching to “Right away” at 10:05 a.m. won’t send it any sooner. Only contacts who get to the “Email” element after the change use the new timing.
- Preferred sending days hold the email back. A flow can be set to send only on certain days of the week. If an email with day-based timing, such as “After 2 days at 09:00,” is scheduled for a day that isn’t selected, sending is postponed until the next selected day. Say only weekdays are selected and email 2 is due on Saturday: it goes out on Monday instead. Emails set to “Right away” aren’t affected, so this usually delays email 2 or later. To lift the limit, select every day of the week.
To check the preferred sending days, open “Auto-flow options,” the gear icon in the top bar next to “Save,” and expand “Advanced options.”
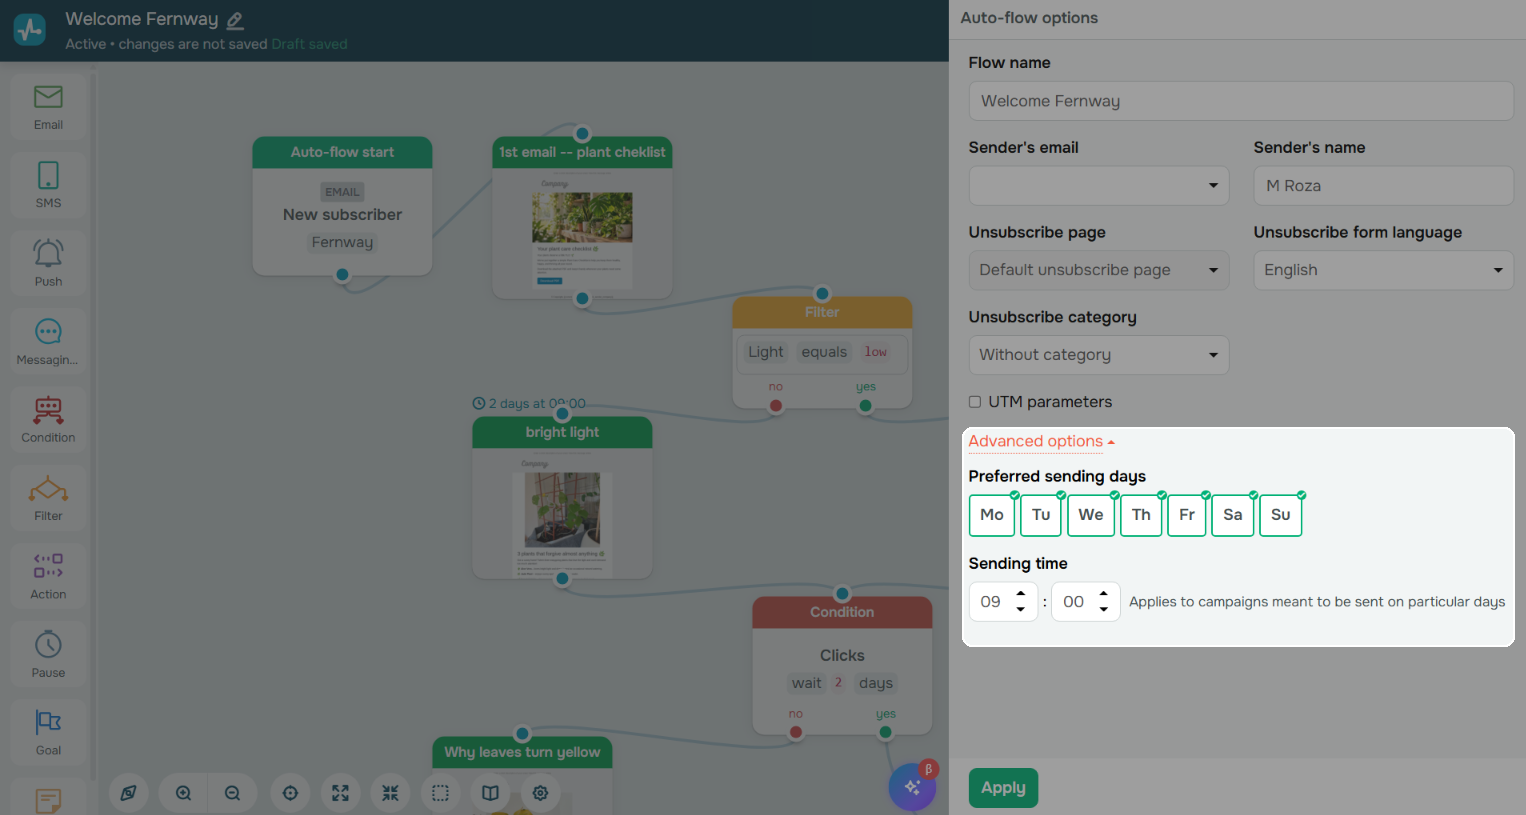 Finding “Advanced options” in “Auto-flow options”
The flow shows the email as processed, but the subscriber can’t find it
“Show path” shows that the subscriber passed the email, so SendPulse processed it, but the subscriber says nothing arrived. This usually happens for one of three reasons.
The email bounced
Sometimes the email address itself is the problem: it has a typo, the mailbox is full, or the domain doesn’t exist, so the email is rejected. You can see this in the flow. Click the email in the working area and open the “List of recipients” tab. The “Status” column shows what happened to each email: “Delivered and read” means it arrived and was opened, while a red status such as “Invalid email” means it wasn’t delivered.
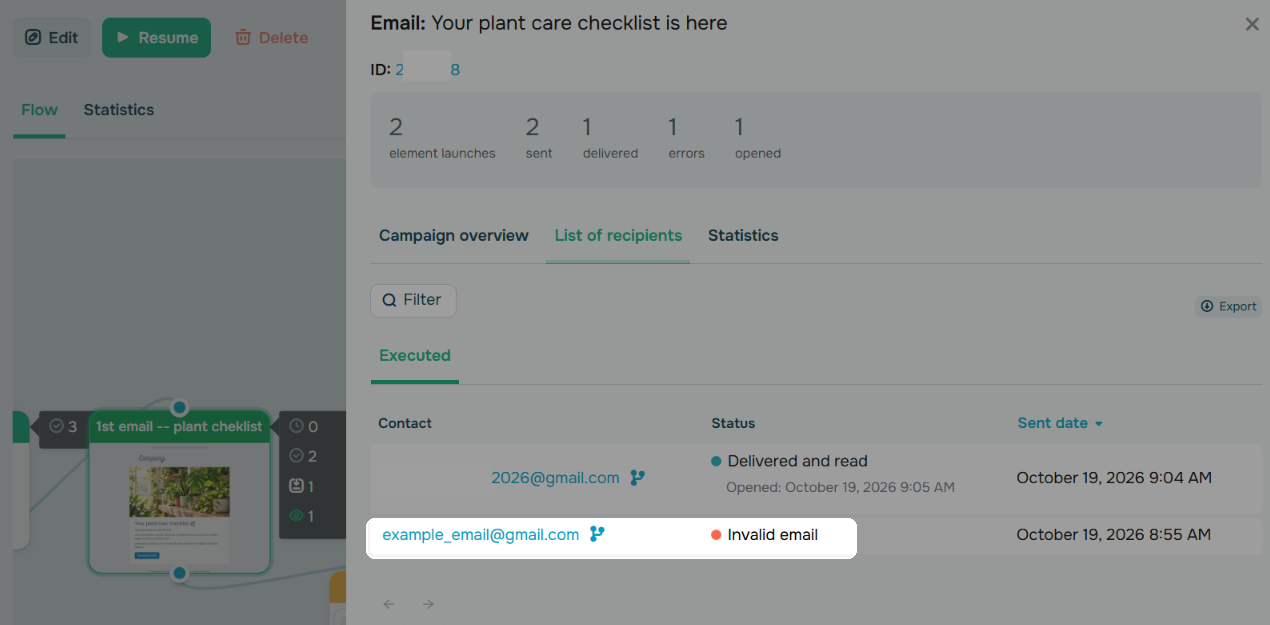 Spotting an undelivered email in “List of recipients”
The catch is that nobody gets notified about a bounce. The subscriber doesn’t know they mistyped their email address, and you only find out if they write to you. It’s easier to prevent these email addresses from getting onto the list in the first place. Double opt-in catches many of them because a mistyped email address can’t receive the subscription confirmation email. And if you add contacts by importing a file, tick “Verify uploaded email addresses” in the upload window, or check the list with SendPulse’s email verifier first.
If someone does write to you, ask them to sign up again with the correct email address.
The email went to spam
Sometimes the email arrives, just not where the subscriber looks. The mailbox provider may flag the message as spam based on factors such as sender authentication and reputation. SPF and DKIM help verify that an email really comes from the domain it claims to use.
For Gmail, all senders need SPF or DKIM, while bulk senders sending around 5,000 or more messages a day to Gmail accounts need SPF, DKIM, and DMARC. Marketing and subscribed messages from bulk senders also need one-click unsubscribe. Yahoo bulk senders likewise need SPF, DKIM, and DMARC, along with an easy unsubscribe method.
So send from an email address on your own domain, not a free one like Gmail, Yahoo, or AOL. SendPulse signs your emails by default, but adding your own SPF and DKIM records can improve authentication and deliverability. Set them up in “Email” > “Settings” > “Domain settings” under “Authenticated domain.”
In Gmail, the email may also land in the “Promotions” tab. That’s normal for marketing emails, but it’s worth mentioning in your pop-up’s notification so subscribers know where to look.
The subscriber had unsubscribed before
This one sounds odd at first: how can a brand-new subscriber be unsubscribed? It happens when the person is new to your welcome series but not to your emails. Say someone got your newsletter last year, clicked “Unsubscribe,” and now signs up through your pop-up. Their email address is still on SendPulse’s unsubscribed list. Such a contact can move through the flow, but SendPulse skips the email steps for that email address, so the welcome series never arrives.
To check, open “Email” > “Mailing lists,” select your list, and find the contact. An unsubscribed email address has a red dot next to it. Hover over it to see “Unsubscribed.” The “Last activity” column shows when it happened.
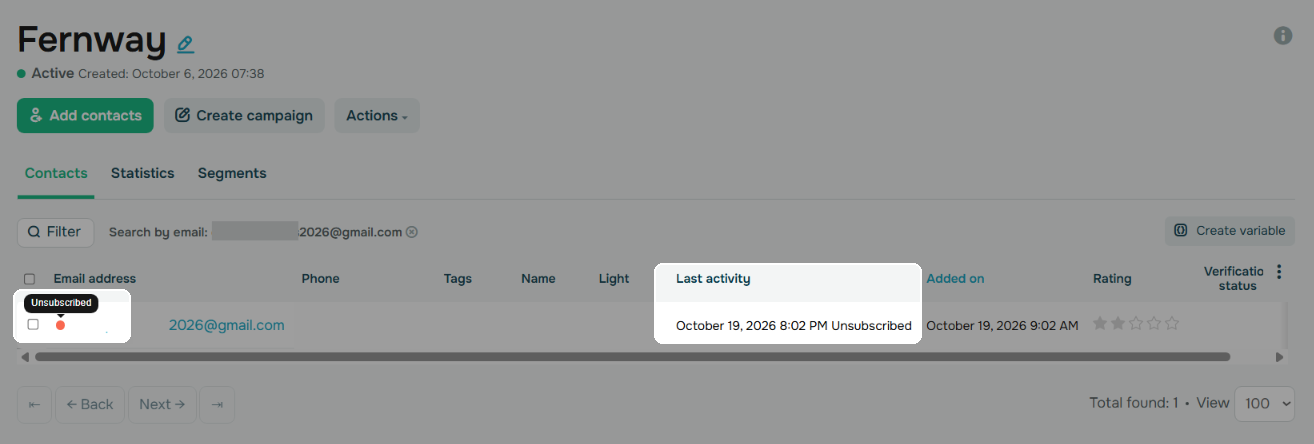 Spotting an unsubscribed email address in the mailing list
To give people who unsubscribe by mistake an easy way back, set up a resubscription email. SendPulse sends it right after someone unsubscribes, and one click brings them back to your list.
7 reasons subscriber data is missing from a welcome email and how to fix them
Another common question in support: the pop-up collects the subscriber’s name or an answer, but the welcome email doesn’t use it. The greeting says “Hi, !” instead of the name, or everyone gets the same version of an email because the “Filter” sends them all down one branch.
Start by checking what was actually saved. Go to “Email” > “Mailing lists,” open your list, and search for the subscriber’s email address. In their row, look at the columns for the name and the answer. If they’re empty, the pop-up didn’t save the data. If they’re filled in, the data was saved, but the flow doesn’t use it correctly.
If the data wasn’t saved, there might be three reasons for that:
- The variable doesn’t exist in your mailing list. Create every variable in the list itself: “Email” > “Mailing lists” > your list > “Create variable.” A variable created only in the pop-up builder doesn’t appear in the list automatically.
- The pop-up field isn’t connected to a variable. In the pop-up builder, click the field and check its “Variable” setting. If it’s empty or set to the wrong variable, the answer doesn’t reach the right column.
- The names differ in capitalization. Variable names are case-sensitive, so “City” and “city” are two different variables. Use exactly the same spelling in the list, the pop-up, and the flow.
If the data was saved, the flow isn’t using it correctly. There might be four reasons for that:
- The “Filter” value doesn’t match the saved value. The “Filter” compares values letter for letter, and the pop-up saves an option’s “Value,” not the text visitors see. If an option says “Low light” but its value is low, the “Filter” has to check for low.
- Most subscribers get the default answer. In “Radio buttons,” one option is always selected, so anyone who doesn’t pick an answer is saved with it. If too many subscribers end up on one branch, check which option is selected by default. It should be the one that suits people who skip the question.
- The email template has no fallback for an empty name. If the name field is optional, “Hi, {{Name}}!” turns into “Hi, !” for everyone who leaves it blank. Add a fallback greeting using smart personalization.
- The email template was edited outside the flow. Changes made in “Email” > “Email templates” don’t reach the copy already used in the flow. Edit the email inside the flow instead.
After any fix, sign up again with a fresh email address and check both the mailing list row and the email itself.
Your welcome series launch checklist
A welcome series has many small parts, and one wrong setting can quietly break it. Before and right after launch, check that:
- the pop-up saves data to the same mailing list the flow’s trigger tracks;
- every variable the pop-up uses exists in that mailing list;
- the first email is sent right away, and all other delays are set before launch;
- “Prevent link expirations” is on in emails without a “Clicks” condition and off in email 2;
- the purchase check, tags, “Goal,” and “Stop the flow by event” are in place;
- the series was tested with a new email address and a test order;
- the flow shows “Active,” and only then is the pop-up published.
Ready to build your own automation flow? Sign up for SendPulse and set up your first welcome email series.
Welcome email series FAQ
Why aren’t new subscribers getting my welcome email series?
The most common reasons are a form that saves contacts to a different mailing list than the flow tracks, a subscriber who hasn’t confirmed their subscription yet, a flow that wasn’t active when they signed up, and a sending time that hasn’t come yet. A new or edited flow also goes through moderation, which usually takes about 30 minutes, and nothing is sent until it’s done. To find the cause, open the flow, click “Auto-flow start,” and search for the subscriber’s email in the “Executed” list. If it isn’t there, the contact never entered the flow.
Will existing subscribers receive my welcome email series?
Not automatically, and usually they shouldn’t. A flow that starts with the “New subscriber” trigger only runs for contacts added to the mailing list after it’s active, and your existing subscribers never signed up for the welcome content. Send them a separate one-time email instead. If a few contacts subscribed shortly before you launched the flow, use “Restart.” With re-entry turned off, it adds only contacts who joined the list in the last two hours.
How do I stop a welcome email series when someone makes a purchase?
Create a “Purchase” event in “Automation” > “Event manager” and add its POST URL as a webhook in your store, so every paid order reaches SendPulse. Then, in “Auto-flow start,” turn on “Stop the flow by event” and select that event. Anyone who buys leaves the flow right away, wherever they are in the series.
Can a welcome email series stop when a subscriber replies?
No. Automation flows don’t track email replies, so there’s no trigger or condition for them. You can stop the series on an event, such as a purchase, with “Stop the flow by event,” or send subscribers down a different branch based on opens or clicks with a “Condition” element.
Can I build a welcome email series on the SendPulse Free plan?
Partly. The Free plan allows five flows with up to 50 elements each. The “Condition” element and the event log need a paid plan, and mailing list tags need Pro. Double opt-in works on Free with SendPulse’s default confirmation email, while a custom confirmation email needs a paid plan.
Why does my welcome email show "Hi, !" instead of the subscriber’s name?
Either the subscriber left the name field empty, or the variable in the email is spelled differently from the one in your mailing list. Variable names are case-sensitive, so {{name}} won’t pick up a variable called “Name.” Match the spelling, then add a fallback with smart personalization, for example: |[IF:{{Name}}]|Hi, {{Name}}!|[ELSE]|Hi there!|[ENDIF]|.