How to Create a Flow for an Instagram Chatbot
The flow builder is the main tool to set up your bot to welcome new subscribers, assist users, sell products, and notify a manager about users’ questions in the chatbot. Also, a chatbot can gather information and send it to your system for future use.
All you need is to create keywords, design the bot’s structure, and drag-and-drop elements in the SendPulse flow builder.
Below, you can find a detailed table of contents. Use it as a map to comfortably find all of the possible triggers and elements to get started adding them to your bot’s flow.
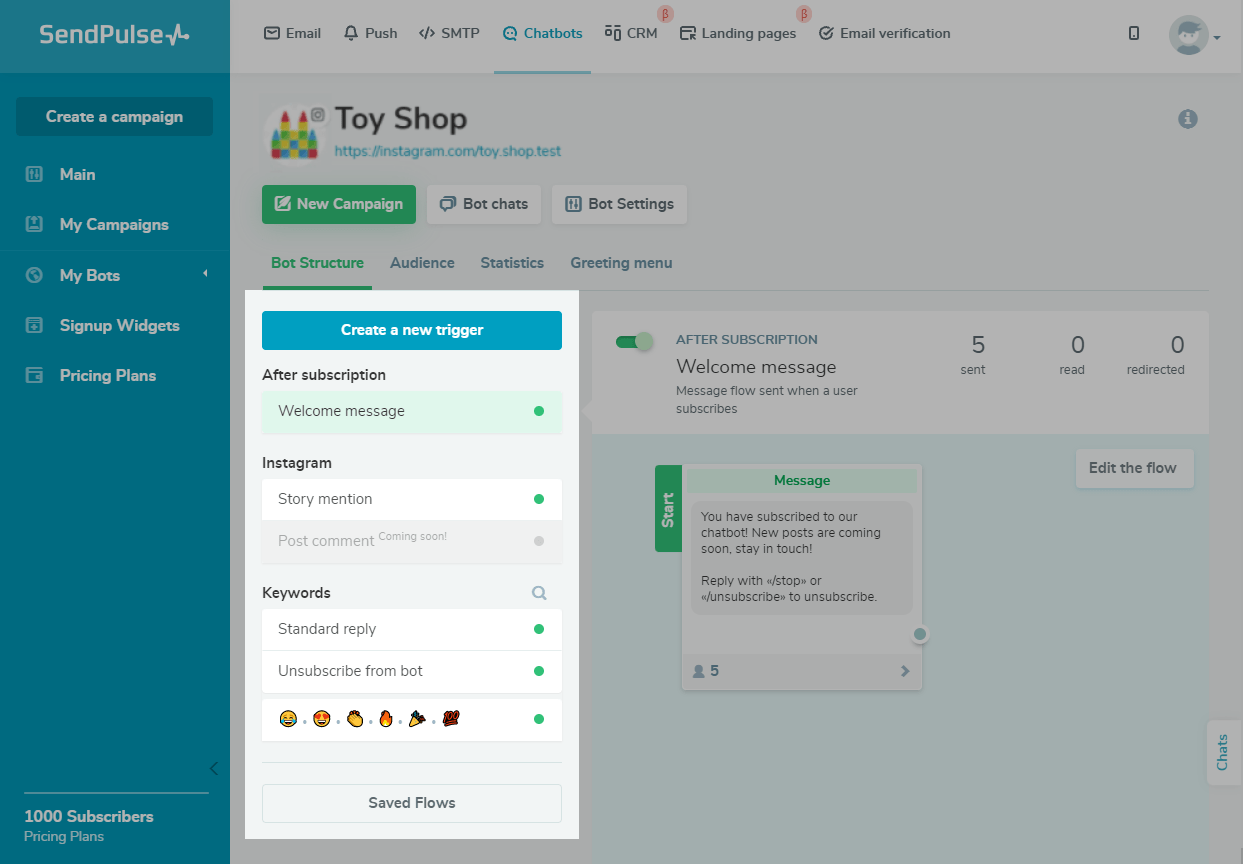
Choosing a Trigger for Your Flow
By default, there are flows for "Welcome message," "Standard reply," "Story mention," "Unsubscribe from bot," and quick reactions to the story in the form of emoji. You can create your own new triggers to get more functionality.
Choose your bot. Navigate to the “Bot Structure" tab and choose a trigger.
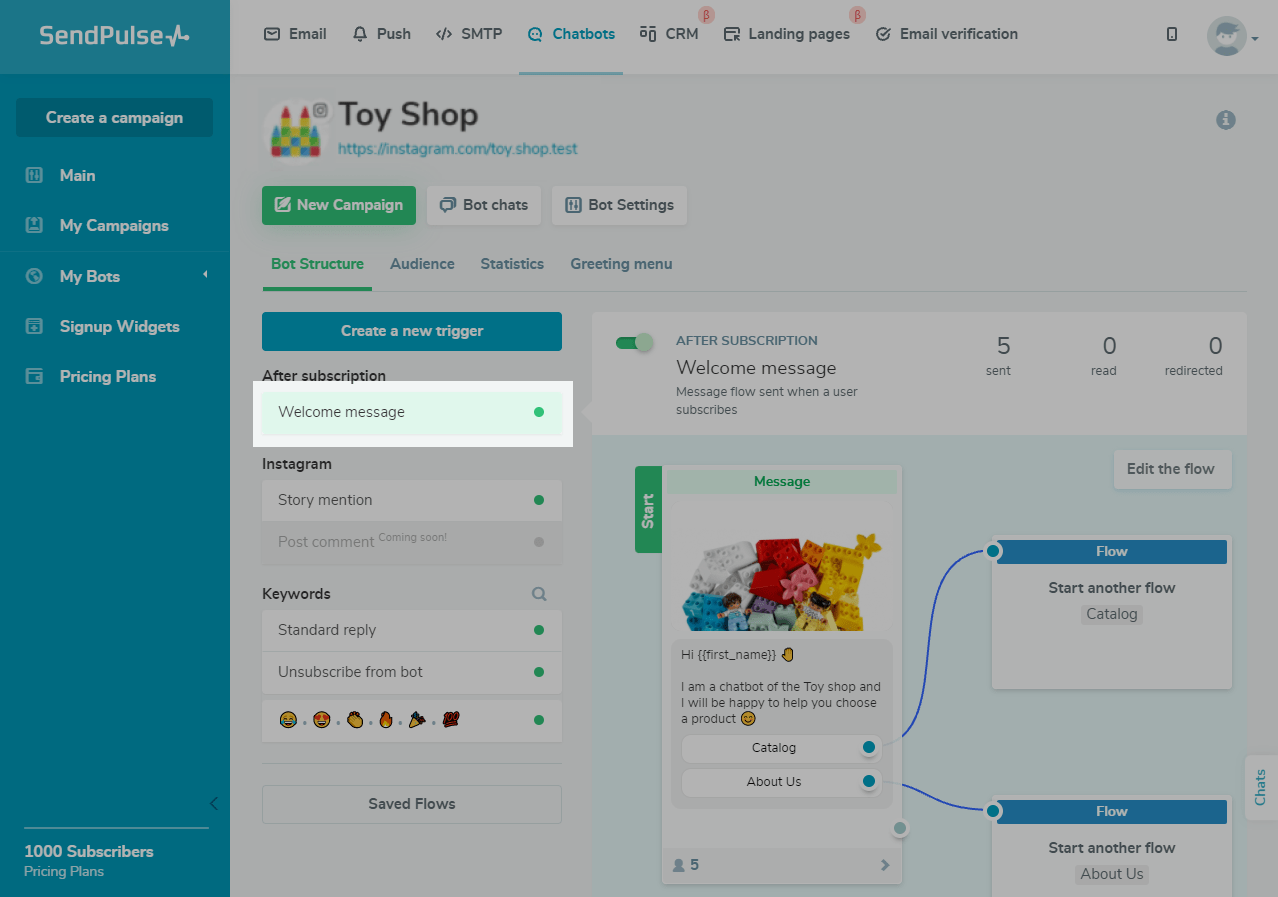
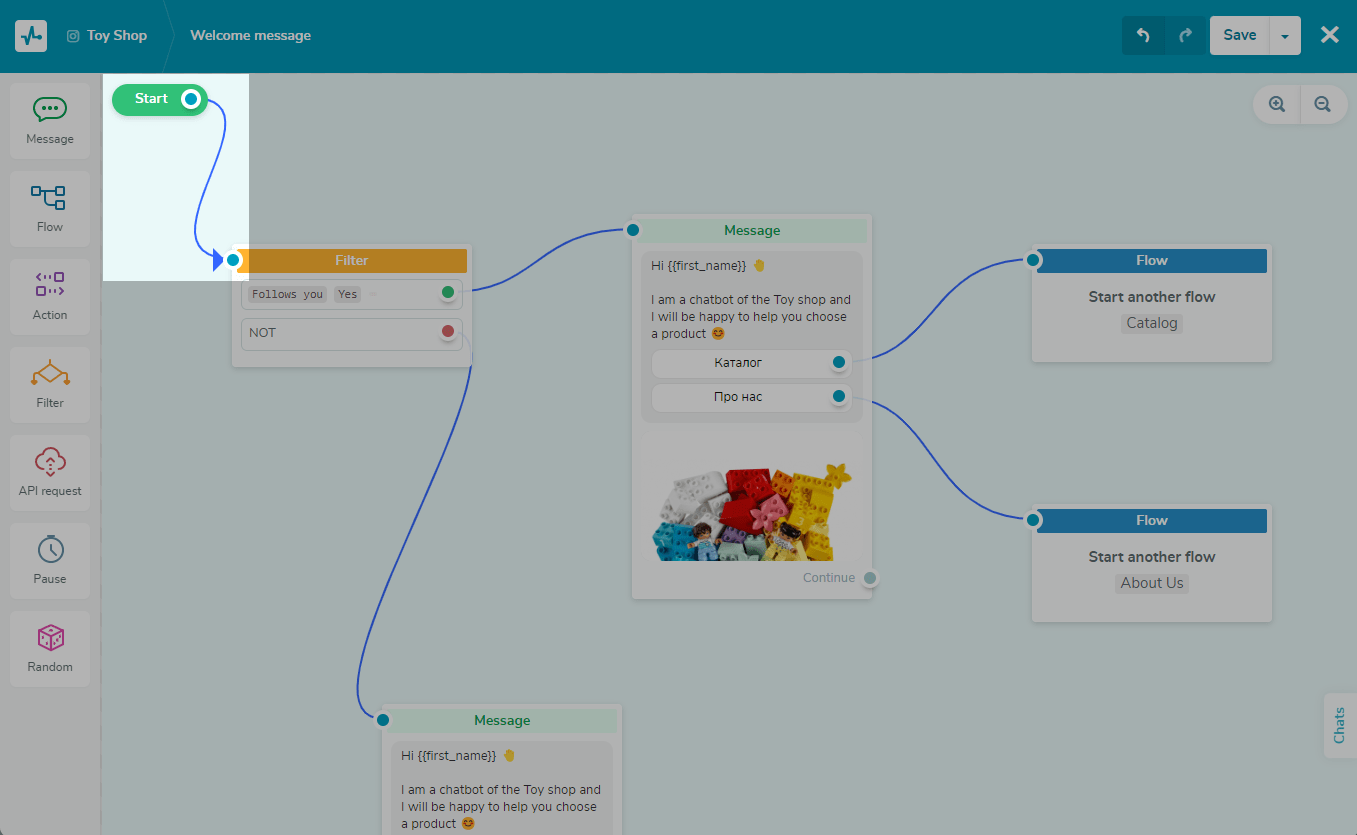
Welcome Message Flows
The flow starts after a user subscribes to your chatbot — i.e. after the user sends your business page a direct message.
A user can be a subscriber of your Instagram chatbot, but not a subscriber of your Instagram business account profile. You can use the Filter element to check the status of your profile subscription.
This flow introduces your bot to users. Here, you can write a little about your bot and its features – how the bot can be useful, what information the bot can provide, how often the bot will send messages, and the content of those messages.
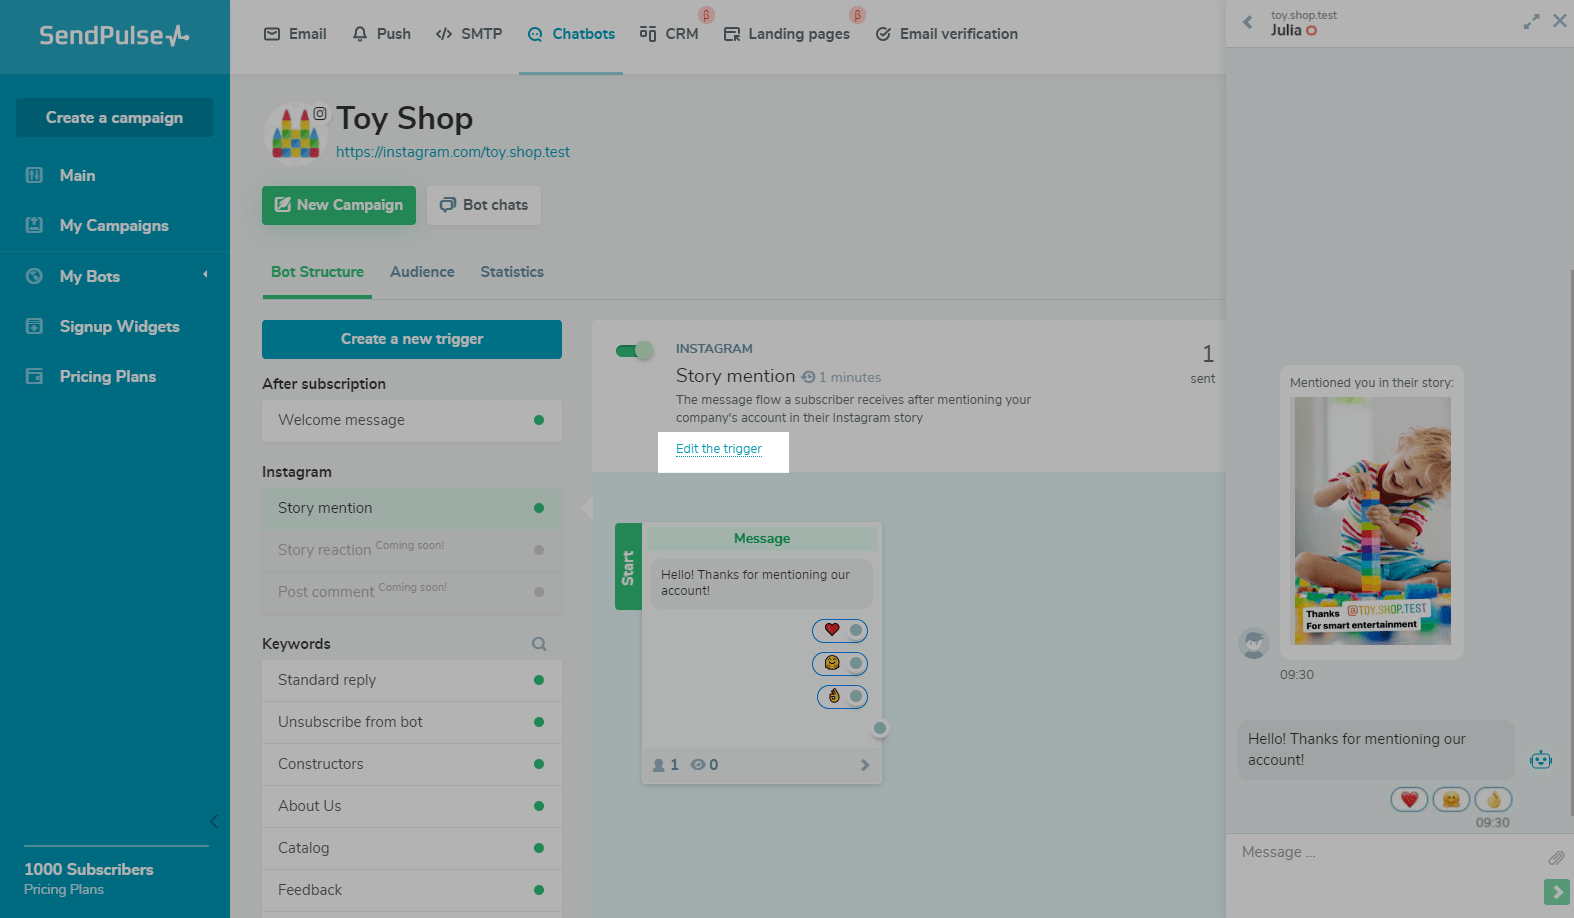
Story Mention
The flow starts when users mention the business account linked to your chatbot in their Instagram story.
For the flow to start, the user account who mentions your account must be public, and their story must be open to everyone.
With this trigger, you can quickly respond to all mentions of your service, building communication with your customers.
We recommend you personalize the content of the message depending on your business niche to send users relevant information.
Users who mention you in their stories become your chatbot subscriber.
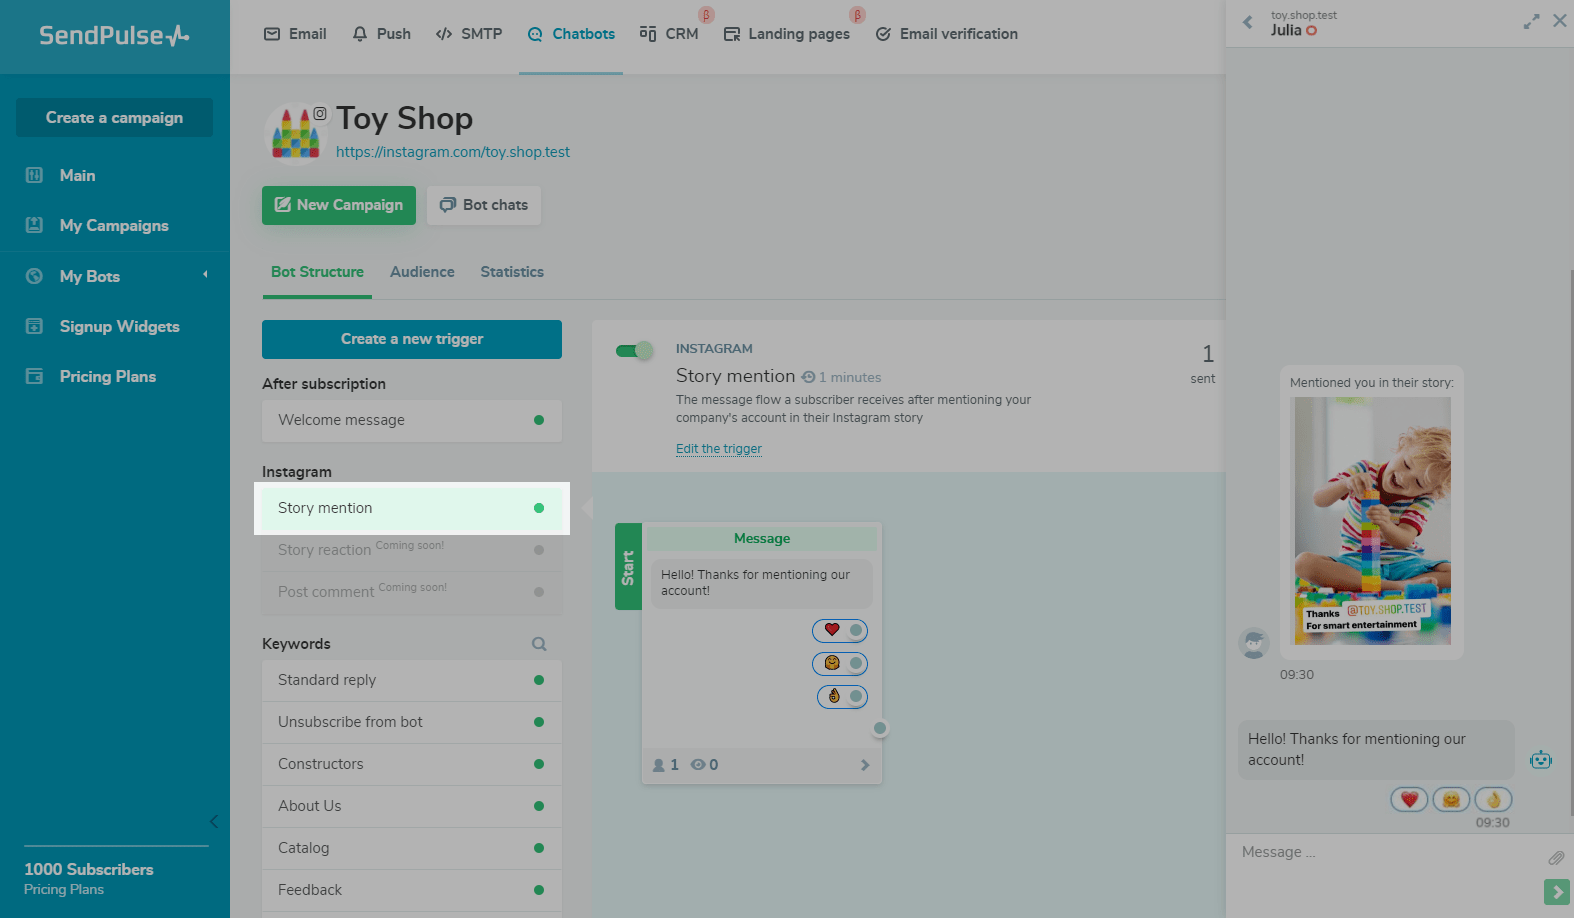
You can set up a cool-down interval for launching a flow between 1 minute and 24 hours — so your bot won’t launch a second time within the specified interval. To set the interval, click Edit Trigger and select a time.
Comment on Your Post
The flow starts when a user leaves a comment on your Instagram post.
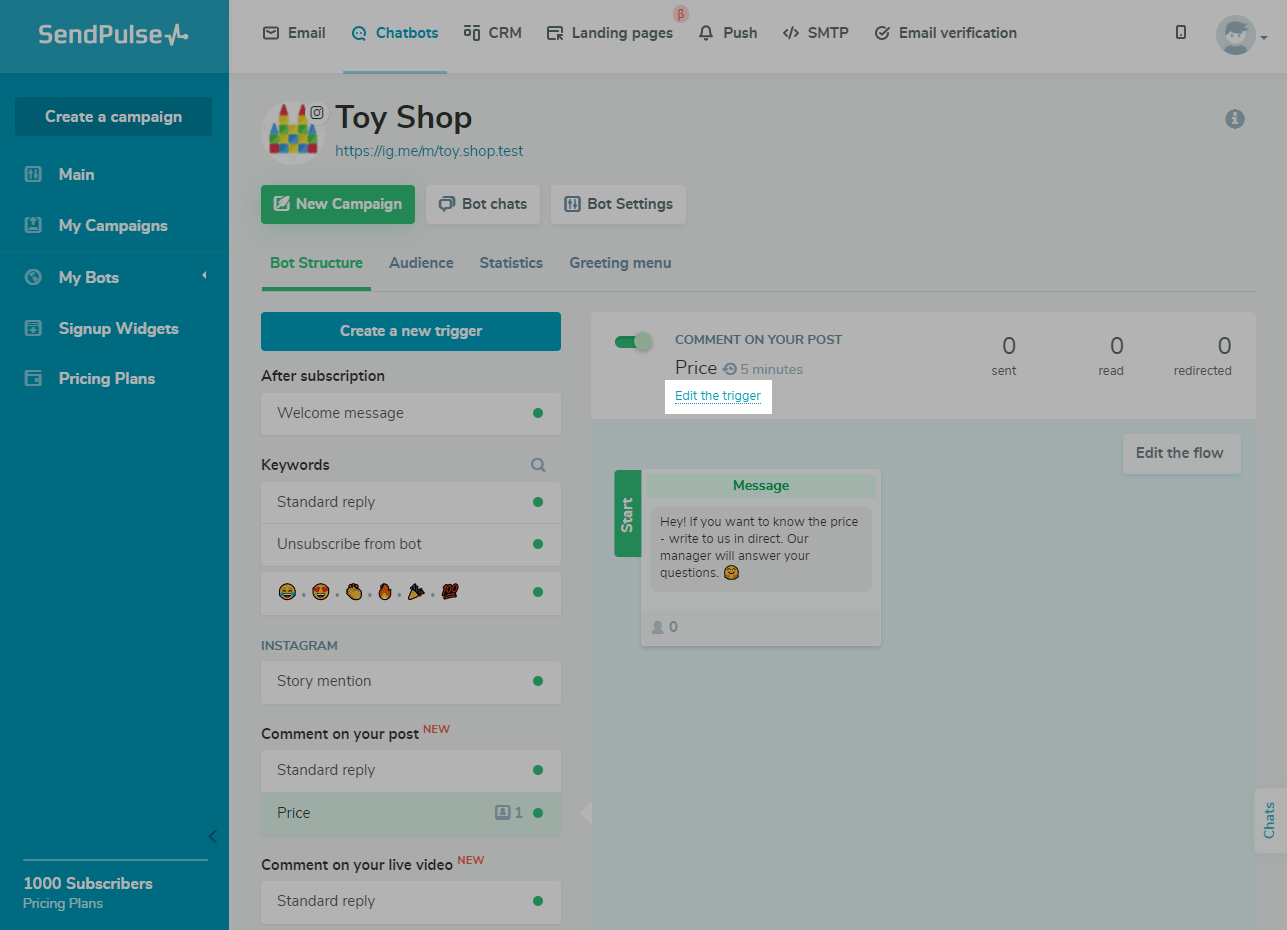
Such a flow can be used to answer frequently asked questions from users about your current event. For example, questions about the price, delivery, registration, or whether a product is in stock.
We recommend you personalize the content of the message depending on the context of the post itself and your business niche to send users relevant information.
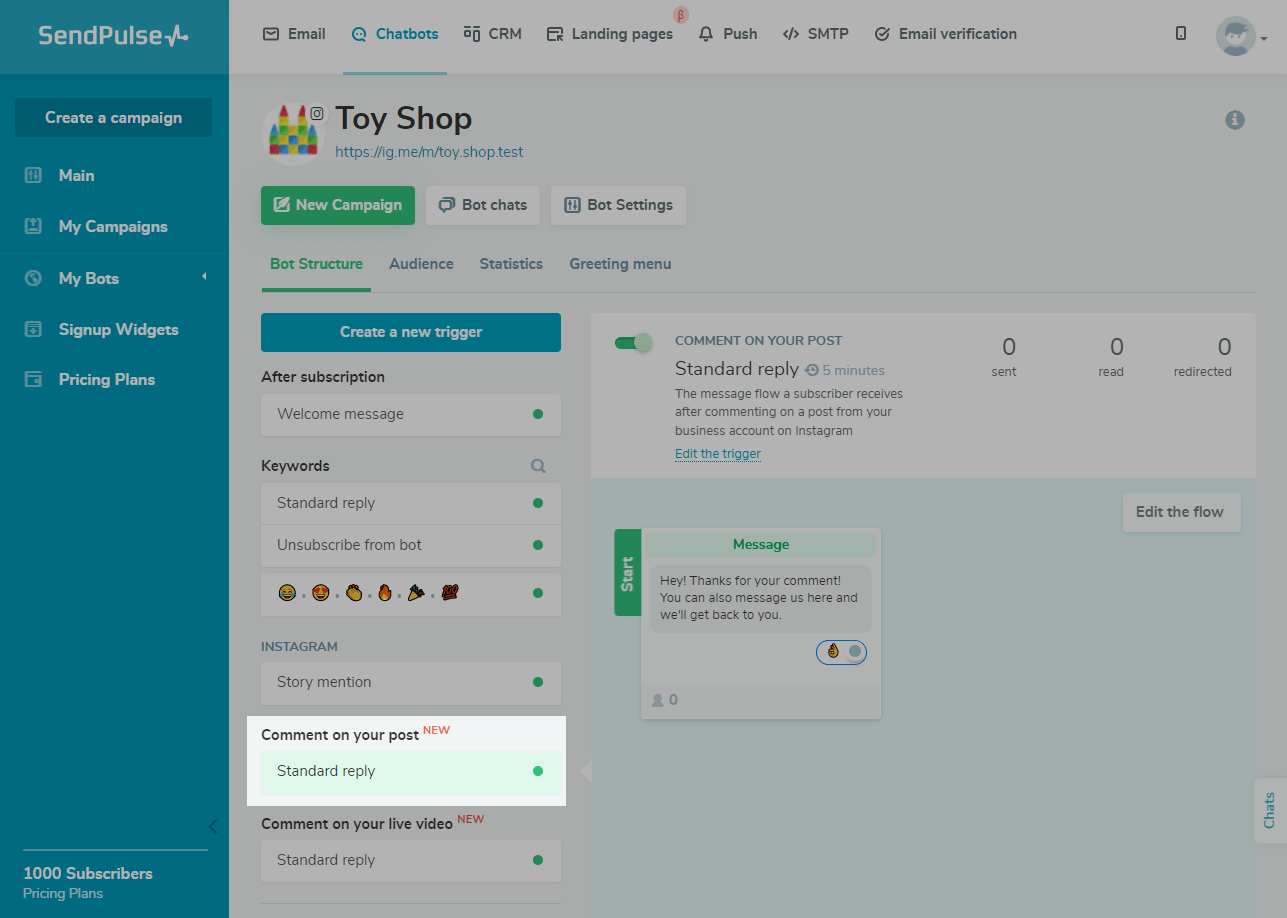
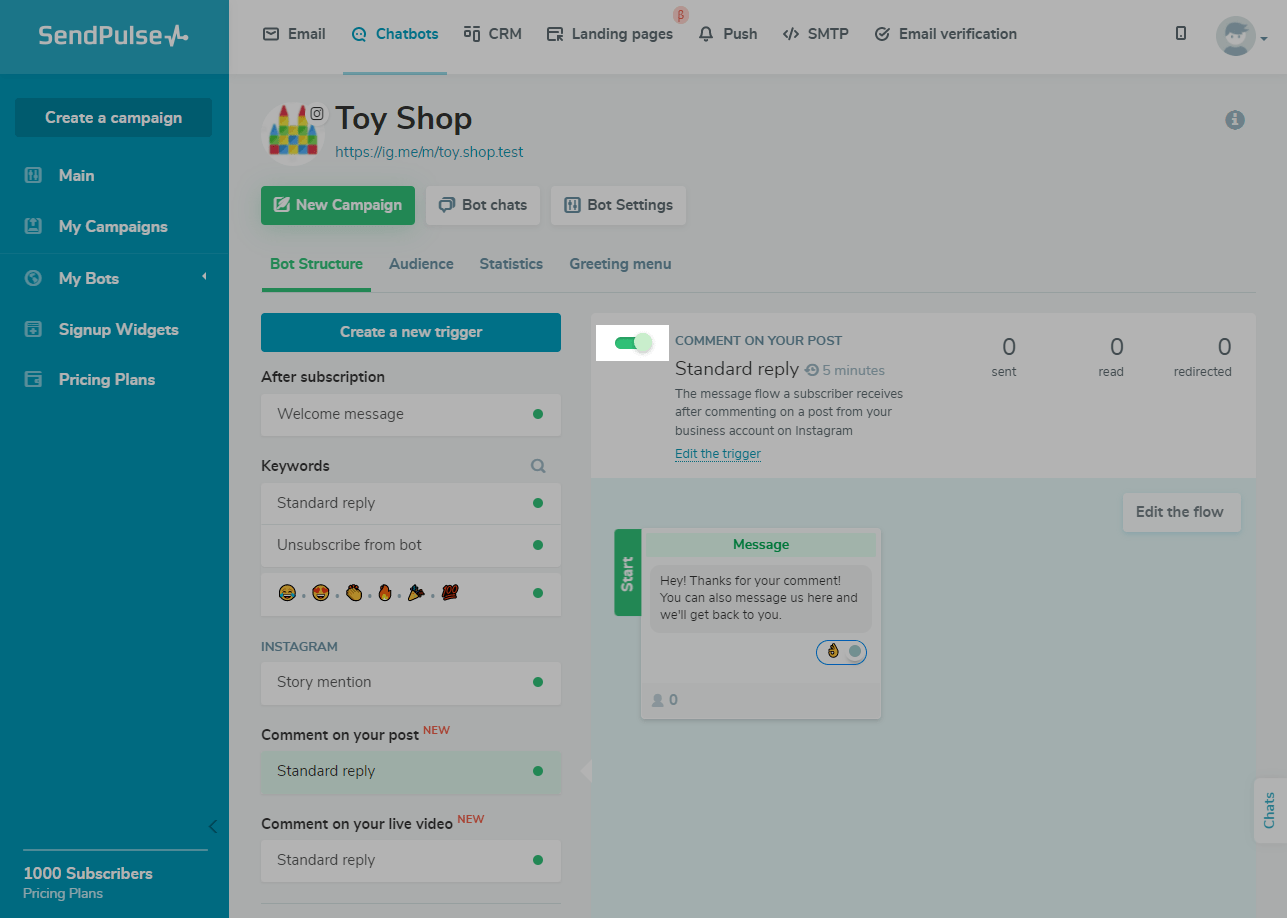
The trigger is disabled by default. To enable the trigger, toggle the switch to the active position.
You can also create and configure your own trigger to launch the flow only when a specific keyword or comment on a specific post is received.
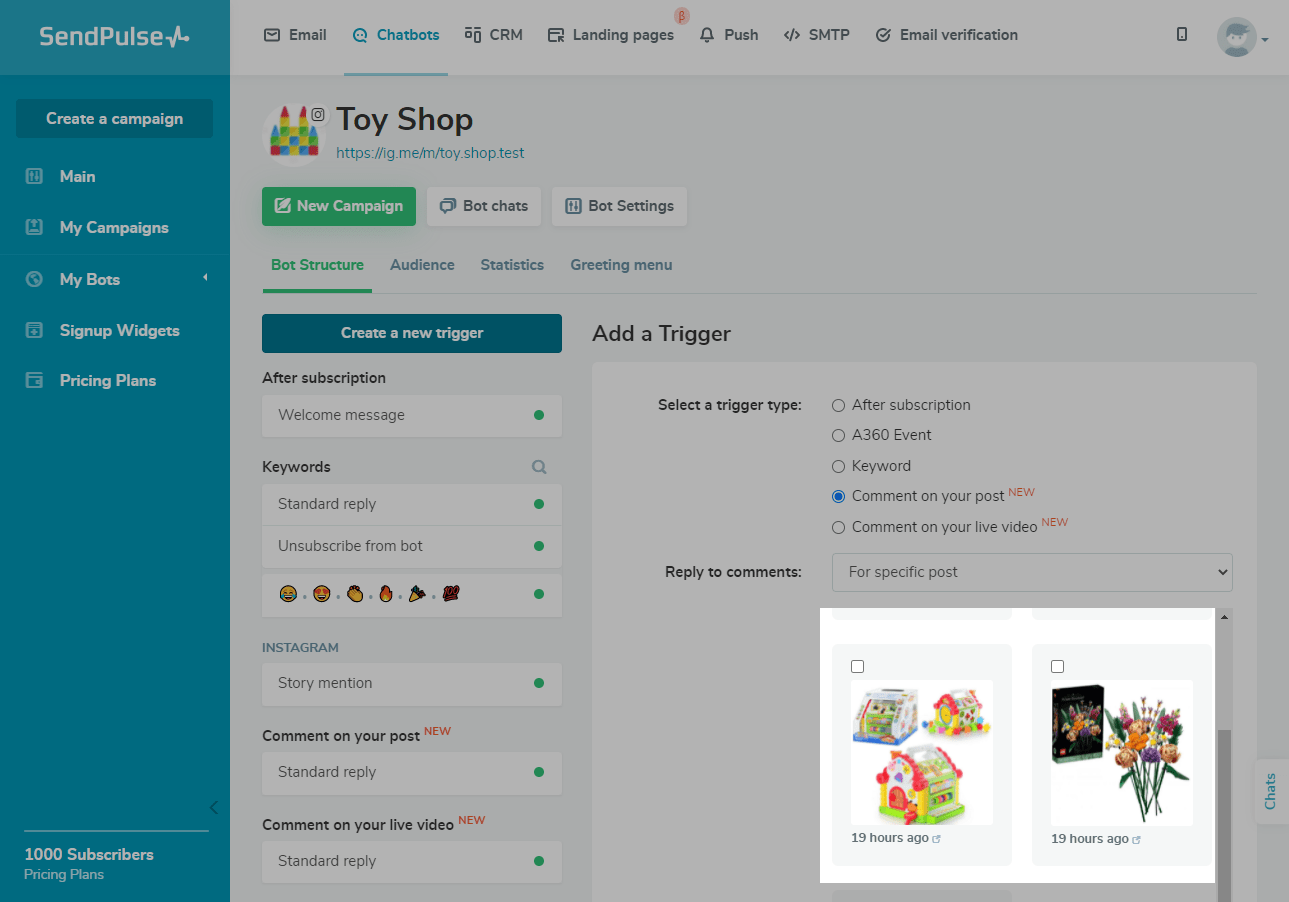
To do this, click Create a new trigger. Select "Comment on your post."
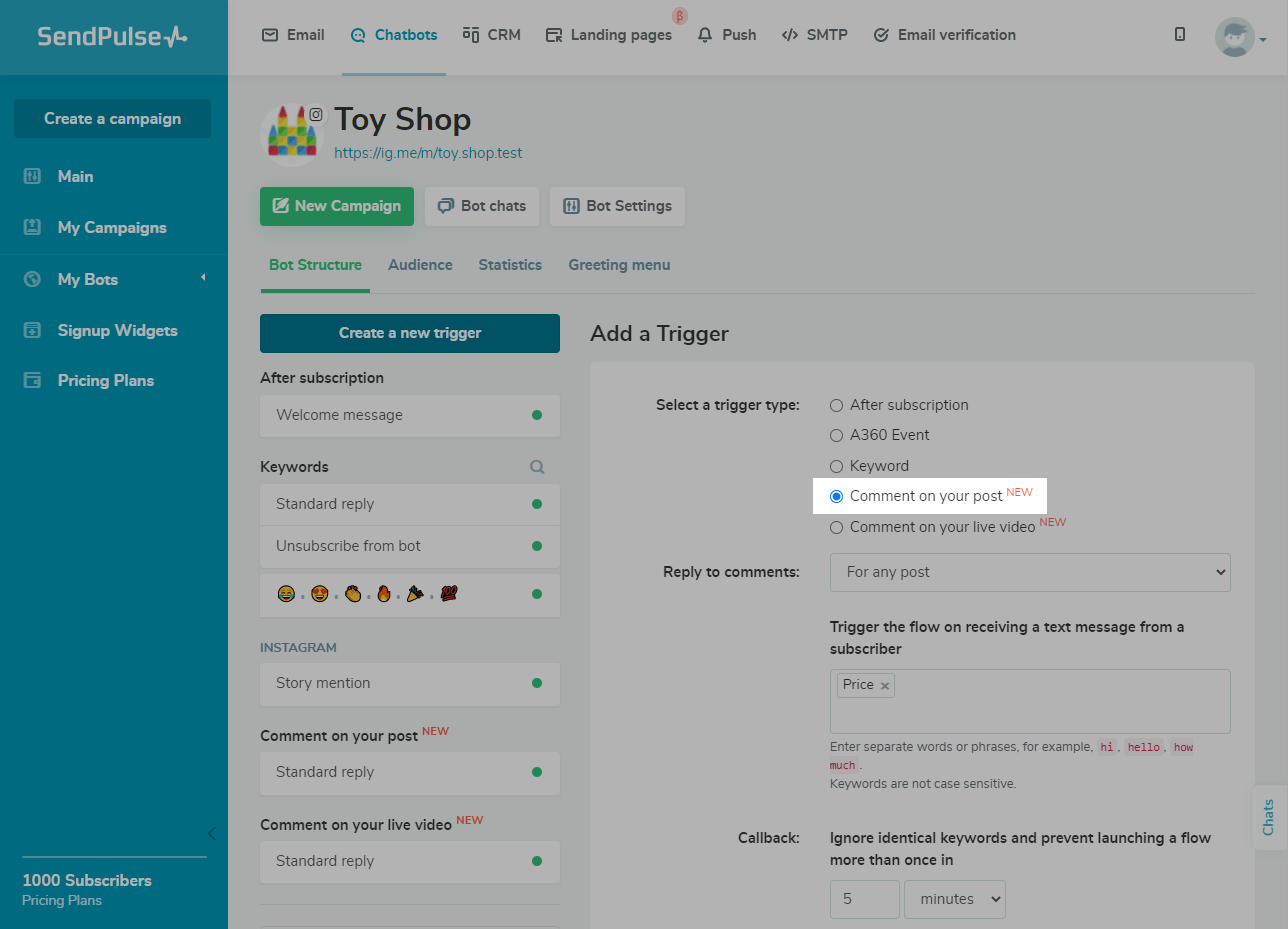
Next, choose whether to reply to comments on any post or a specific one.
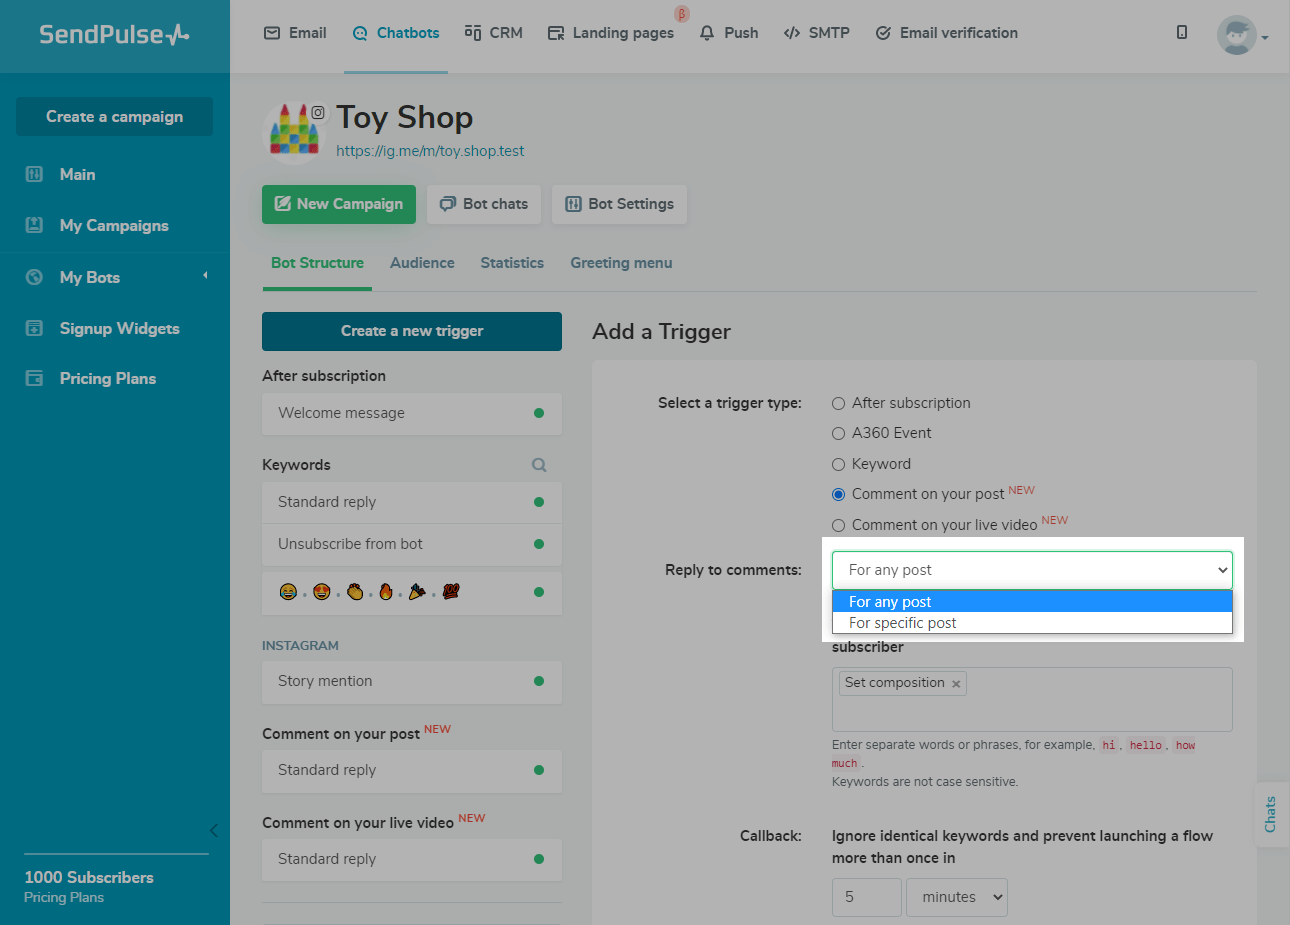
For the "For specific post" option, select a post from the list.
Write from one to several keywords that will start the flow.
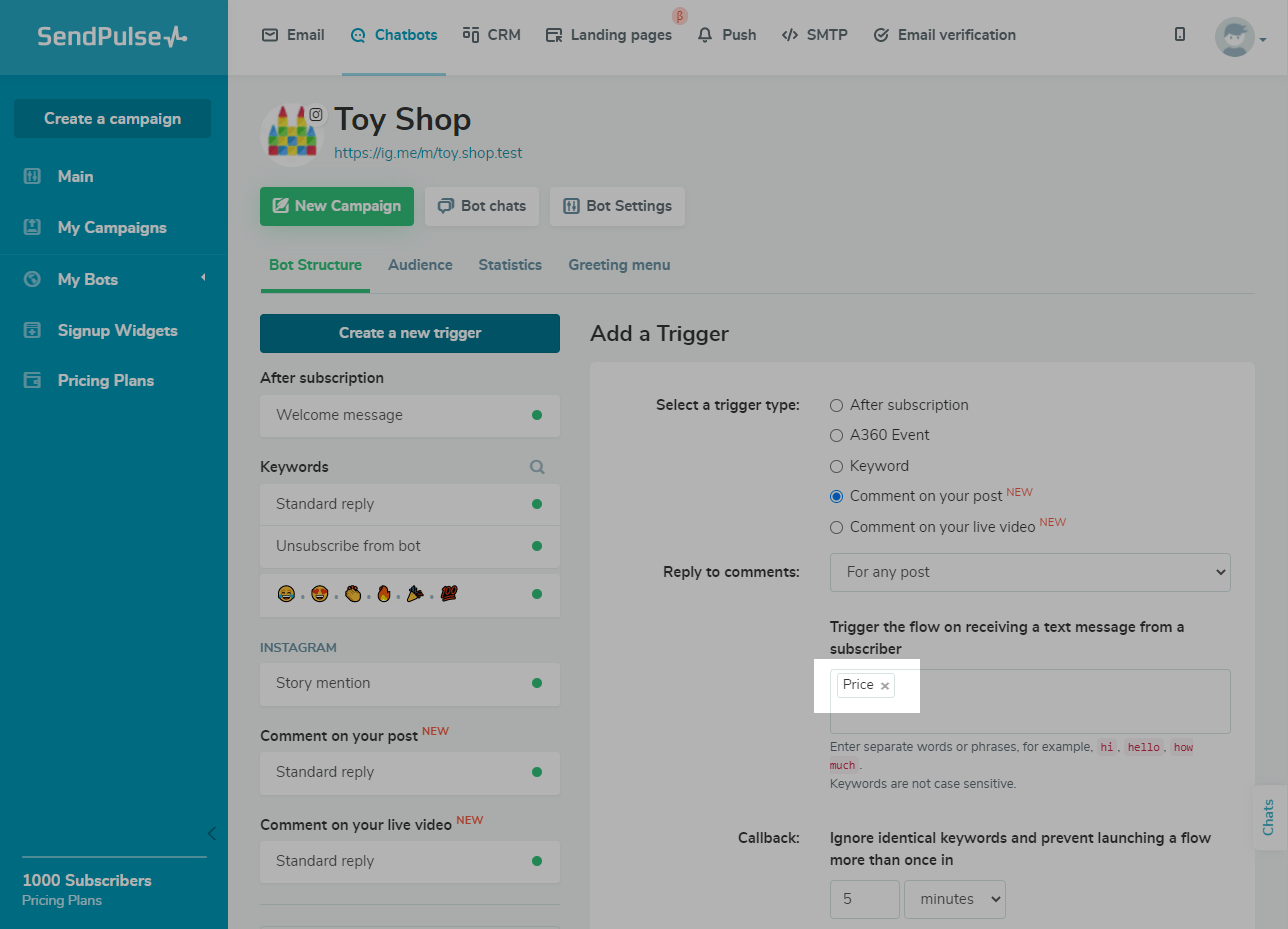
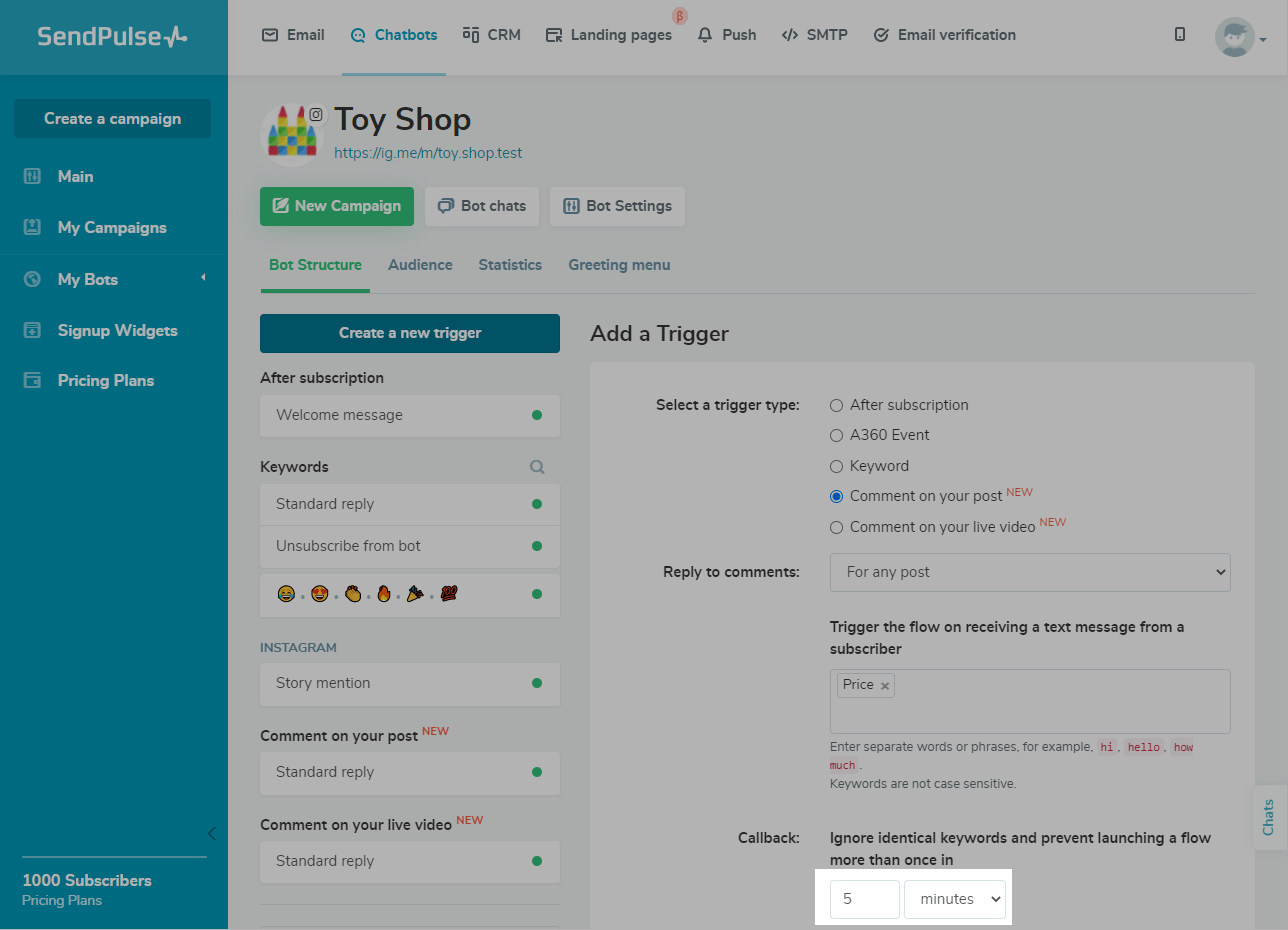
You can also set your callback interval from 1 minute to 24 hours — the flow will not restart when the same keyword is entered.
Click Add.
To change your trigger settings, for example, to select a new post, add a keyword, or set a callback interval, click "Edit the trigger."
Please note that after a new user leaves a comment on your post, they will be added to the list of your chatbot subscribers, but you will not be able to send them a campaign or a message. However, after this user contacts you via the chatbot, you can send them a campaign or a message.
Comment on Your Live Video
The flow starts when a viewer posts a comment during your Instagram live video stream.
Such a flow can be used to answer frequently asked questions from users about your current event. For example, questions about the price or whether a product is in stock.
We recommend you personalize the content of the message depending on your business niche to send users relevant information.
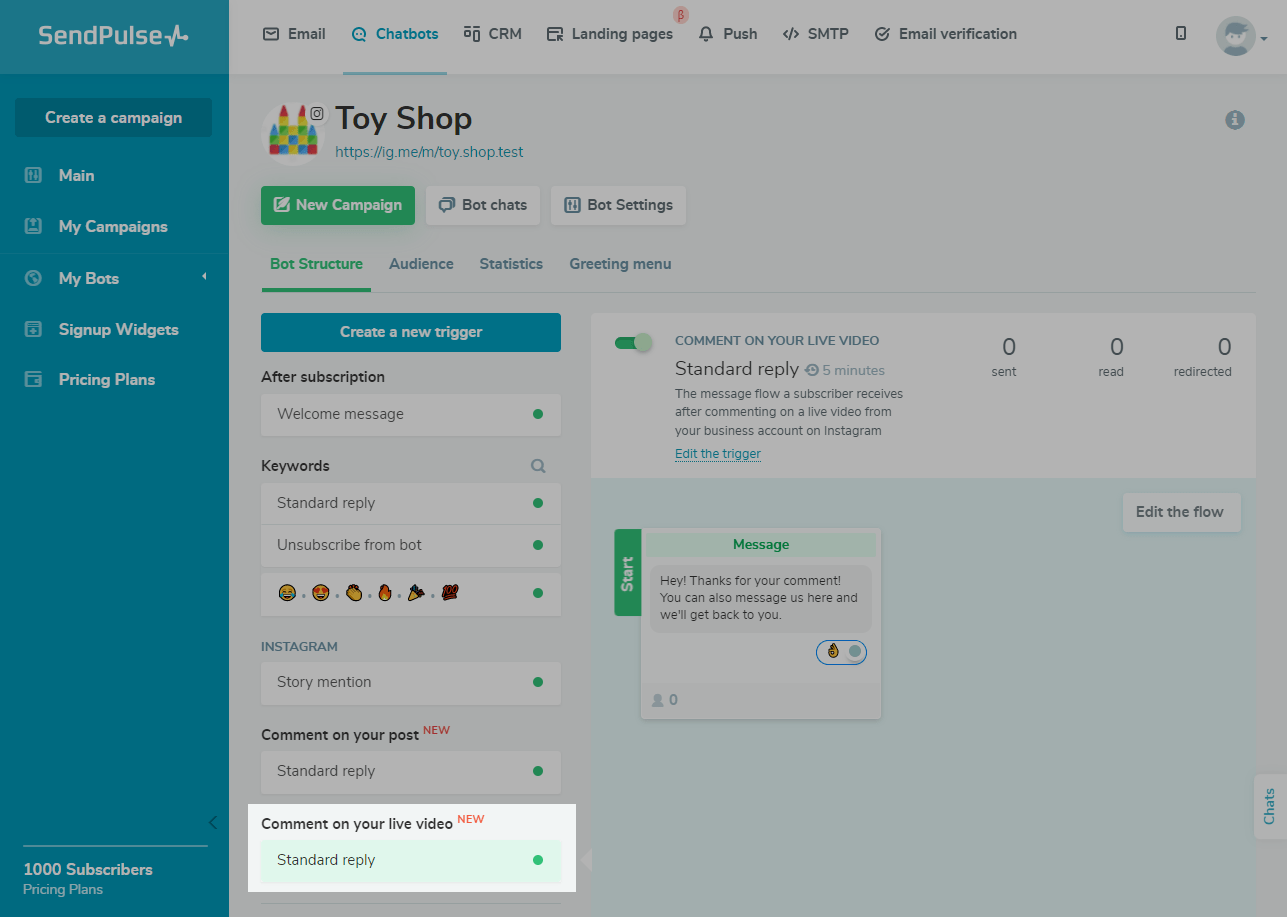
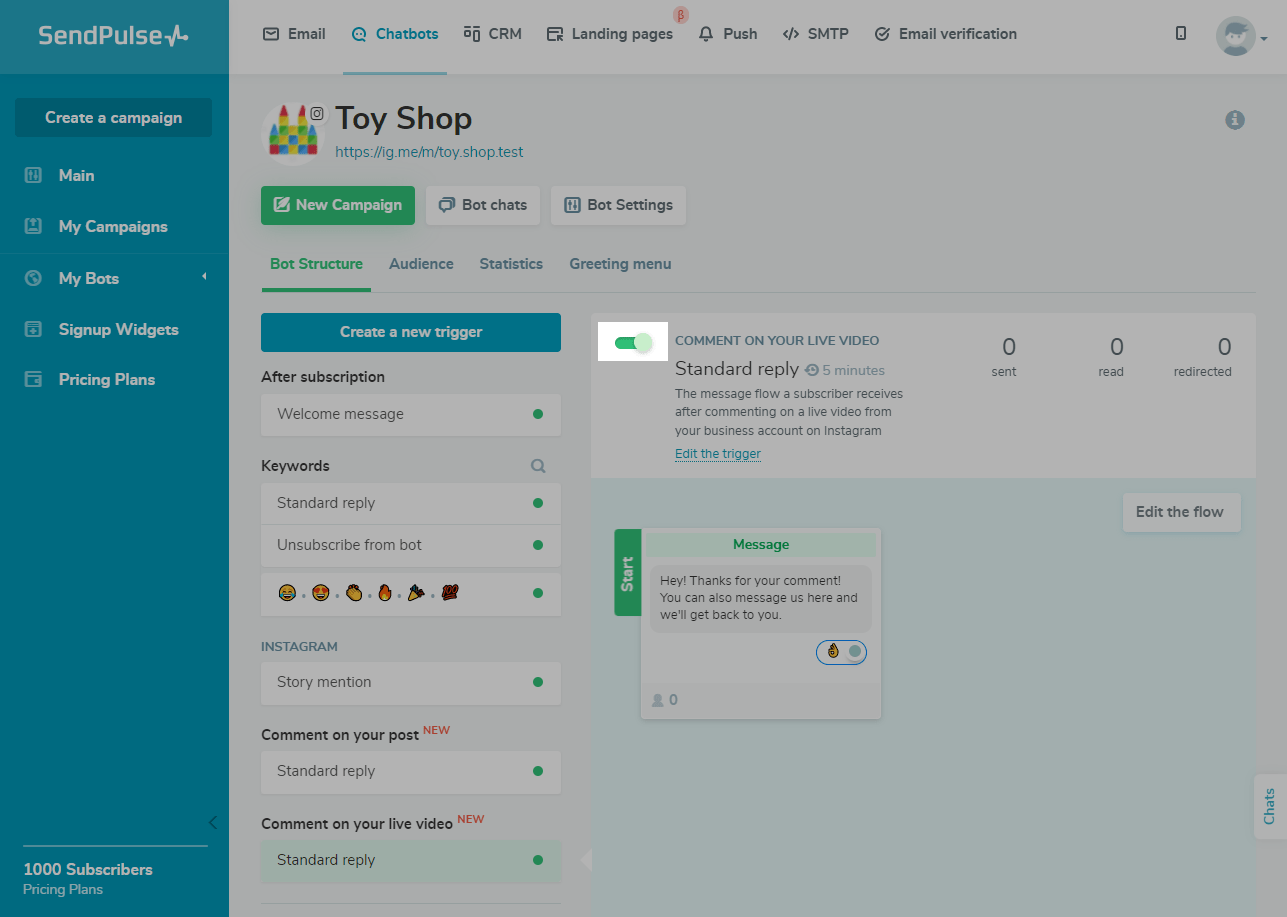
The trigger is disabled by default. To enable the trigger, toggle the switch to the active position.
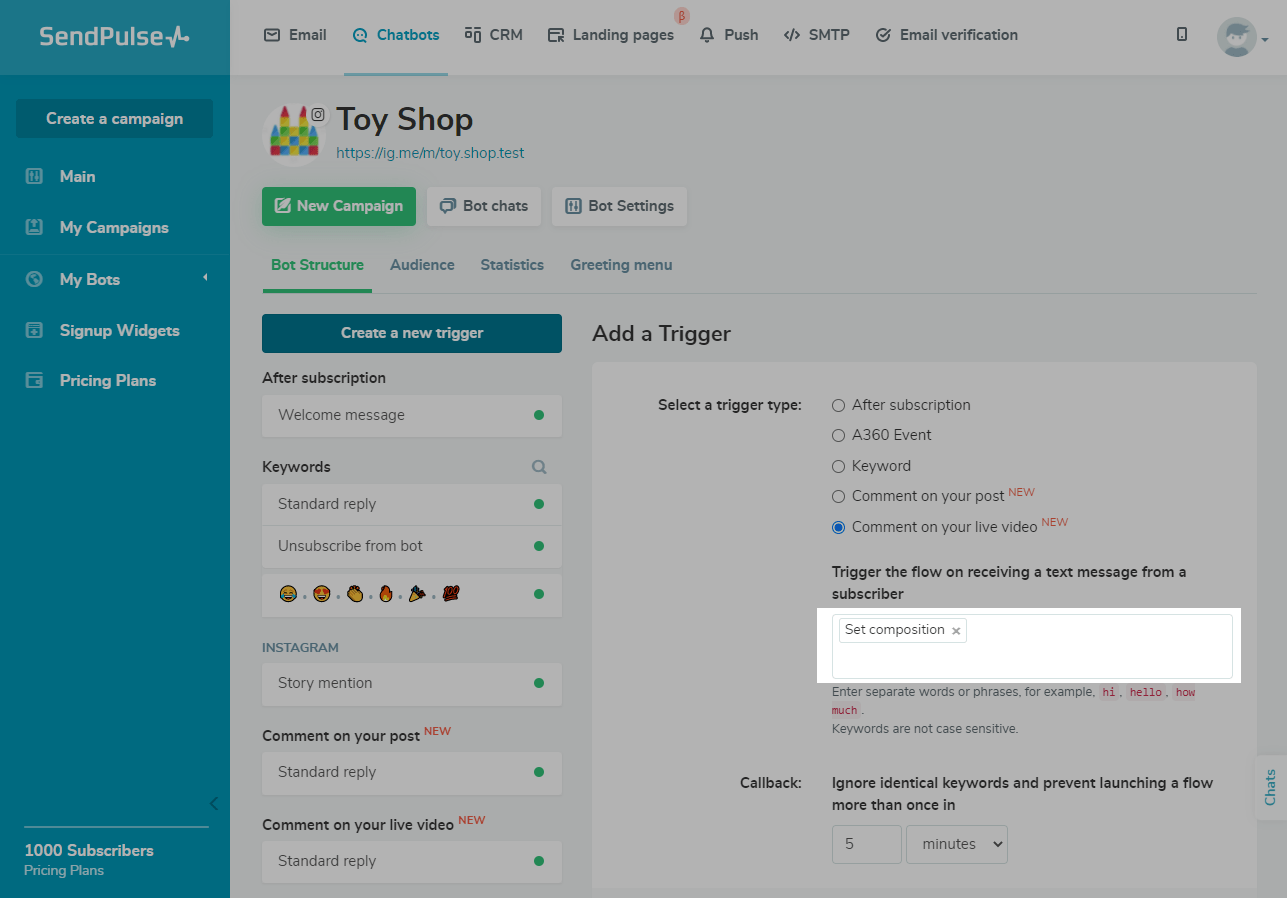
You can also create and configure your own trigger to launch the flow only when a specific keyword or comment is received.
To do this, click Create a new trigger. Select "Comment on your live video."
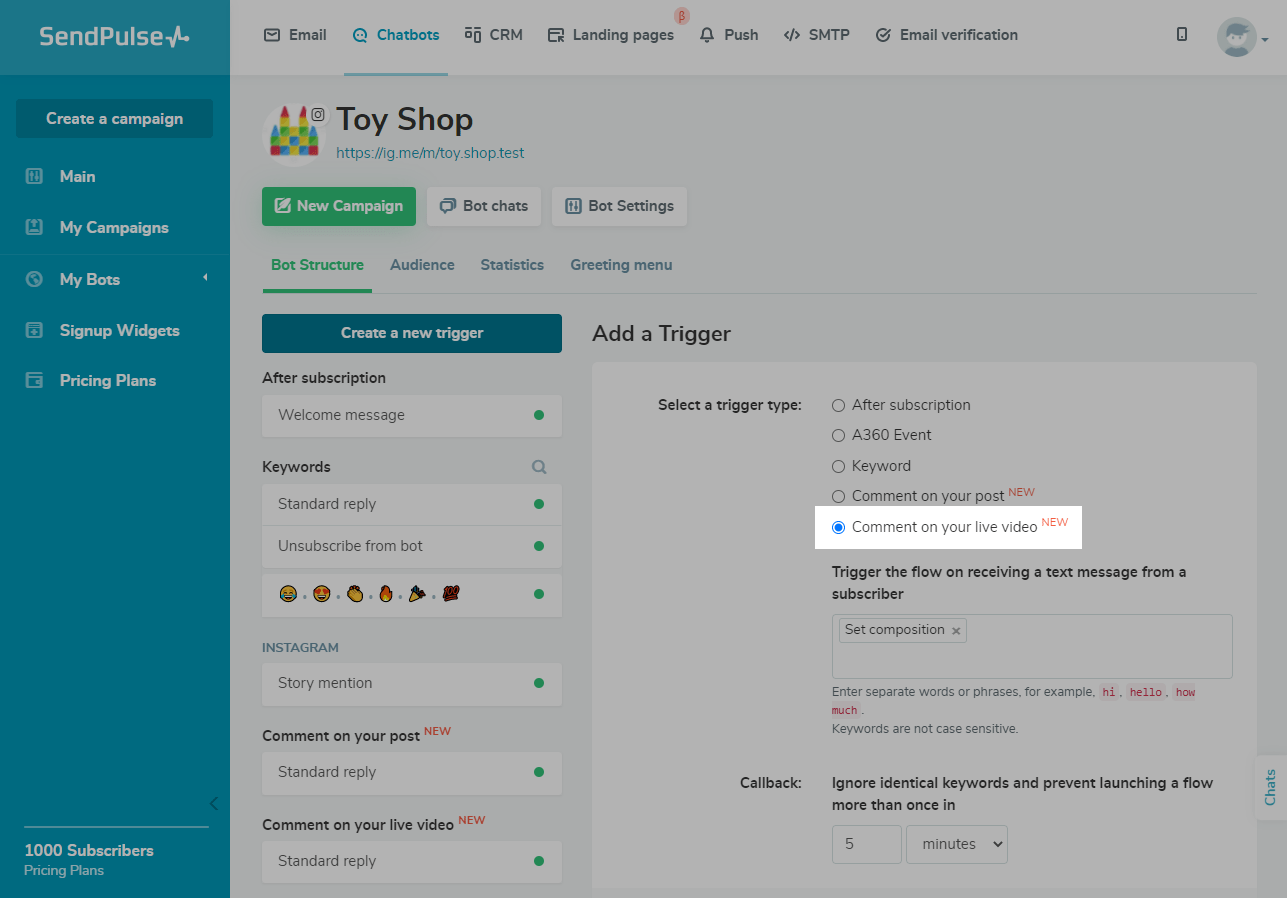
Write from one to several keywords that will start the flow.
You can also set the callback interval from 1 minute to 24 hours — the flow will not restart when the same keyword is entered.

Click Add.
You can also change your trigger settings: add a keyword or set a callback interval. To do this, click "Edit the trigger."

Please note that after a new user leaves a comment on your live video, they will be added to the list of your chatbot subscribers, but you will not be able to send them a campaign or a message. However, after this user contacts you via the chatbot, you can send them a campaign or a message.
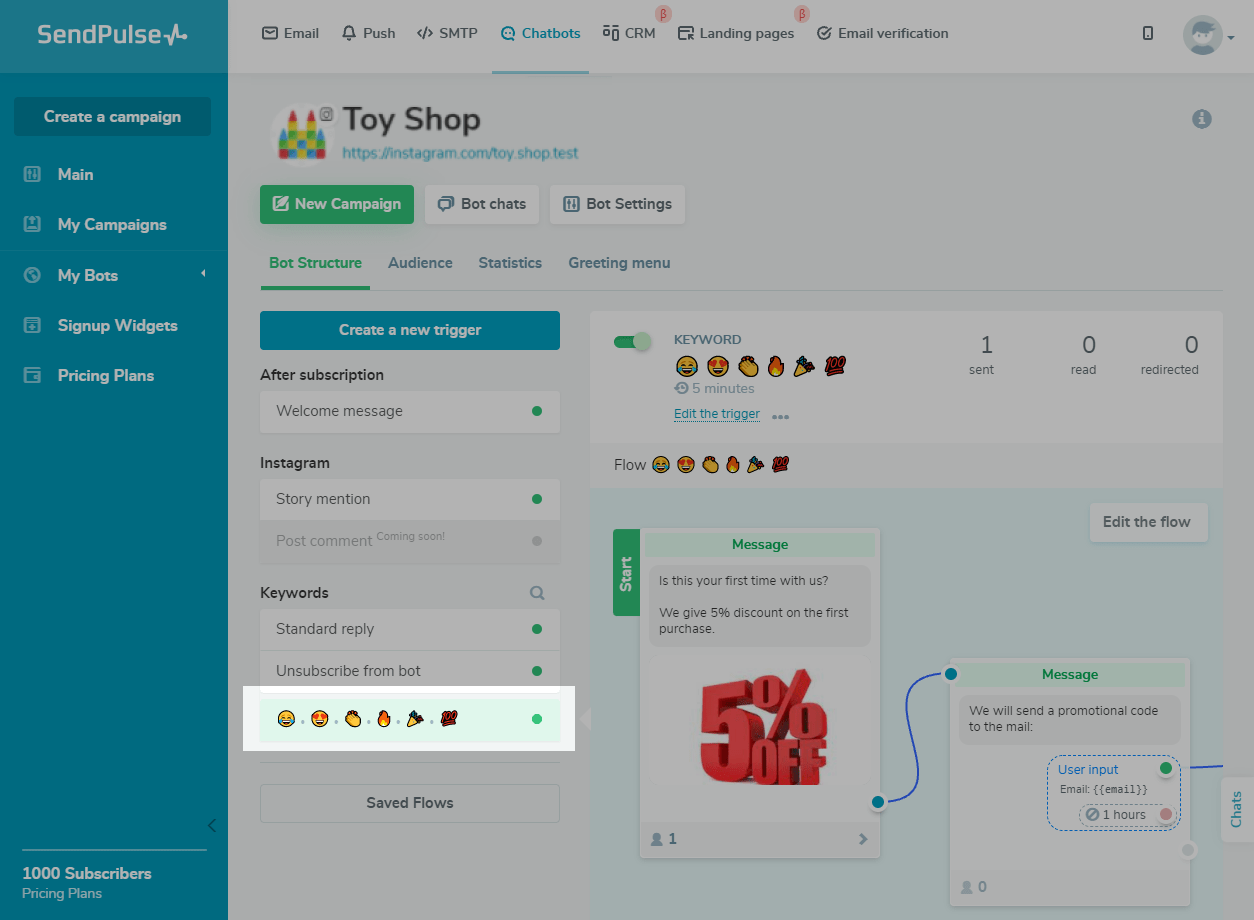
Emoji reactions
The flow starts after a user reacts to your company's Instagram story with an emoji.
With the help of such a flow, you can offer a client a discount, visit a store or a trial lesson, send the address of your location, ask a question, engage in a dialogue, and send a link to helpful materials.
We recommend you change the content of the message depending on the context of the story itself and the niche of your business to send users relevant information.
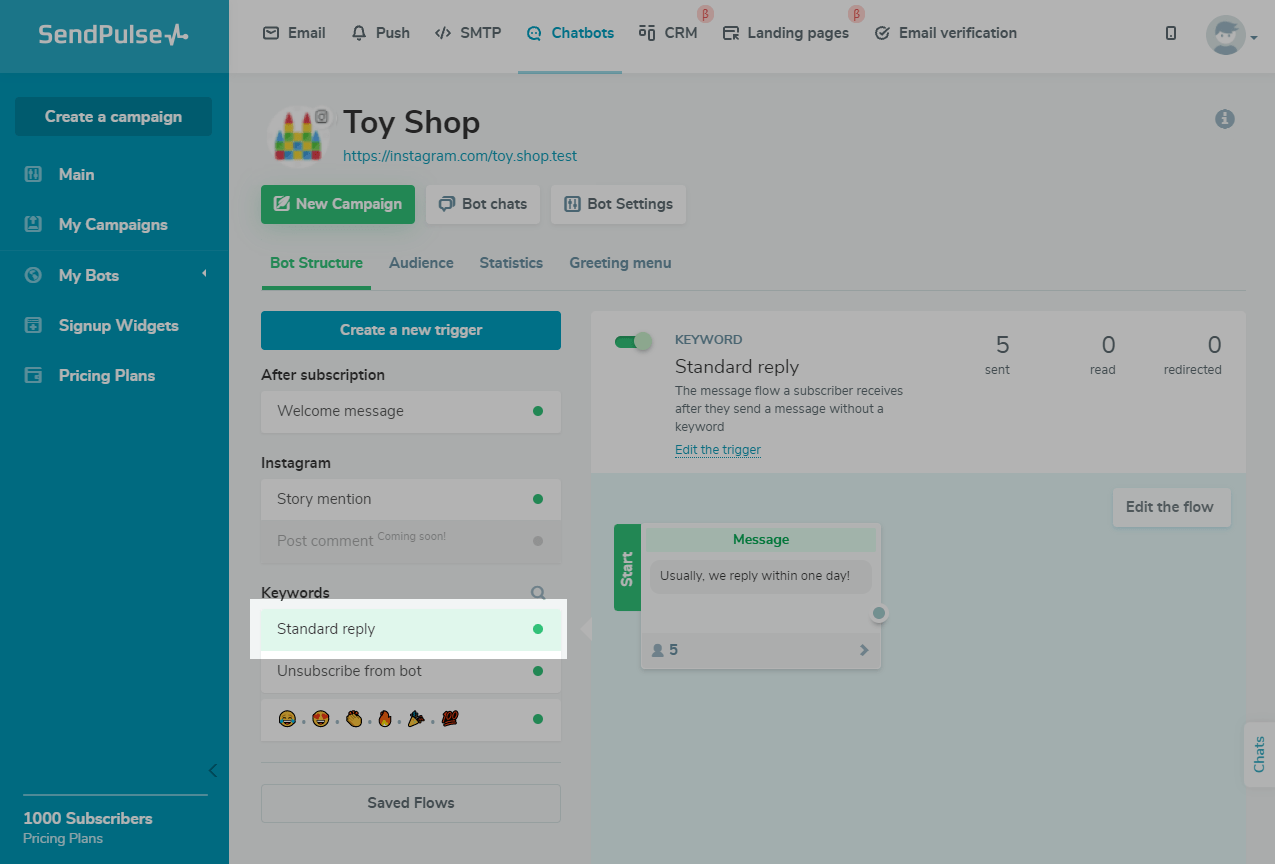
Standard Reply
The flow will launch in response to any user question that is outside your bot’s scenario, or by sending an image to a bot. You can add a message with information that a manager will contact them during business hours and reply to the user.
You can set up a cool-down interval for launching a flow between 1 minute and 24 hours — so your bot won’t launch a second time within the specified interval.
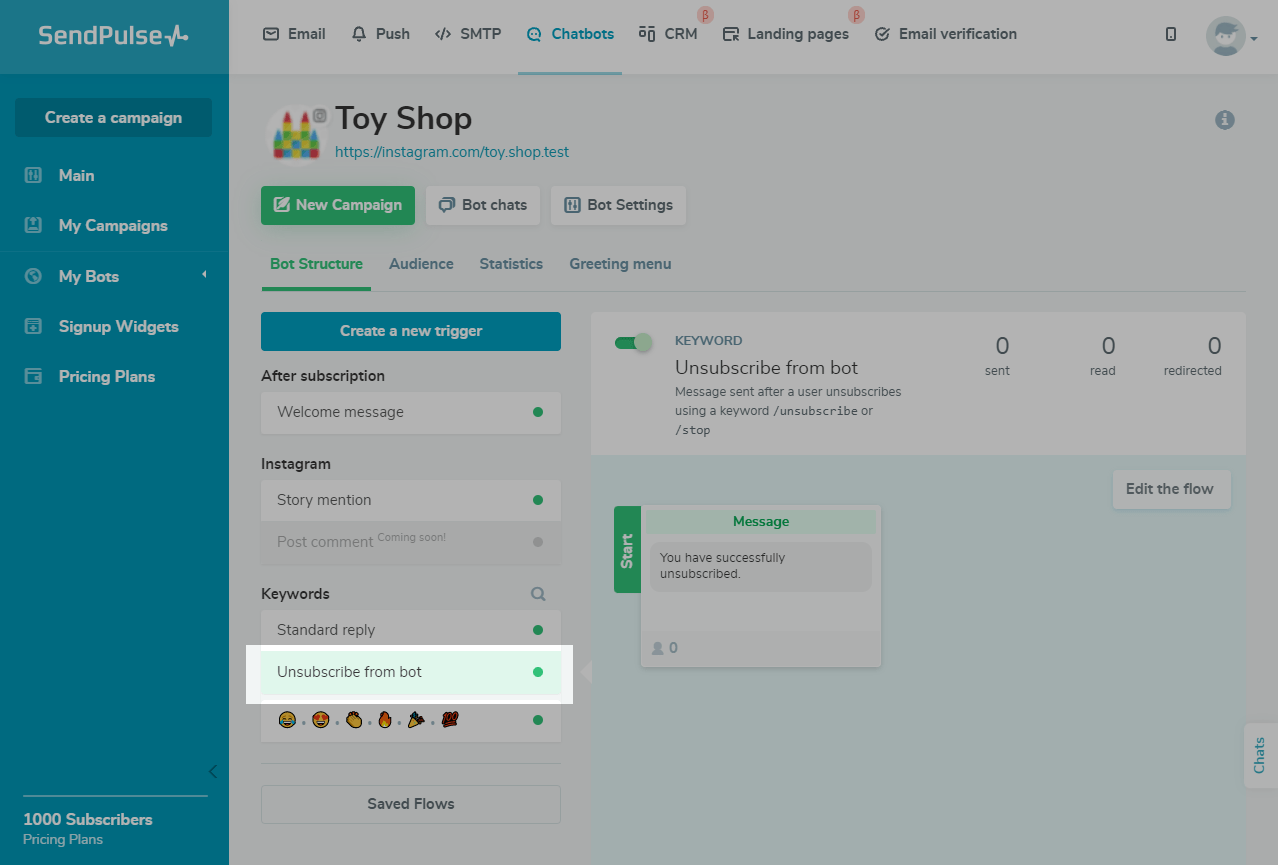
Unsubscription from Bot
This is a flow with one message element that will launch after a user unsubscribes using the /stop or /unsubscribe command.
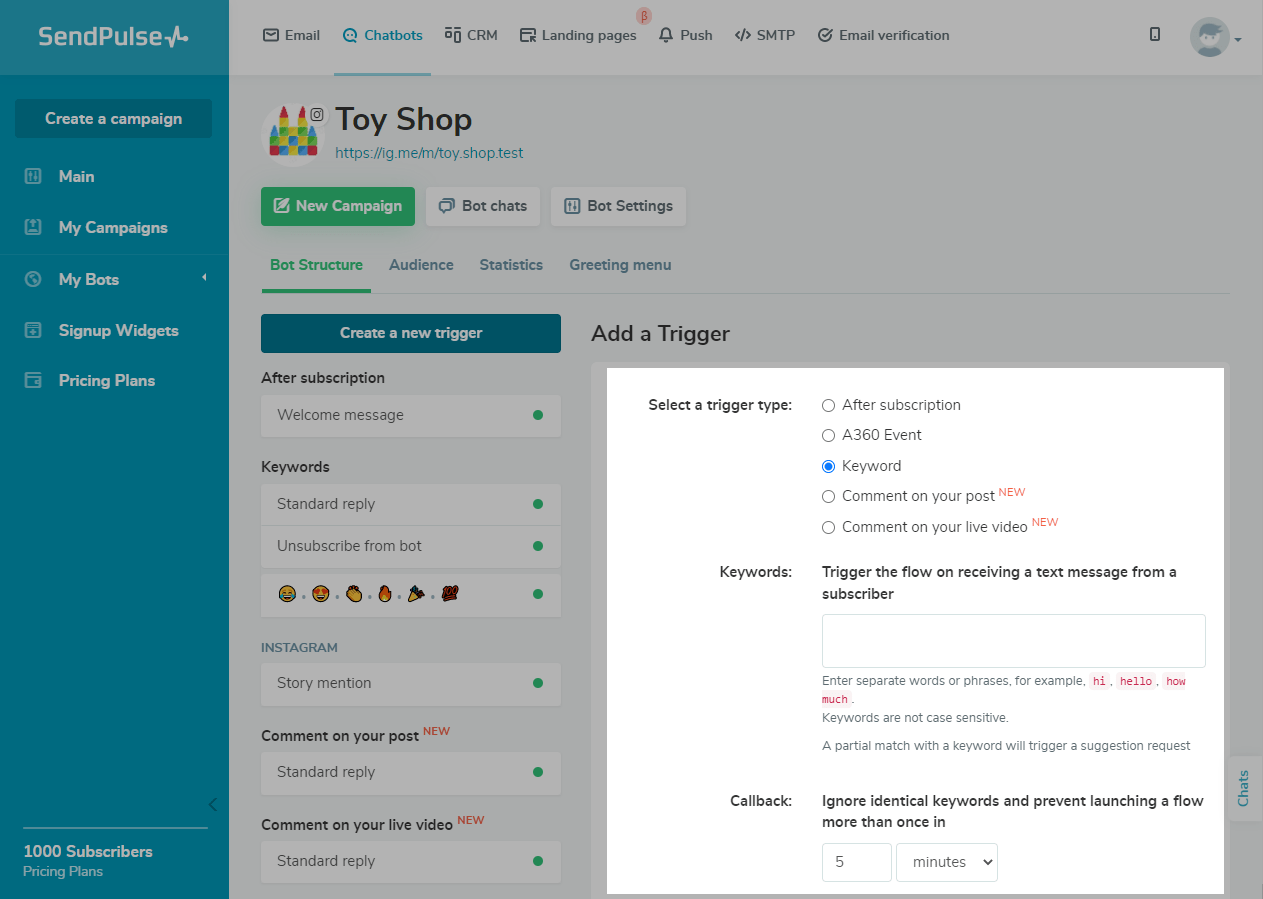
Trigger Flow
You can add keywords — triggers, that your bot will react to and launch your flow.
Click “Create a new trigger." Write your command using one or several words. For example, you can use the words “Order," “Tickets," “Price," or “Delivery."
If the user enters part of a keyword linked to your command, your bot will suggest prompts such as a button with the name of your trigger. When the user clicks the button, the flow will launch.
You can also restrict the callback for a specific period of time.
Learn more: How to Manage Chatbot Flow Triggers.
If the user enters part of a keyword linked to your command, your bot will suggest prompts such as a button with the name of your trigger. When the user clicks the button, the flow will launch.
To disable this feature, go to your chatbot settings and select the "Disable bot suggestions when entered messages do not match a keyword" option.
After creating the trigger, click the Create flow button and start editing it.
Building Your Flow
It’s important to think about the architecture and logic structure of your bot carefully. A well-designed bot will let users easily get a reply to their questions or place an order successfully by providing the necessary information.
Formulate the bot’s tasks, divide its functions into sections, think of how you will connect the elements, and start creating your bot’s flow using our drag-and-drop builder. You can also use services like X-Mind, Miro, or Coggle to create a preliminary customer journey map.
Start
You can choose the first element that launches your flow: "Message," "Filter," "Randomizer," and "API Request."
For example, using the "Filter" and "API Request" elements, you can check the subscriber's data and personalize your communication by starting your flow only for those users who have or do not have the requested data or branch your flow and send different messages. Using the "Randomizer" element, you can diversify your chatbot's auto-replies or create an A/B test.
To make an element a start element, connect the desired element to the “Start.”
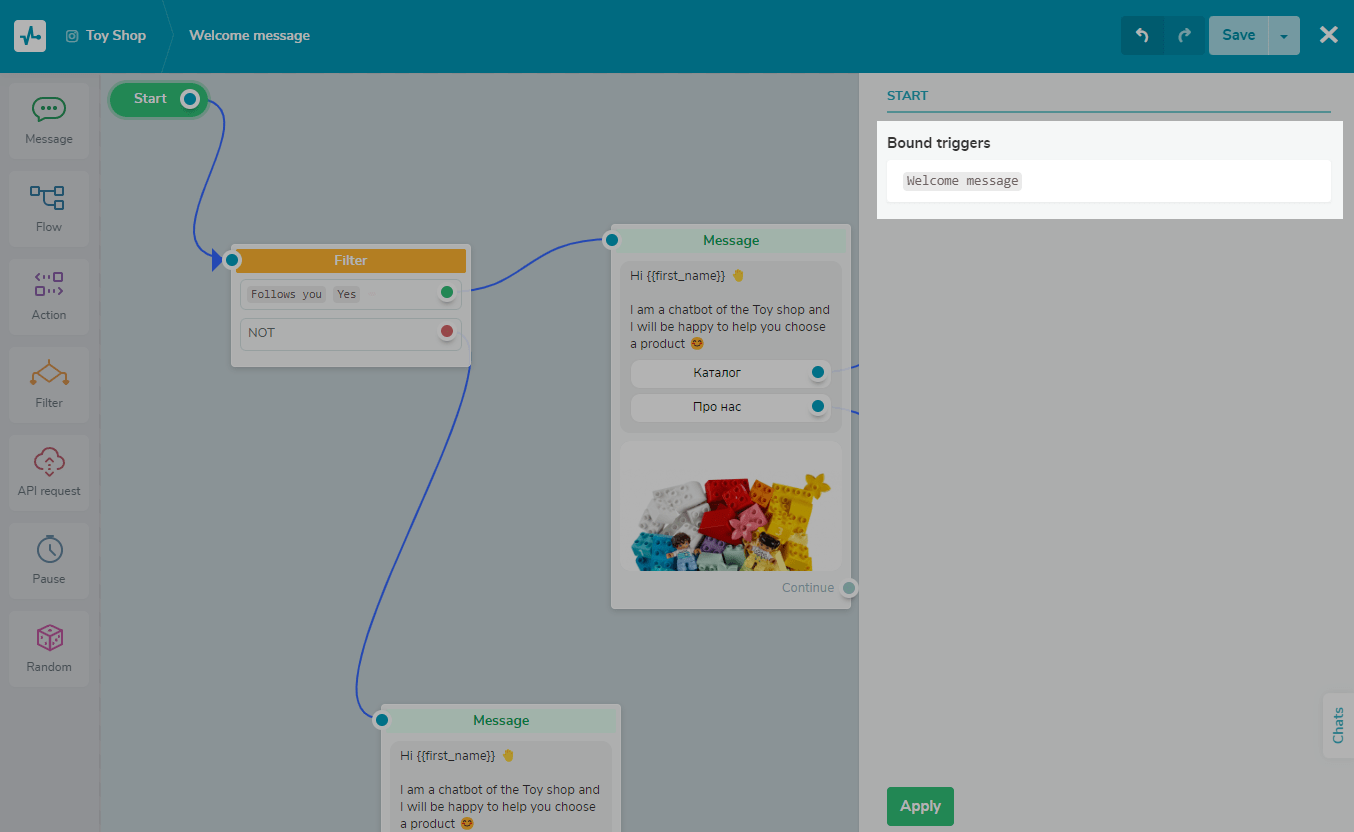
To see which trigger starts your flow, click on the "Start."
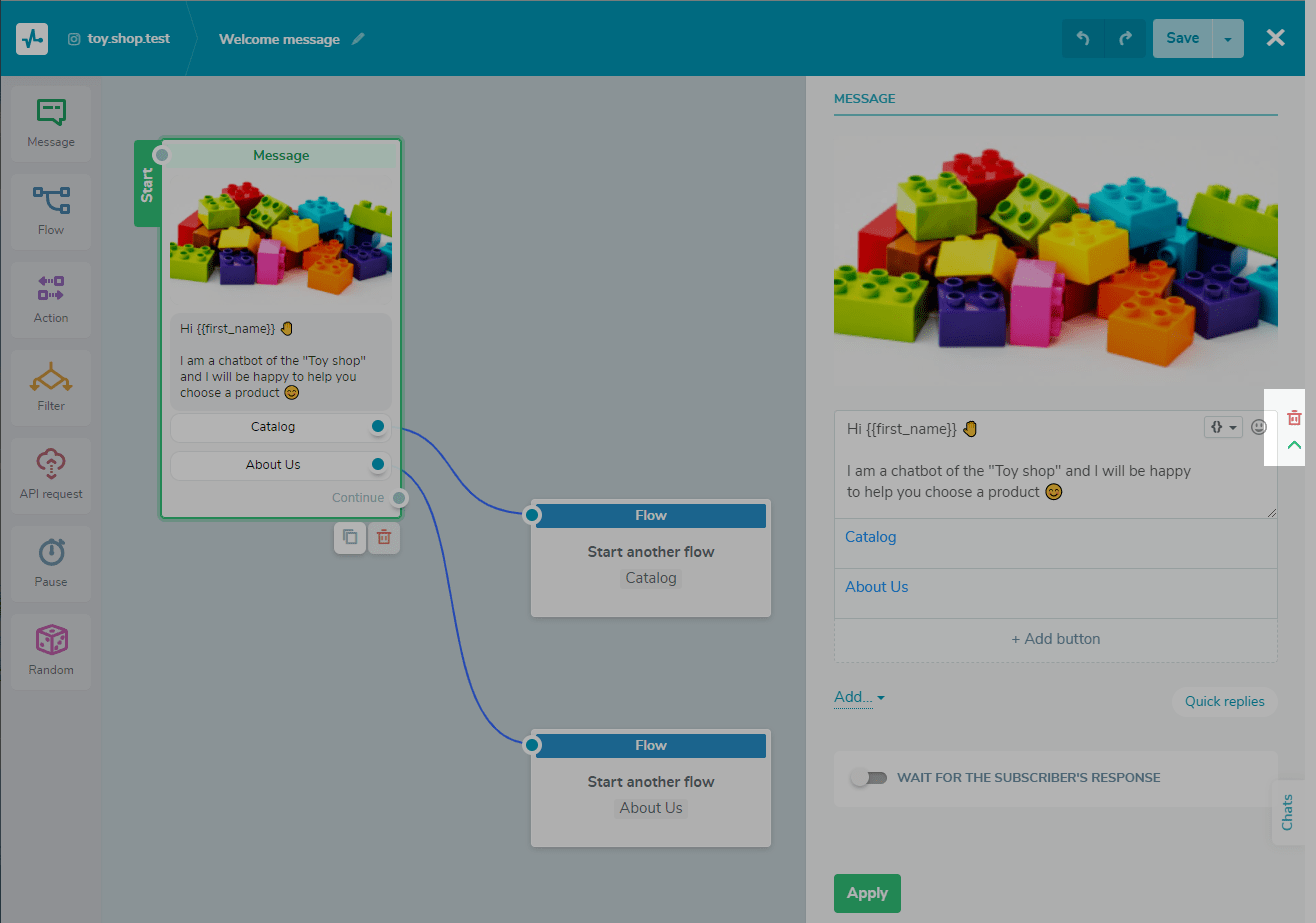
A "Message" Element
Using the "Message" element, you can create a message of any type and add various blocks to it: text, video, gallery, buttons, user data request, and so on.
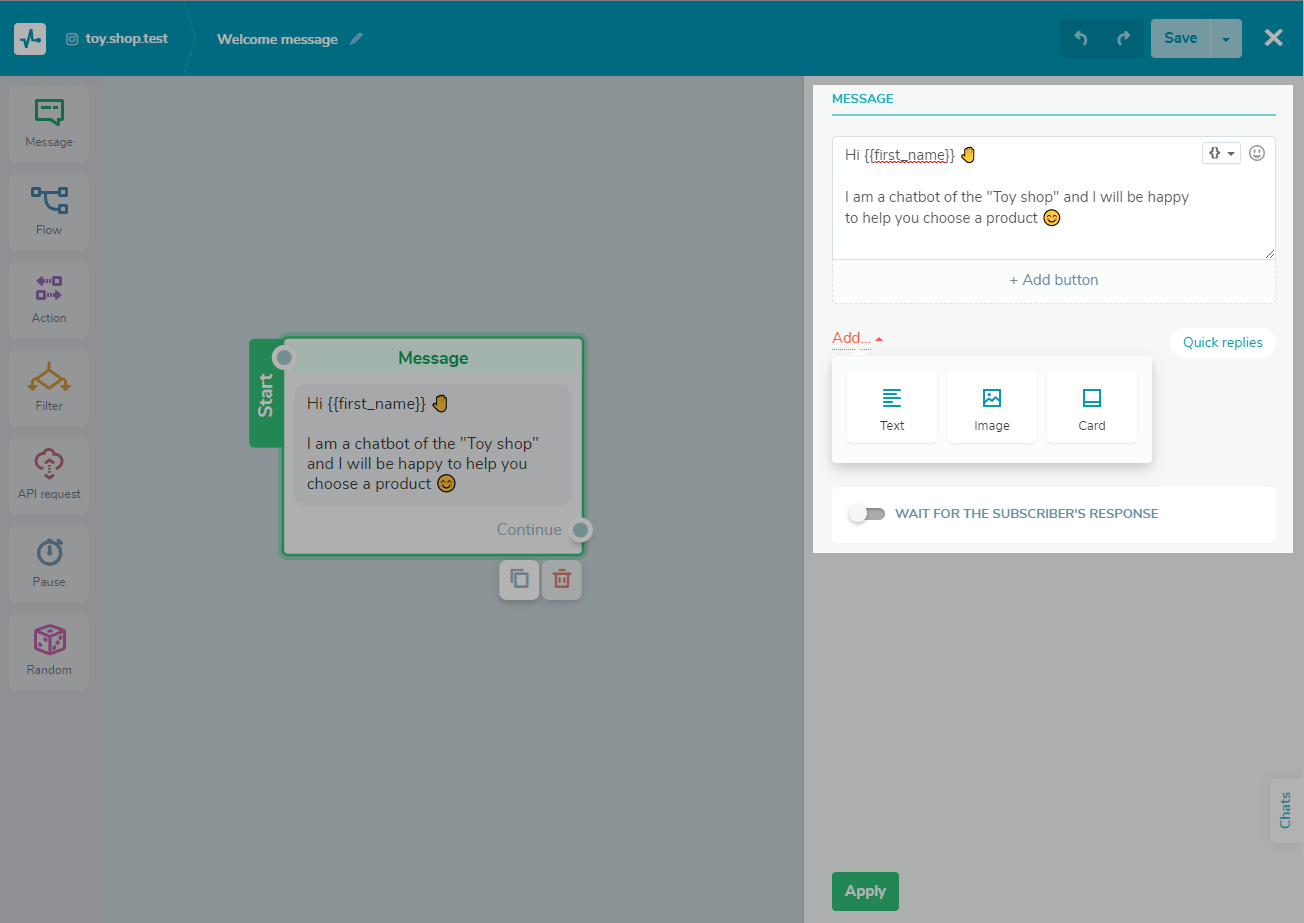
You can add the "Message" element to any part of your flow. For example, in the last element of your flow, you can thank your users, confirm their order, and send personalized information using variables, asking if the information is correct.
Text
Within the “Message" element, select the text element type, and add the text of your message. You can input up to 512 characters and insert emoji and variables to personalize your messages.
To add a variable click {} in the right corner of the text block and choose the variable you want to add from the drop-down menu. If you have a value for this variable in the user’s contact information, they will receive a message with the value filled in.
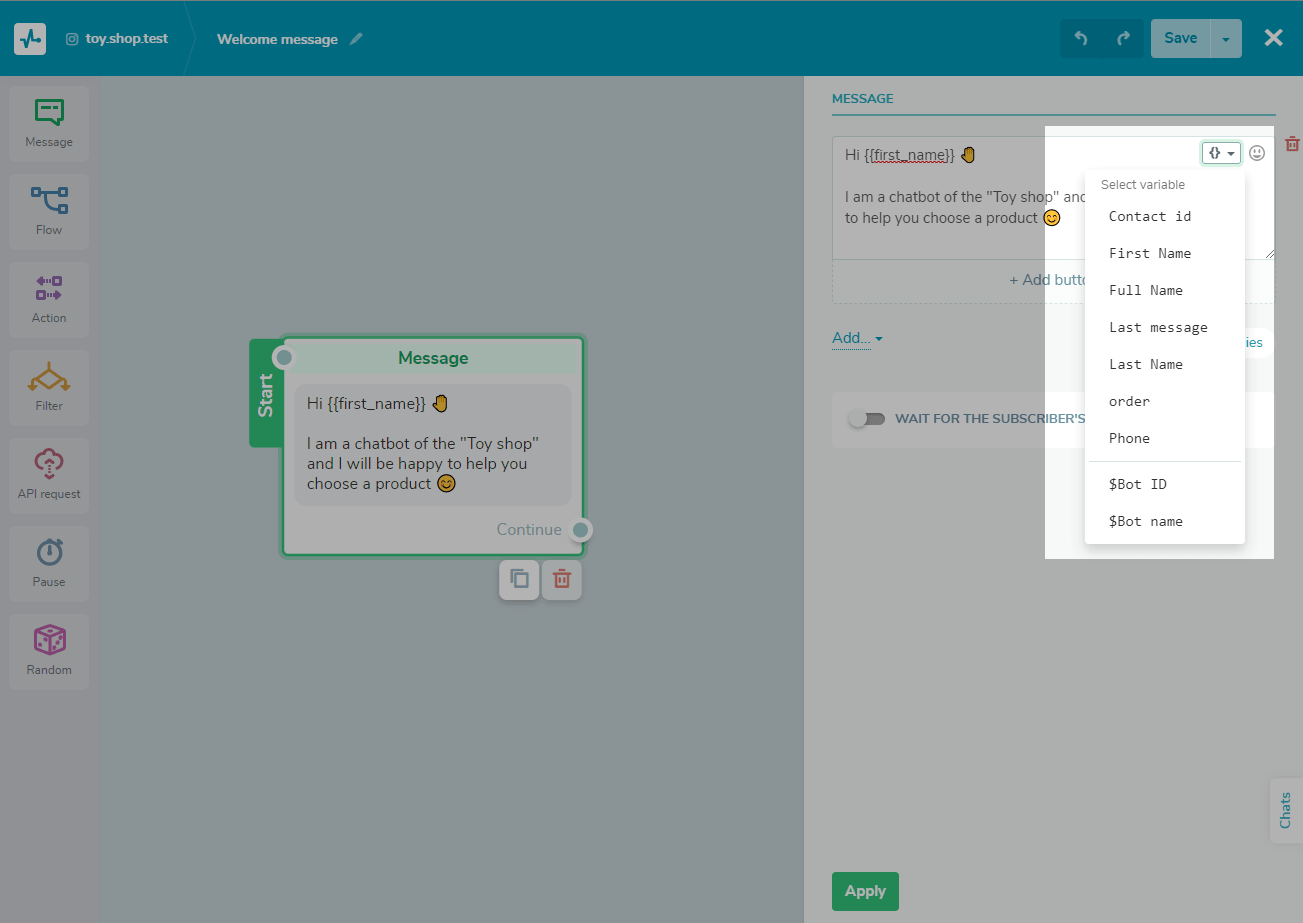
You can add the following types of variables.
| Custom variables for contacts | You can transfer variables when a user subscribes to your chatbot. Set and update variables manually in the "Audience" section. Set and update variables automatically in a flow using the "Action — set variable," "User input," and "API request" elements. |
| System variables | You can insert the text of the last message from your subscriber using the last_message variable. You can also add a subscriber ID using contact_id. |
| Global variables | You can create your own variables in your bot settings and use messages with predefined values that will be shared with all of your subscribers. By default, $bot_name, $bot_id, and $current_date are available. |
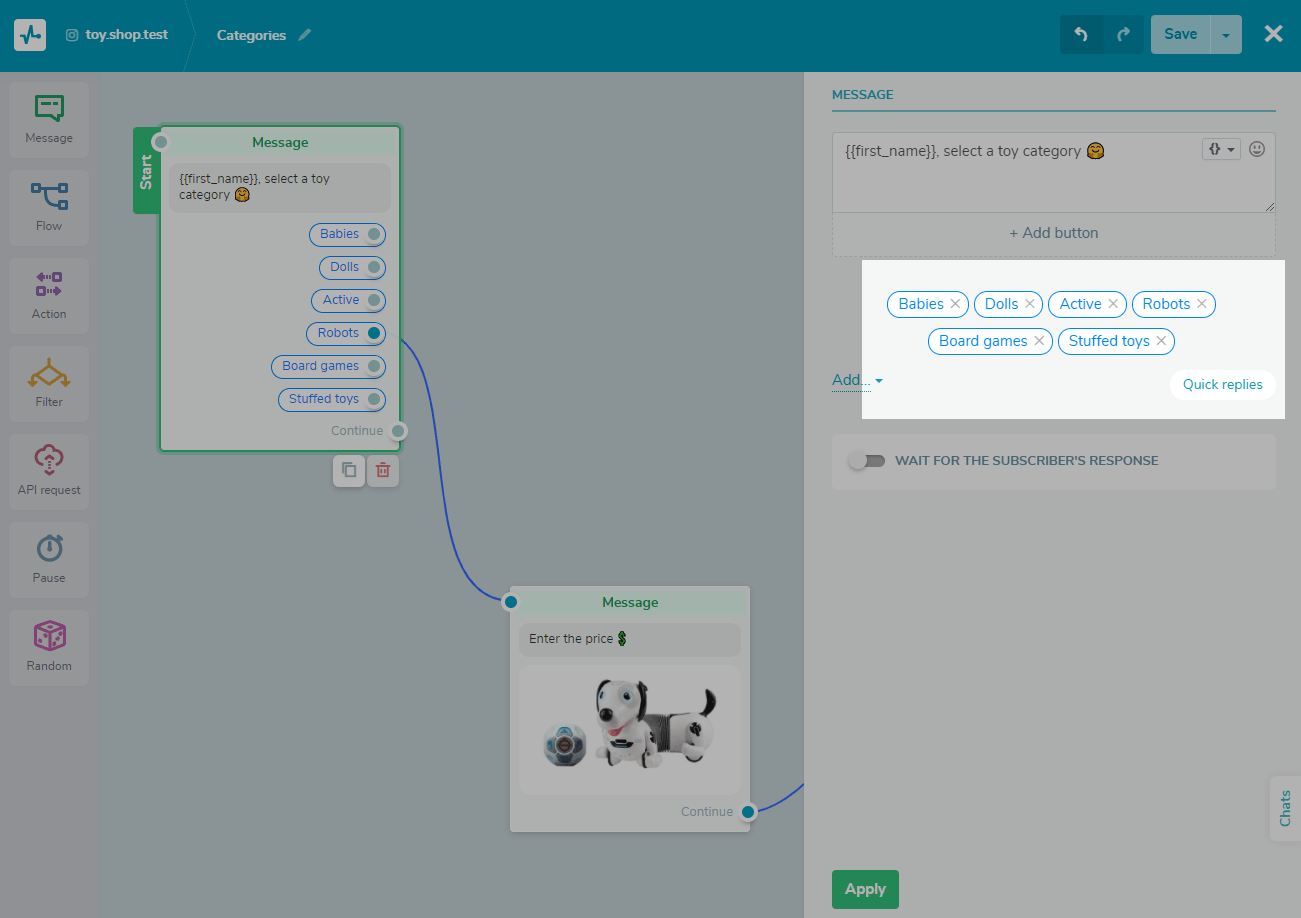
Button
To connect the "Message" element with other elements in your flow, add a button or user input element to the message element. This is one of the most important elements for communicating with your users — buttons engage users and let them choose a direction for your bot to take them to the next part of your flow.
You can add up to three buttons in one "Message" element.
To add a button, click + Add button. Select the type of button: "Continue flow," "Link," or "Payment." For a button of the “Link” type, you can also attach a link to a third-party resource. Your link can contain up to 512 characters.
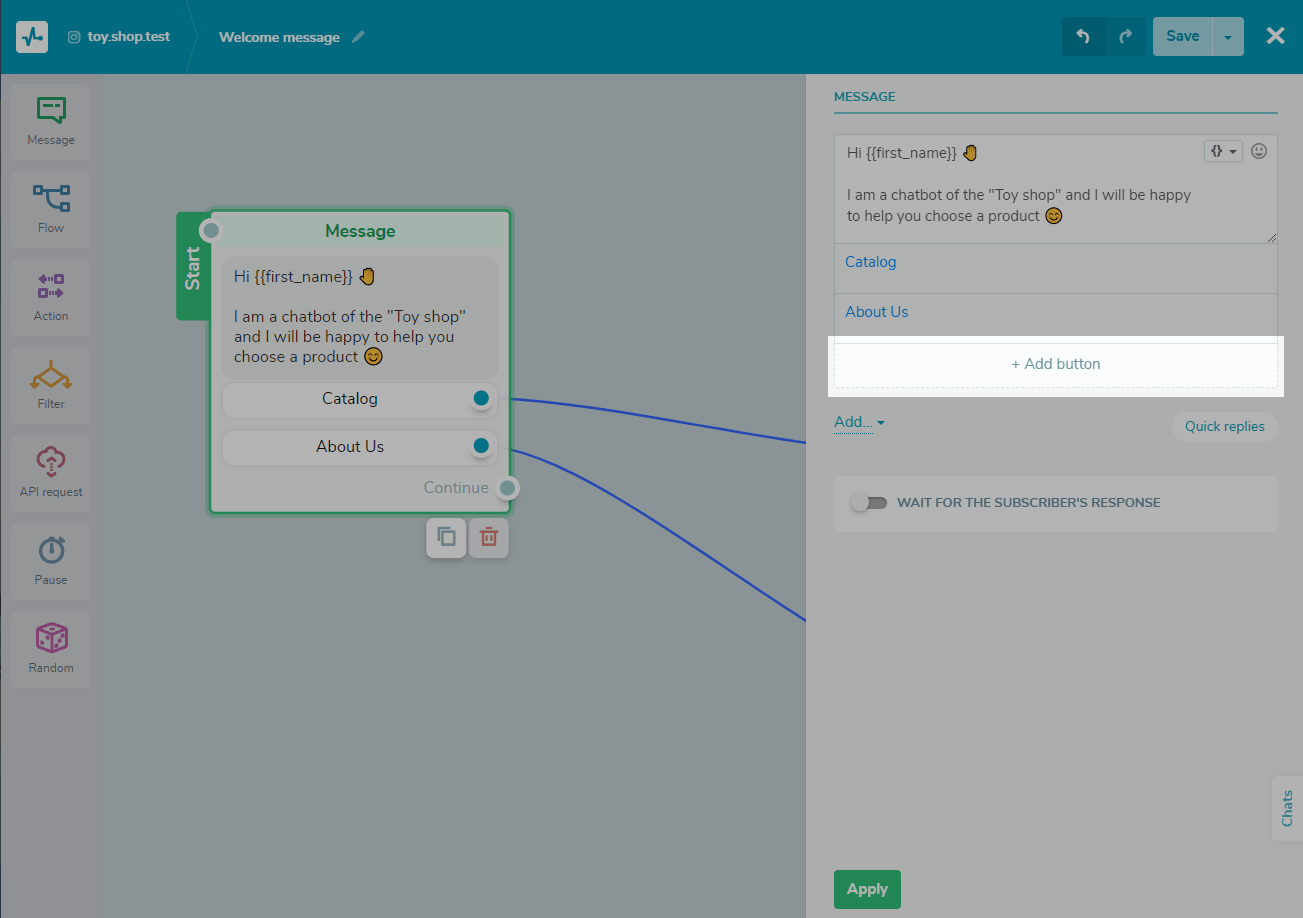
Name your button in the first field. You can add up to 20 characters and emoji to the button’s text.
The text on the button should be easily understandable — it’s important for users to understand what will happen when they click on the button and know what specifically they need to choose. Make sure that the next element in your flow corresponds to what the button says it will do to maintain the logic of your bot.
For a button with the "Link" type, you can also attach a link to a third-party resource.
To allow the user to continue the conversation by clicking on the link button, you need to activate the "Link Tracking" option in the chatbot settings under the "General" tab.
We recommend adding “Back" and “Back to main menu" buttons after all the information you add, so users can change their choice and choose another path through your flow. This prevents the logic of your bot from being trapped or broken with one message.
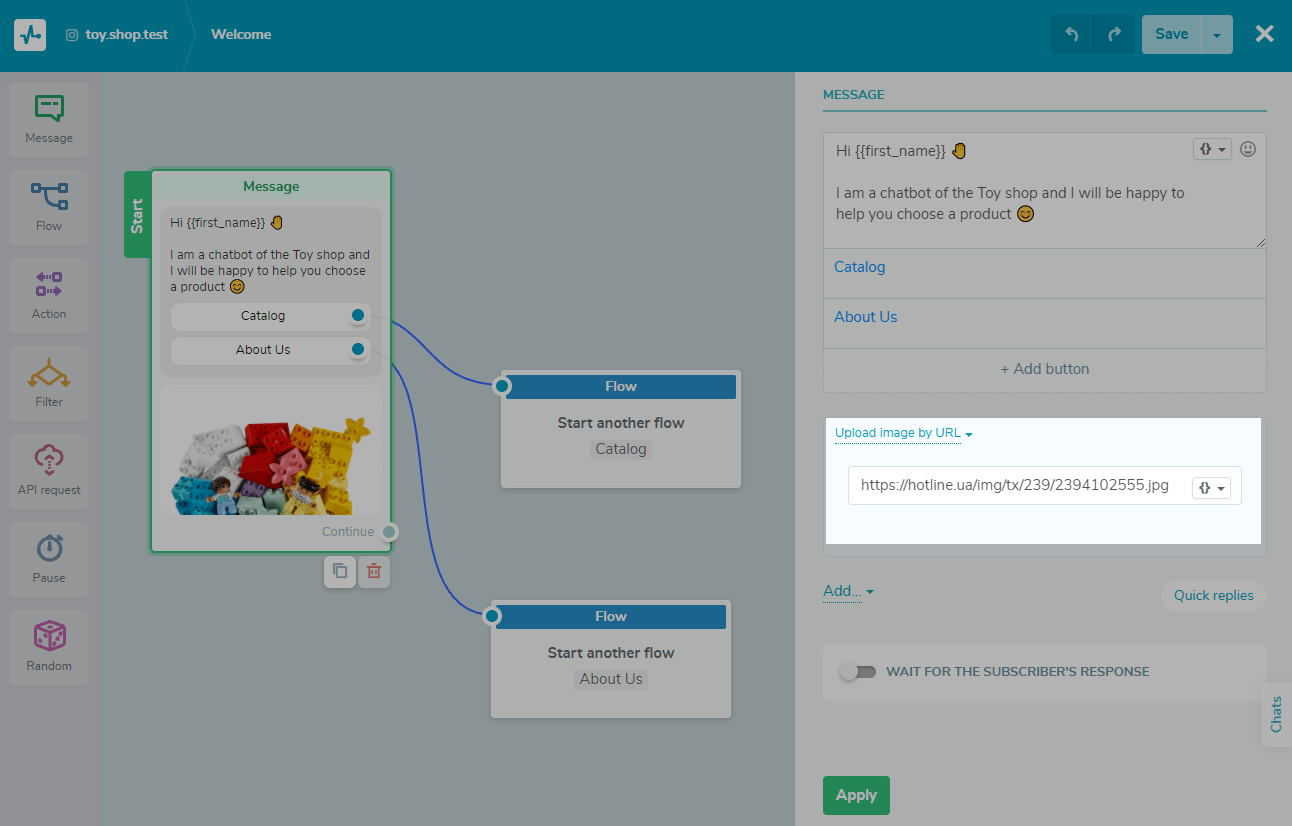
Image
Diversify your messages by using visual content that relates to your text.
To add an image click on the Add button, choose the “Image" element, then upload your image. You can add images in JPG and PNG formats up to 5MB in size.
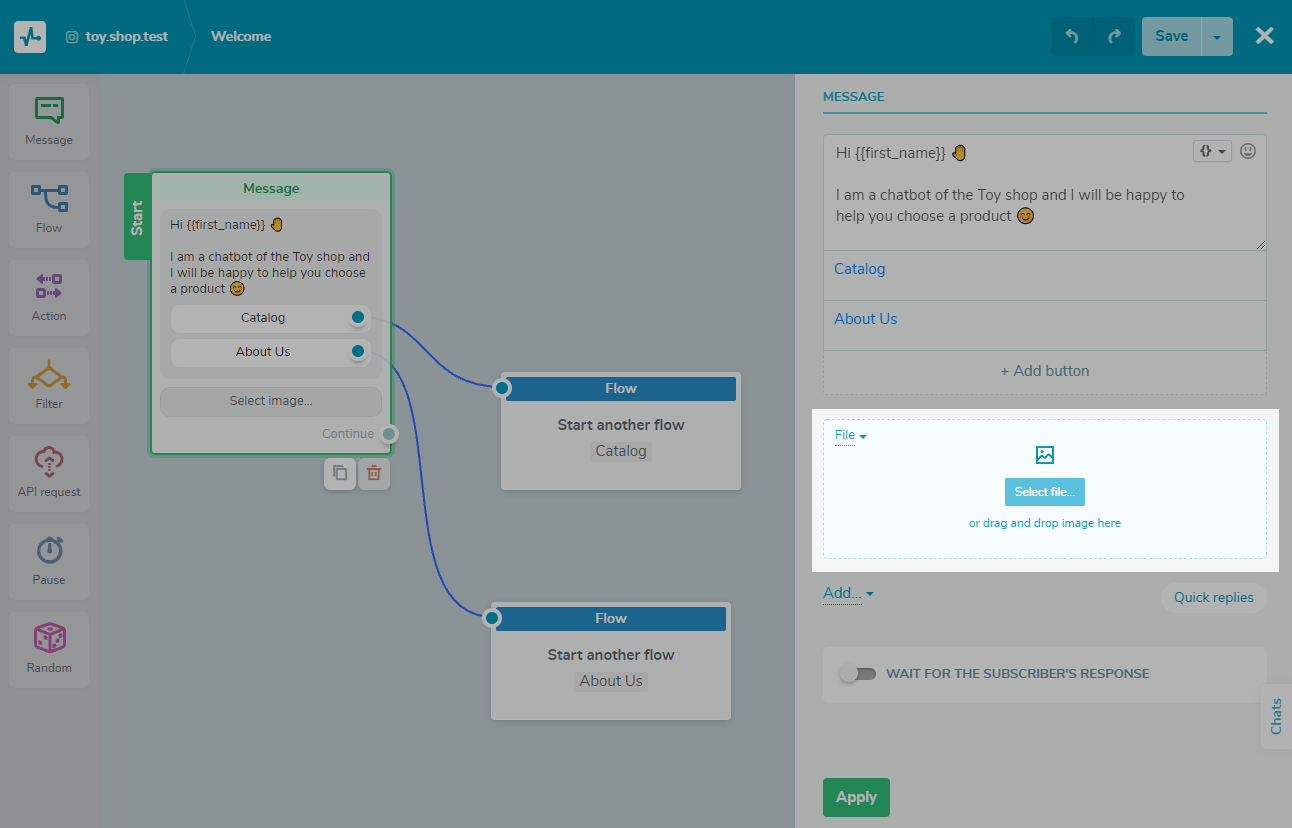
To upload an image from a link, select "Upload image by URL" in the drop-down menu and specify the link to the image in the field.
You can also specify a dynamic path to the image. For example, using the "API request" element or an a360 event, launching the flow via API, you can send a product picture and use this variable in the following message, displaying order data to the client.
To do this, select a variable or specify a JSON path in the field and pass the path to the image in the variable's value. Thus, each client will receive an image according to their order.
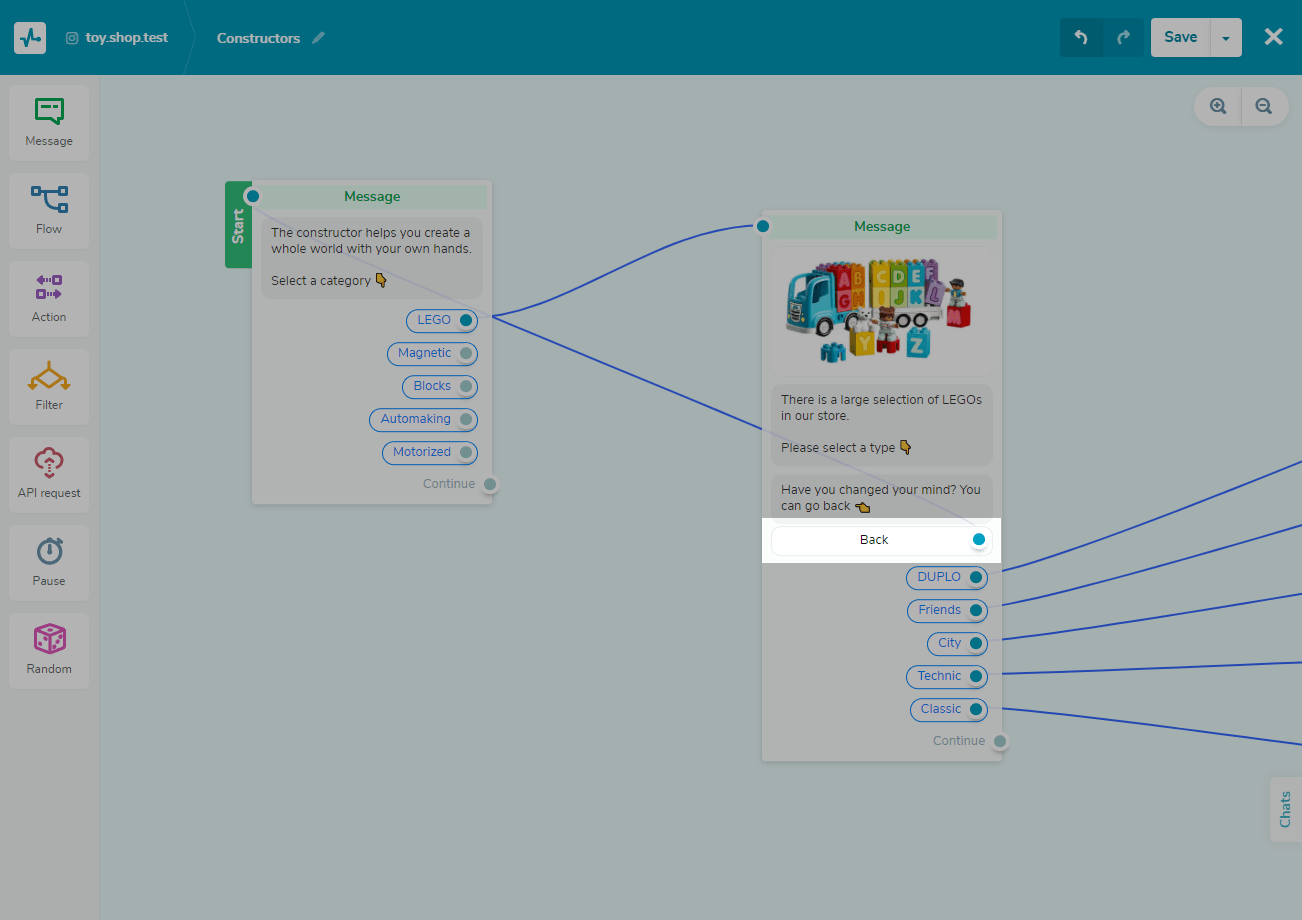
Card
The carousel format allows you to showcase up to 10 cards. In one card, you can add an image, title – with up to 80 characters, and a description – with up to 80 characters and 3 buttons with a link to another flow or an external source.
To add more cards, click + on the right.
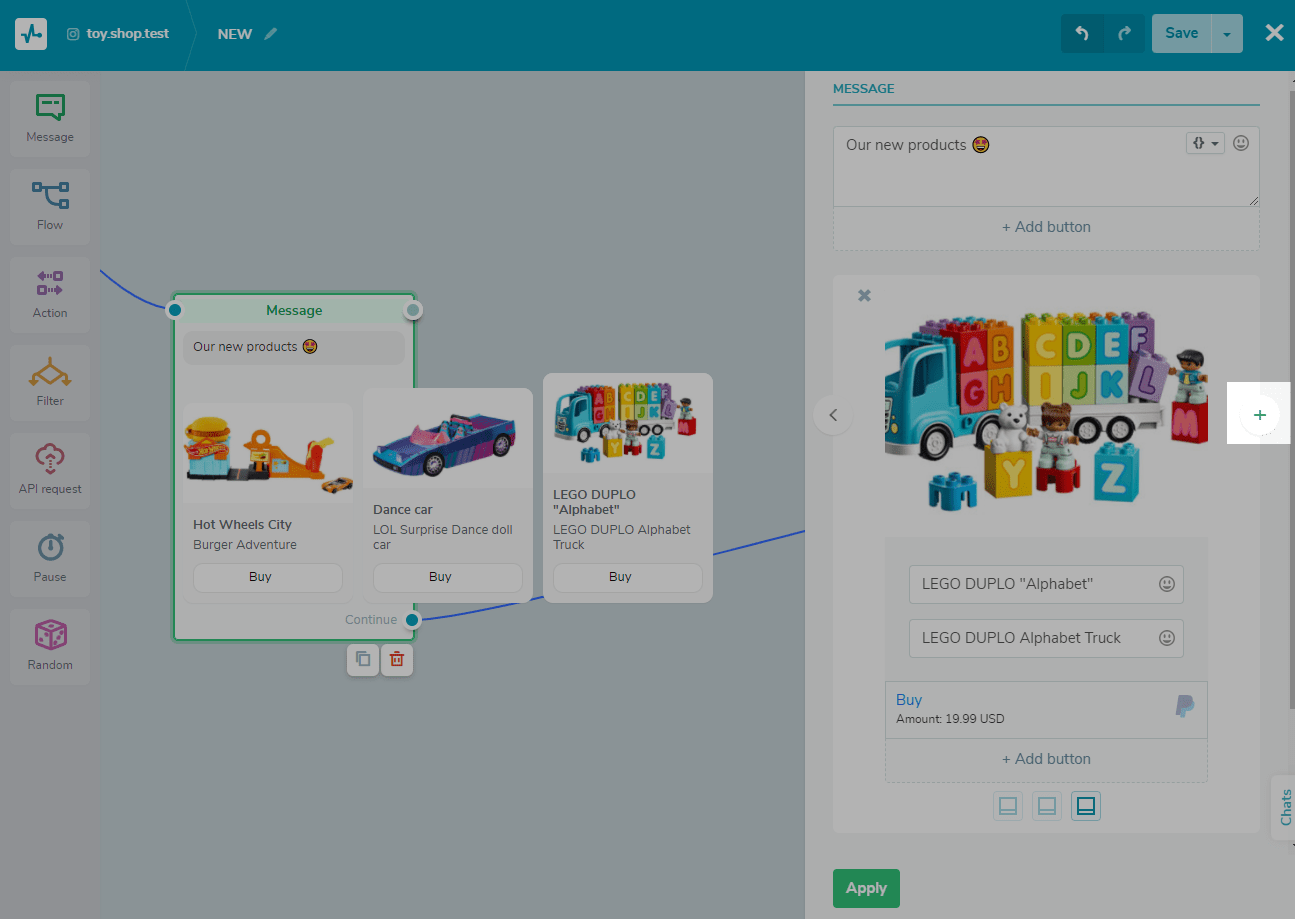
The service allows you to add up to 10 cards in one element. To switch between the cards, click the arrow buttons. To delete a card, click the cross button.
Media: "Audio" and "Video"
You can also add audio and video messages to your flow scenario. You can upload files up to 20 MB.
File formats supported:
- Audio: AAC, WAV, MP4, M4A;
- Video: MP4, AVI, MOV, WEBM.
Thus, you can attach video lectures and voice messages directly in the bot without sending the user to third-party resources.
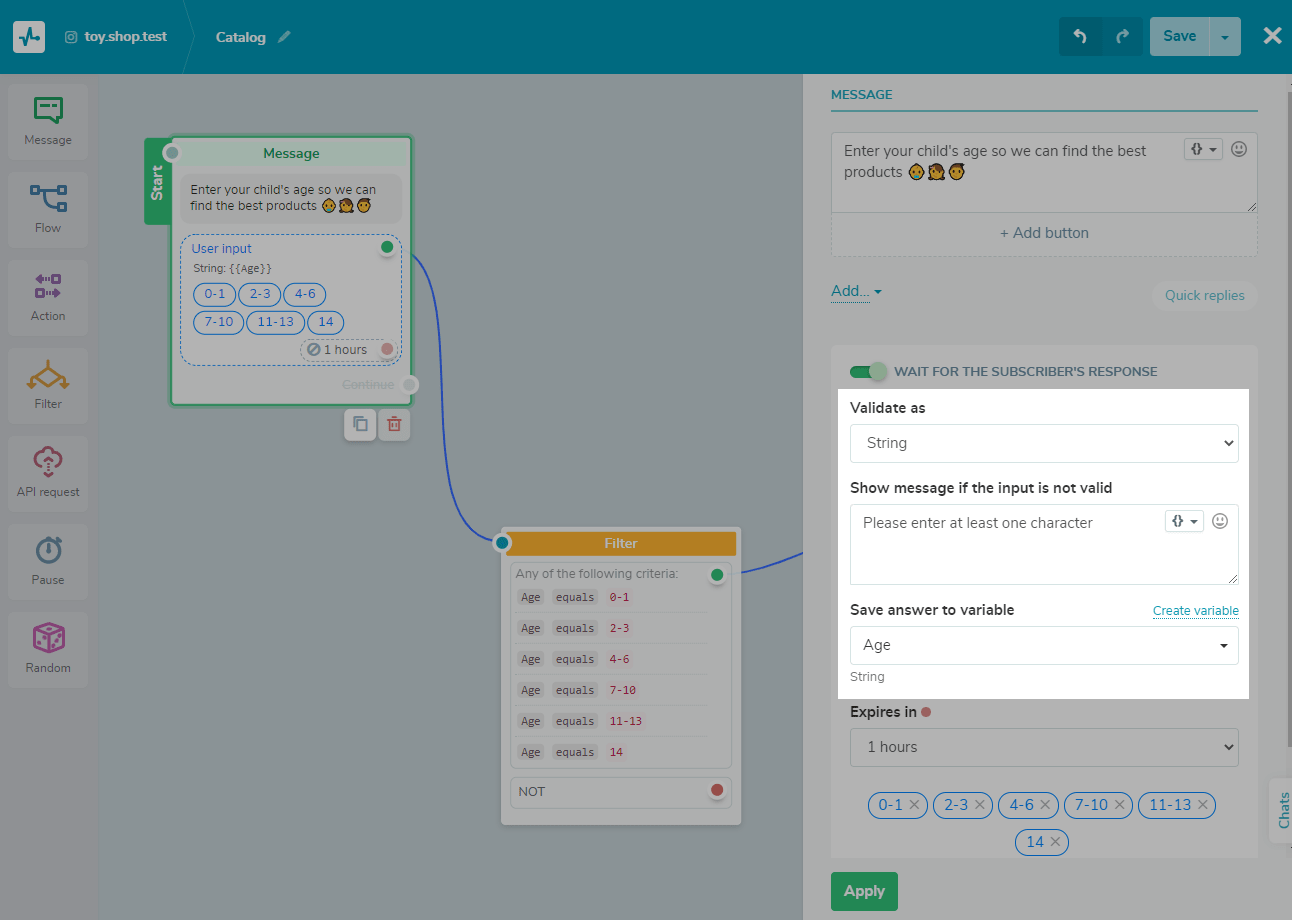
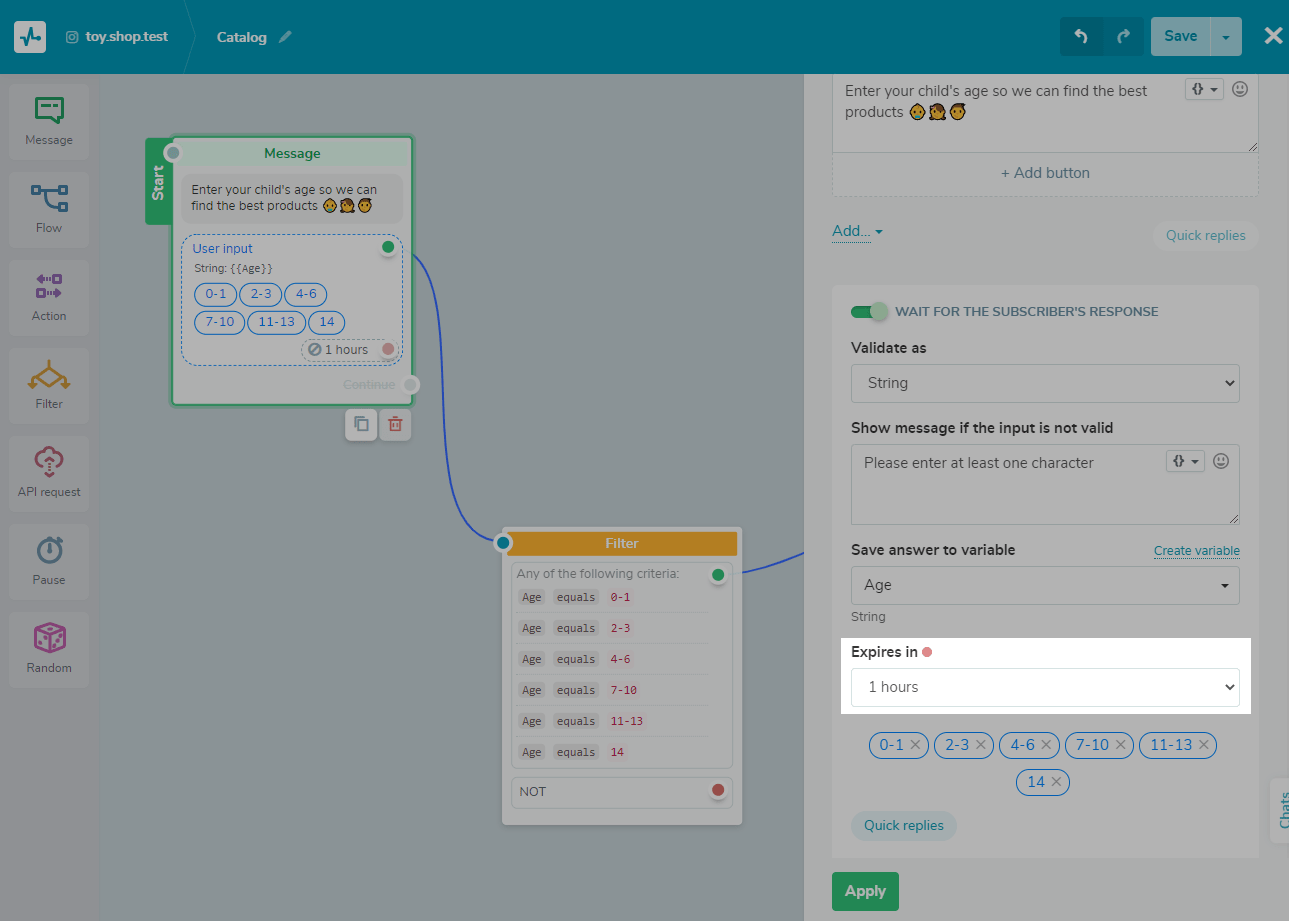
User Input
You can gather information from users and save it to a variable for future use. Users can enter any value, and you only need to set up the type of validation for this value, e.g., string (for text values), number, date, phone number, email address, URL, regular expression, or image or document.
Activate "Wait for the subscriber's response." Choose the validation type, add a warning message for users who enter the wrong value, and choose the variable you want to store information to.
The received email address, phone number, and other user data are saved in the automatically generated mailing list from our Email service.
Enter the time to wait for a response.
Also, under the message, you can add quick replies buttons - so users can choose from predefined responses instead of typing their own.
To do this, click on the “Quick replies” button in the “User input” element window and enter values for the buttons. Quick replies disappear when a user or a bot sends the next message.
Note the difference between standard buttons and quick reply buttons: quick reply buttons are the bot’s element that saves information of the chosen button into a variable
And click on a standard button redirects the user to another element of your flow according to your scenario or to an external source.
Quick Replies
You can also add another type of buttons — "Quick Replies," (preset replies for chatbot users) which do not save user data (unlike data saved with the "User input" function). However, you can use it to expand the number of buttons and link each button to the next branch of your scenario.
Likewise, you can use buttons as an additional menu to improve navigation for your chatbot.
To add quick reply buttons, click "Quick replies" in the editing panel of the "Message" element, and enter a name for the button with up to 20 characters.
You can use emoji in your button text and add up to 10 buttons to the message element.
Quick reply buttons are displayed to the user immediately below the text input field. Users can hide the buttons and reveal them by clicking in the text input field on the corresponding icon located on the right.
You can combine "Quick reply" buttons and regular buttons, but users will receive an additional emoji message in this case.
After sending the next message, quick replies disappear. To quickly get a message with these buttons, we recommend creating a trigger and a flow on this trigger. Then, place the flow in the menu, which is always shown to the user and expands when the "/" icon is pressed.
Moving Elements
By default, each element you add is placed at the end of the message element you are working on. Hover over the element that you want to move up or down and click on the corresponding button.
Continuing the Flow
You can connect the next element after the "Message" element using the button or the "Input" function. You can also continue your flow without waiting for the user's response. We recommend using it with the "Pause" element to check if the subscriber interacted with the flow and send a message after a particular time.
When planning a flow scenario, keep in mind that you cannot both continue your flow using the "Continue" connector and use quick replies.
Connecting Elements
Drag a line from the blue drop of one element to another element to connect them.
Click on the line twice, and you will see a button to remove a connection.
The disconnected elements will be highlighted in yellow; remember that you need to link them to another element.
Elements with empty fields will be highlighted in red, reminding you that you need to fill in fields. For example — if you added a button but did not enter text for it or used a link element but did not enter a URL. You cannot save your flow until you fill in these fields.
You can link an unlimited number of elements to elements that wait for user response and link up to 100 elements to the "Continue" button.
A "Flow" Element
You can simplify your bot’s structure and move your subscriber to another flow.
To do this, add an element, then choose the "Flow" element, and select the flow you want to link from the drop-down list.
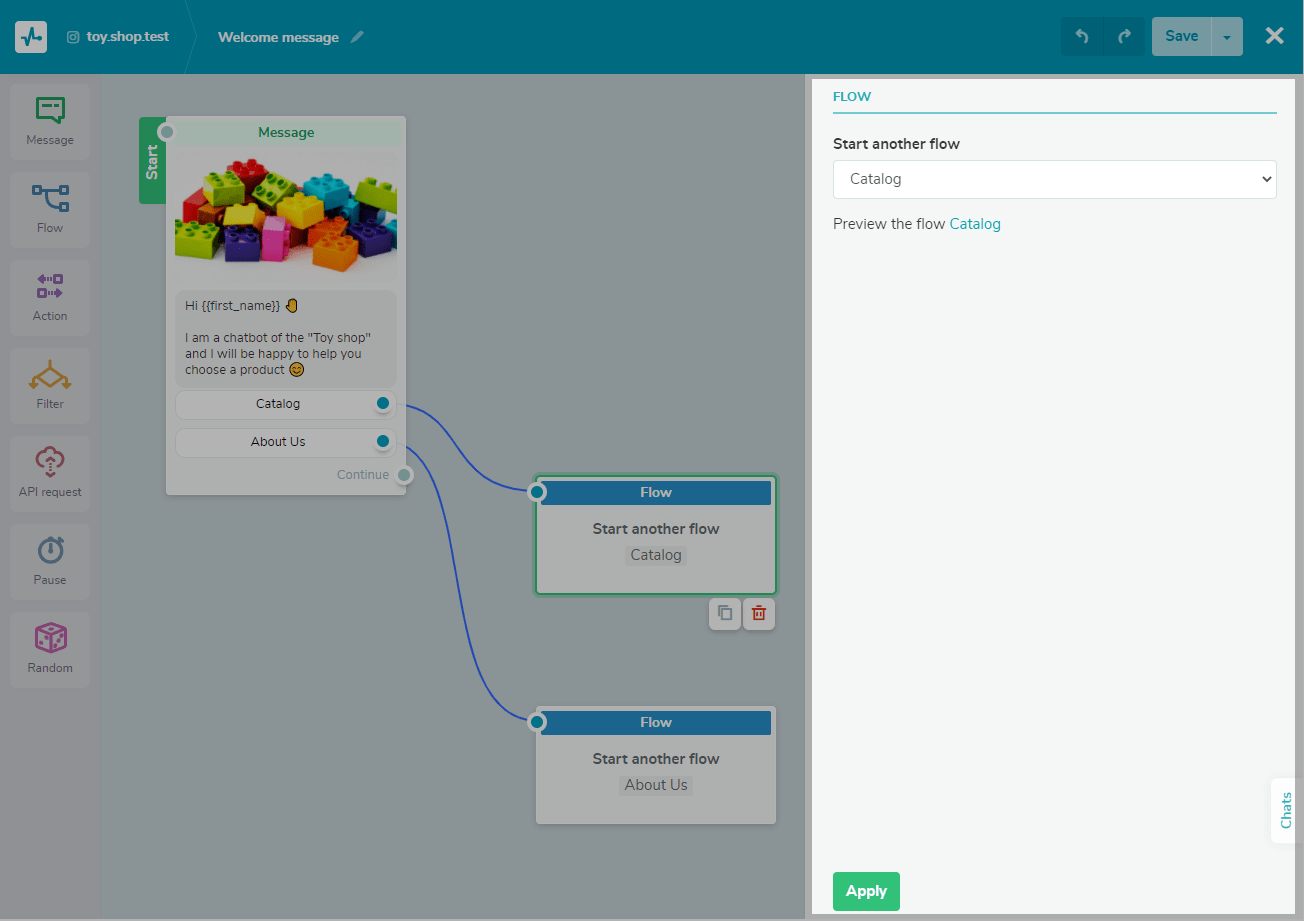
The "Flow" element will be the last element in this branch of your existing flow. You cannot link it to another element to continue the original flow.
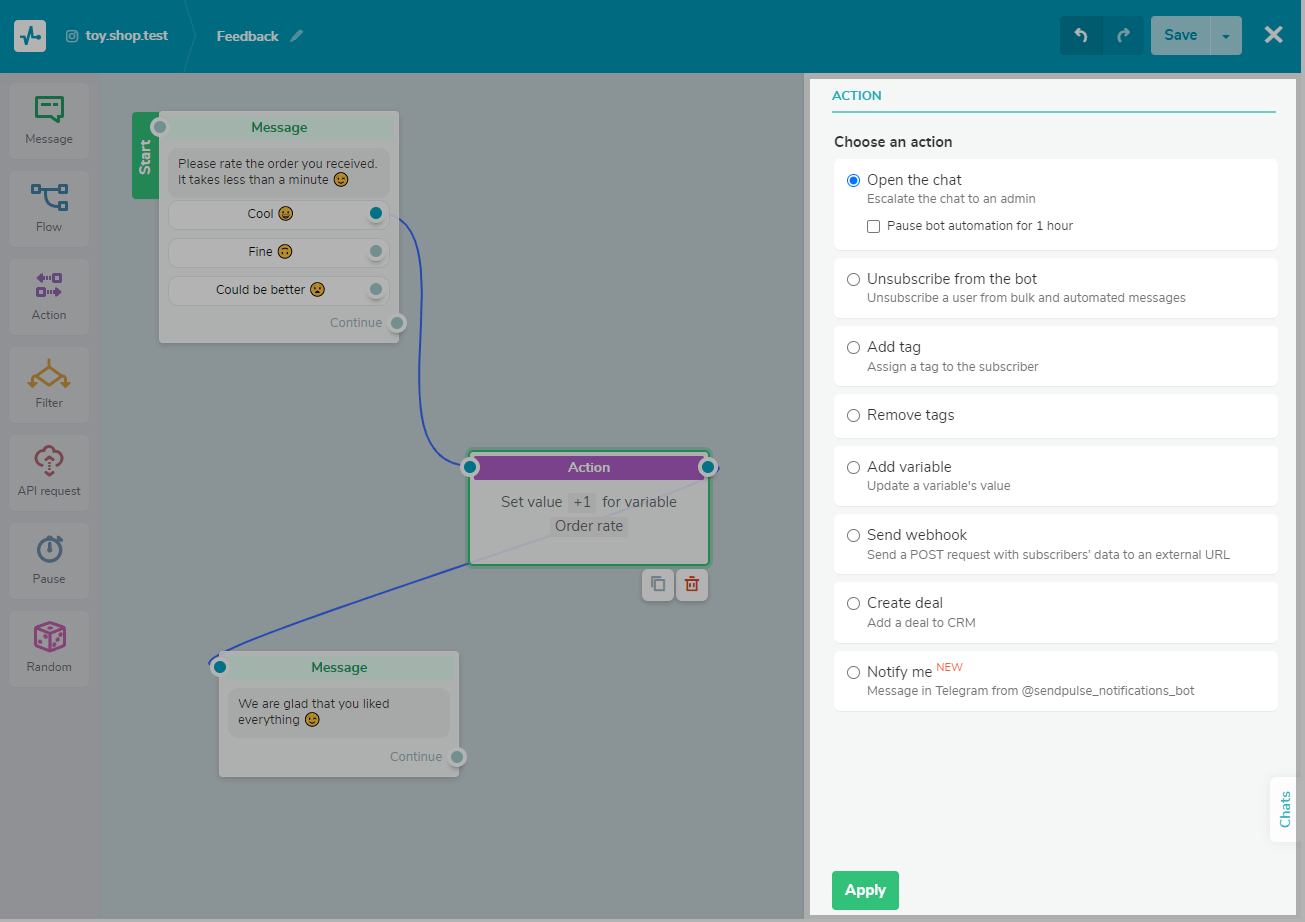
An "Action" Element
The Action element is visible only to you. Select the element in the panel on the left and drag it after the block you're tracking.
Then select what action you want to create:
| Open the chat | Open a chat with a subscriber in the "Conversations" section |
| Unsubscribe from the bot | Unsubscribe a user from bulk and automated messages |
| Add or Remove tags | Assign a tag to a subscriber, remove a tag assigned to a user |
| Add variable | Set the variable value to be assigned to the subscriber or updated. You can also create a new variable |
| Send webhook | Send a POST request with user data to your URL |
| Create deal | Create a deal in your CRM when a specific action is performed, for example, clicking the "Buy" button |
| Notify me | Send a message on behalf of your chatbot to the system chatbot or Telegram group |
A "Filter" Element
Segment customers based on their personal data and previous messages received. Select the element in the left sidebar, and drag it after the element that will start your script branching.
Then select the condition itself. Combine conditions by adding the operators “any” or “all,”, or add independent additional conditions.
Read also: How to Use the "Filter" Element in the Chatbot Flow Builder.
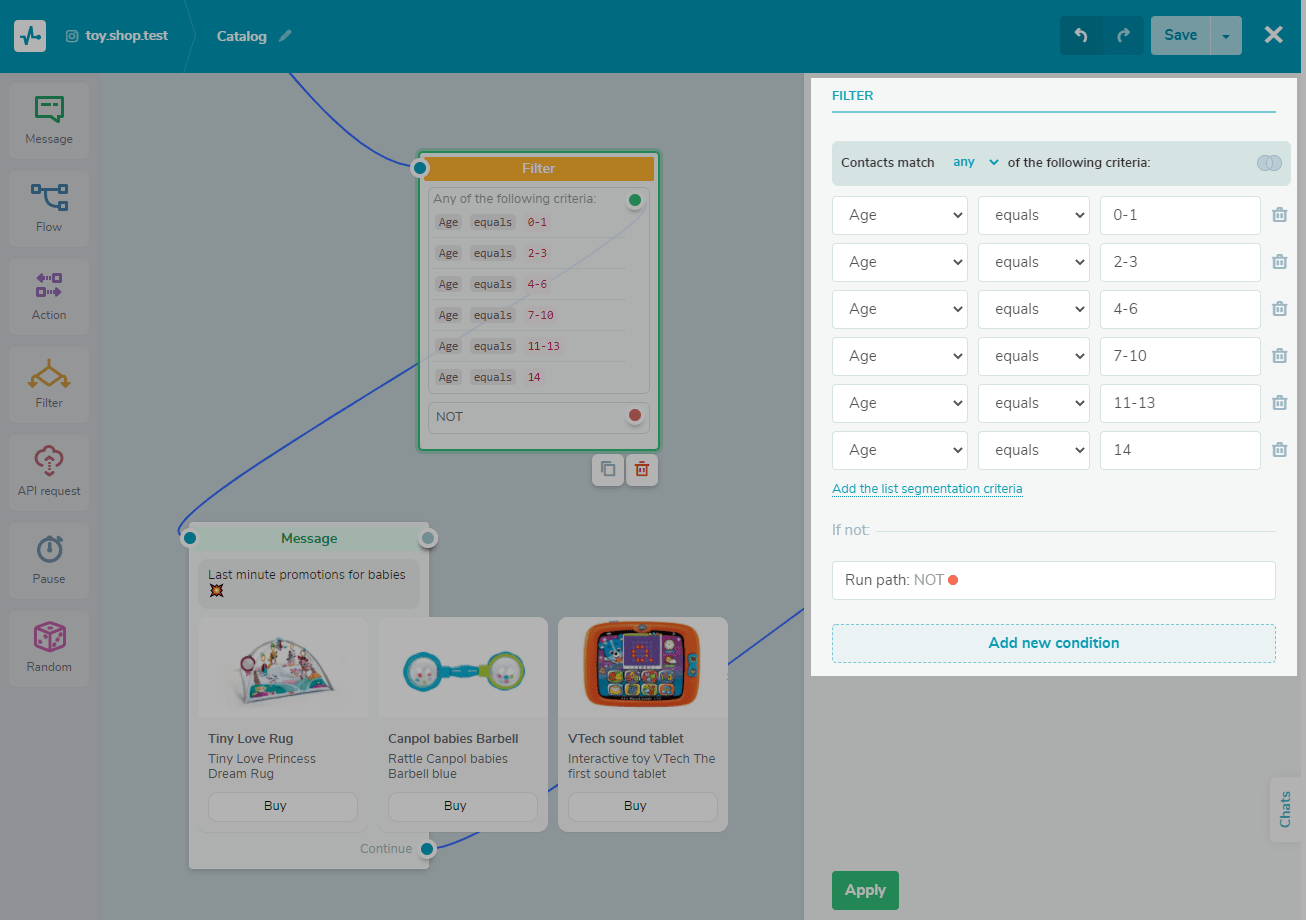
After adding conditions, add the additional flow elements to each of the Filter element options if the condition is met (green dot) or not met (red dot).

An "API Request" Element
Send requests to a third party server to create objects or retrieve data. Get data and use it in your chatbot messages.
You can save the received data to a variable or add it to a message as JSONPath.
Drag the "API Request" element to the workspace, connect it to the element, after which you want to retrieve data. Select the type of request and enter the URL to send the request to.
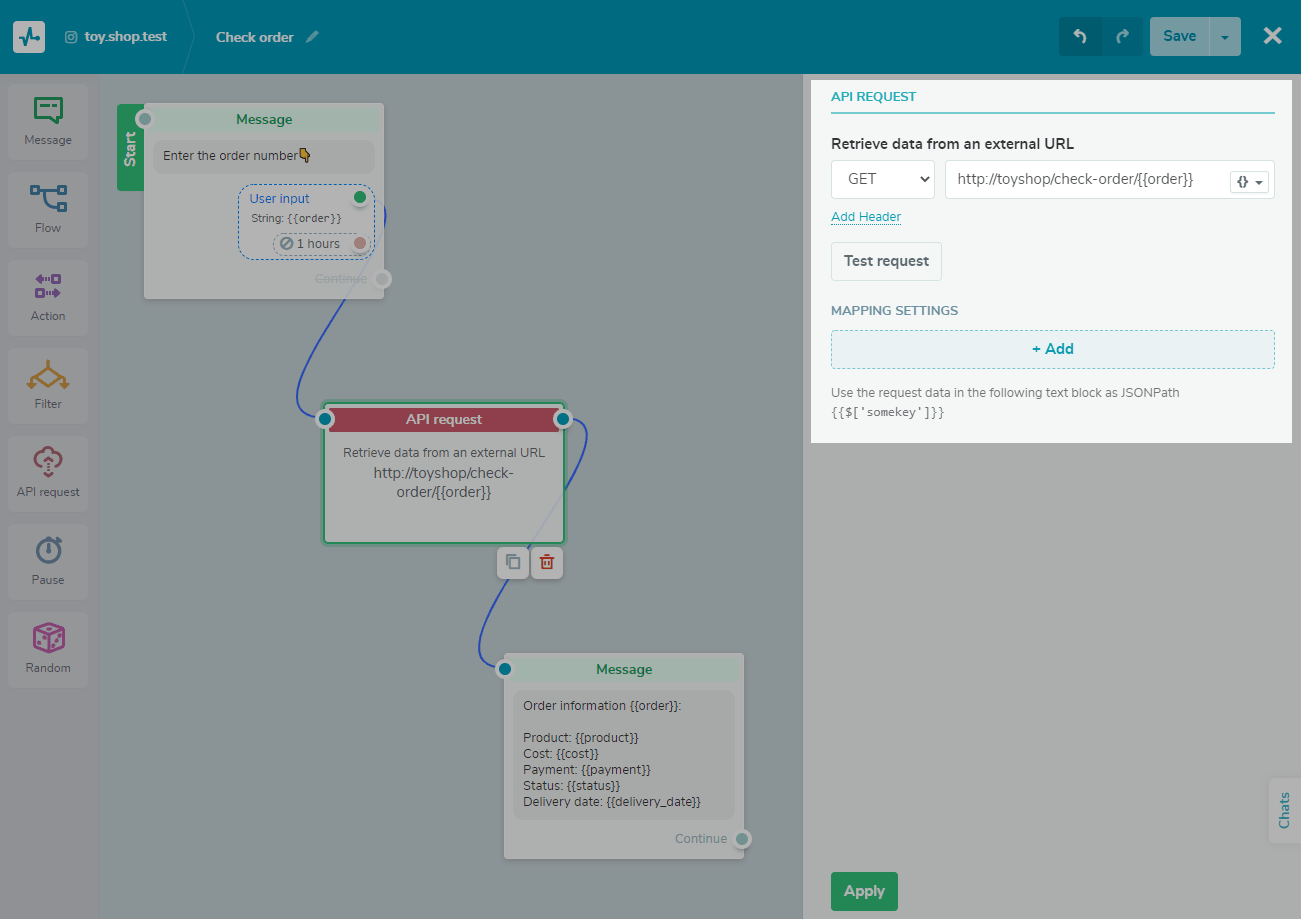
After testing the request and receiving a successful response, configure the mapping settings. If you need to save the value from the response to a variable, select the key from the received request and the variable to save to. If you want to use the received value once without saving it to a variable, copy {{$ ['somekey'] ['nestedkey']}} and use it in the next message element.
Read more: How to Send and Receive Data from External Sources
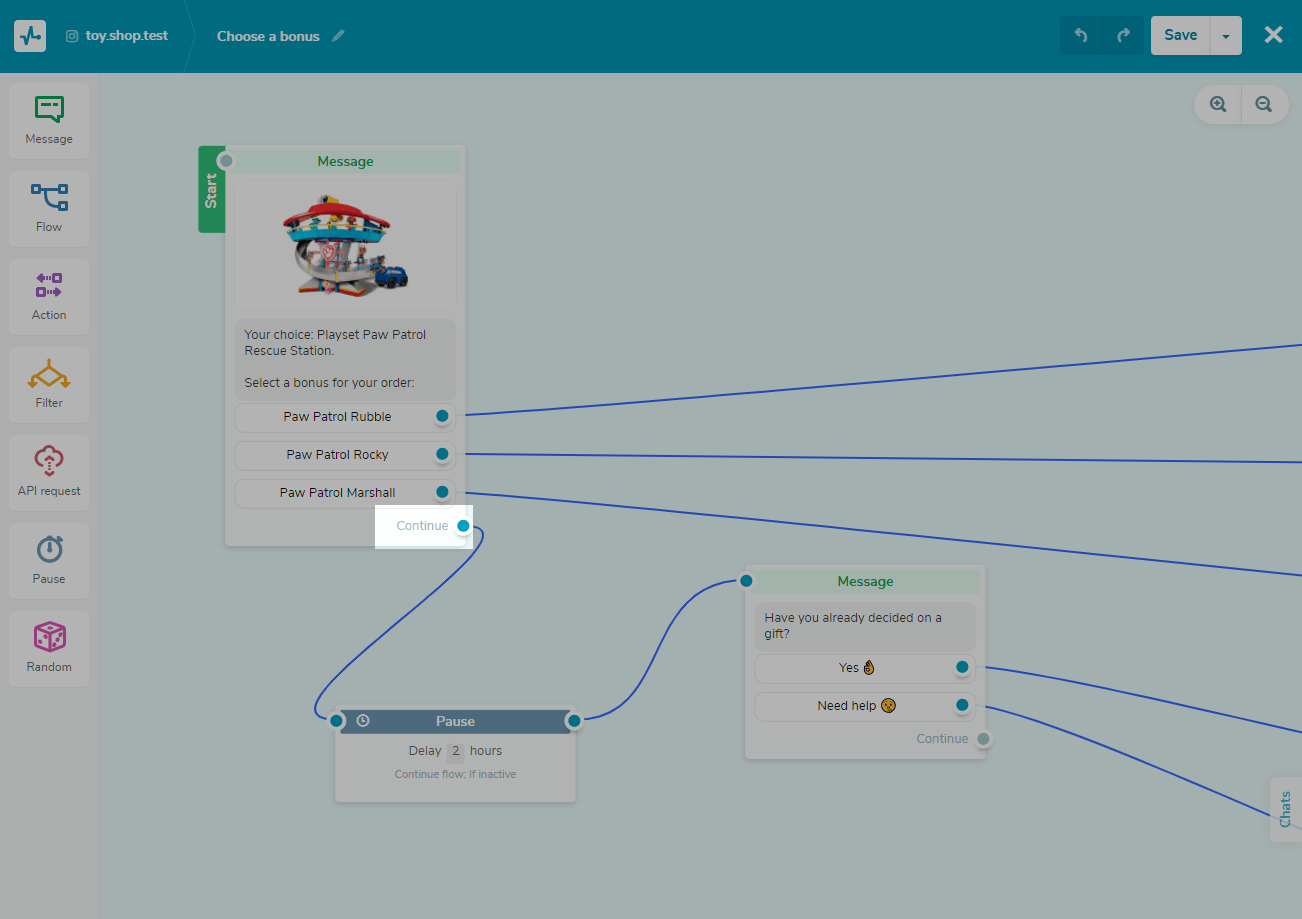
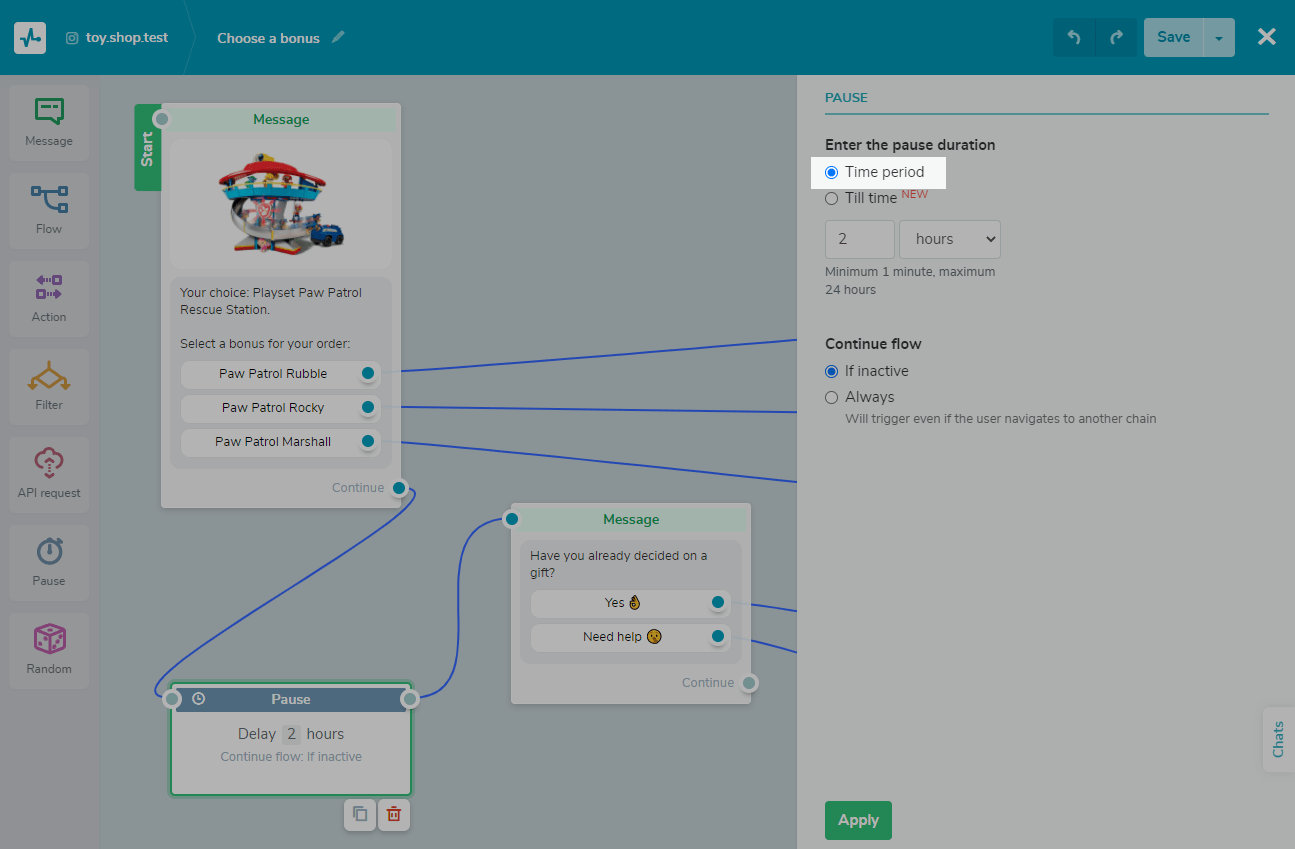
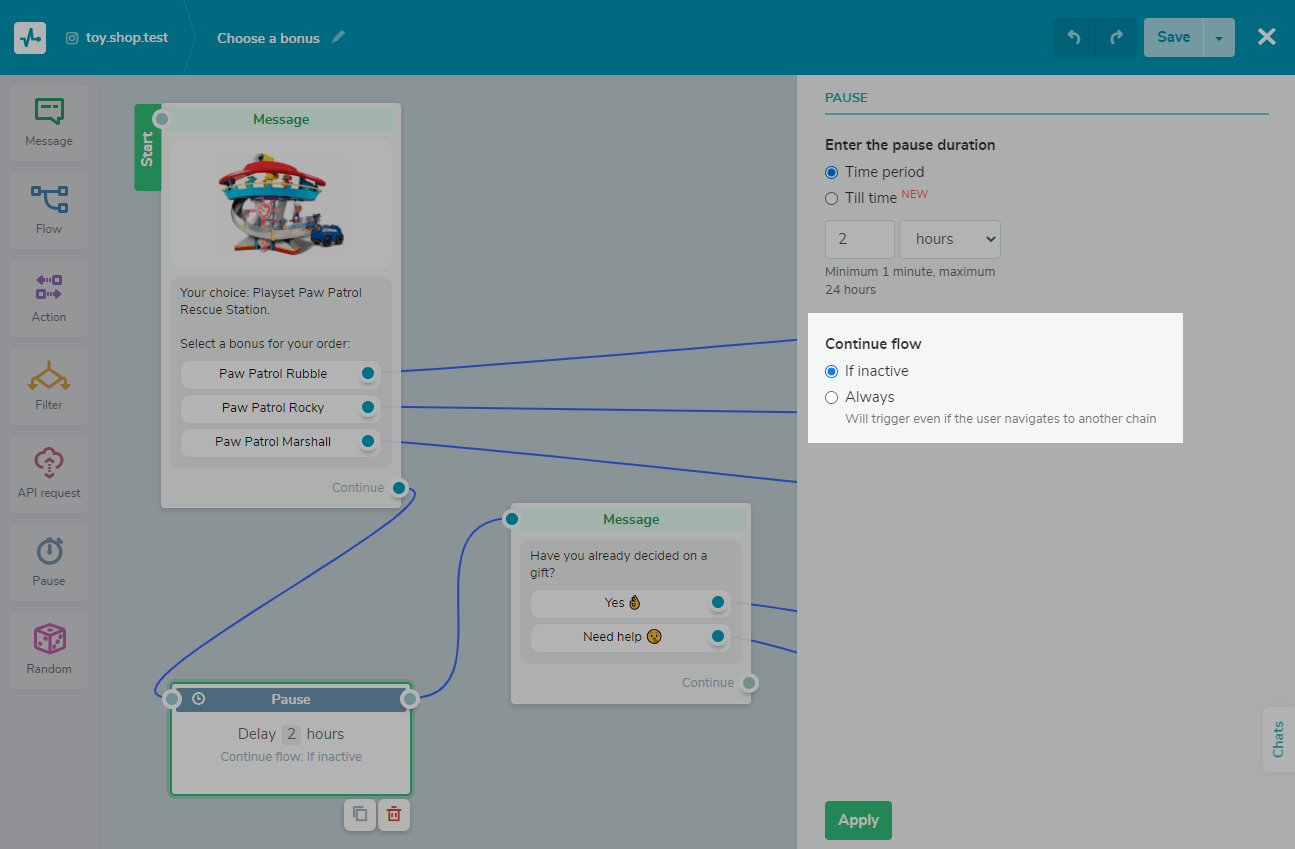
A "Pause" Element
You can set up a pause between flow elements between 1 minute to 24 hours. Use this to warm up your clients to avoid sending them too many messages at once.
This is the period during which no automatic messages are sent to the subscriber. The pause can be set in minutes, hours, or days.
You can choose to pause in between using the "Time period" option or until a specific time using the "Till Time" option.
Select the "Time period" option and set a pause between sending flow elements from 1 minute to 24 hours. Use it in a flow, for example, to warm up a client. After the specified time, the next message will be sent.
Please note: Instagram only allows the following message to be sent after user interaction for 24 hours.
If you select a pause of more than 1 day between elements, you can set the time at which the message will be sent. The system considers the next day any time after 00:00 according to the time zone set in the settings of your personal account.
Also, you can select "Till time" and set a delay until a particular time. For example, you can use this option to indicate business hours or promotion hours.
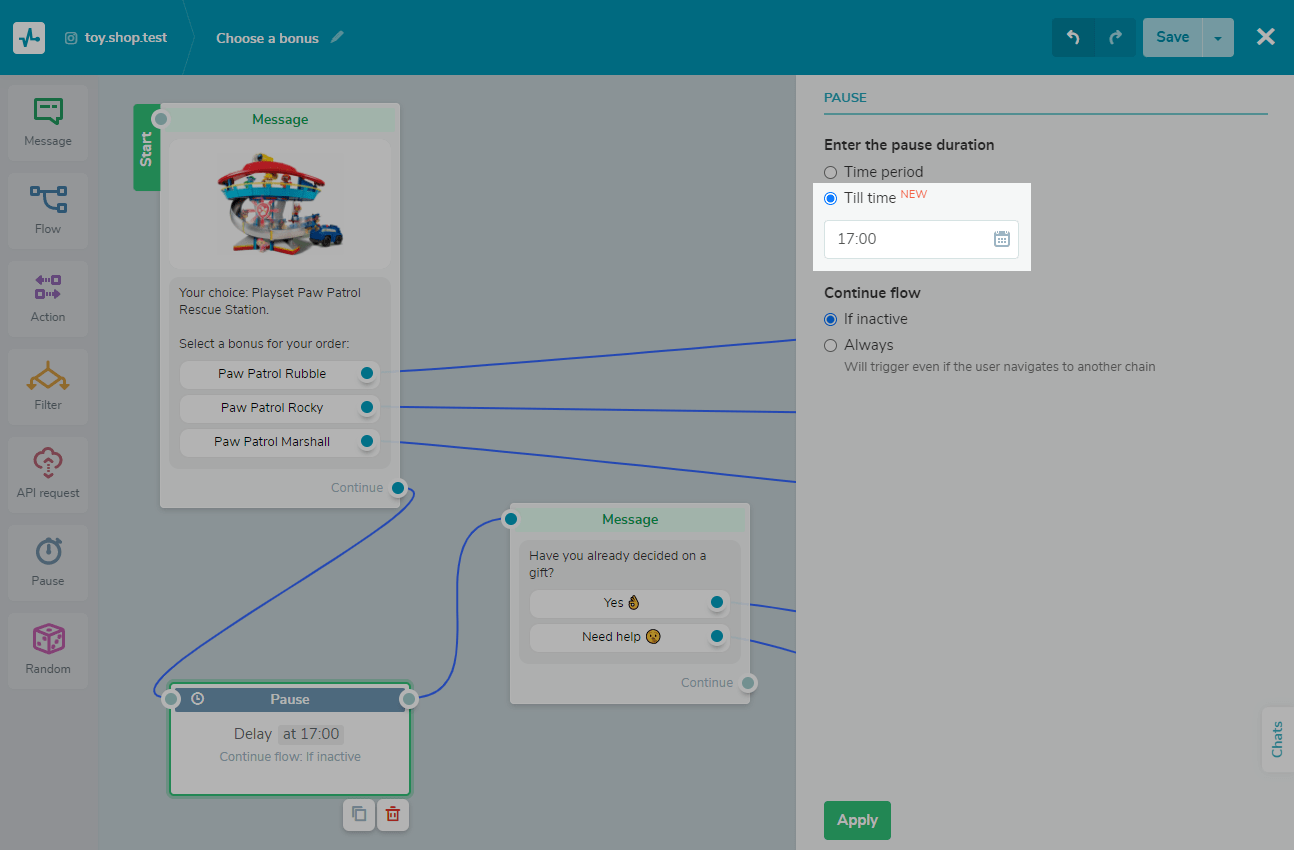
Also, using the "Pause" element, you can set the condition for executing the next element of the flow: always or when the subscriber is inactive.
A "Random choice" Element
Send elements from your chatbot script at random for A/B testing, creating quizzes, and more. You can customize the size of the recipient group for each option, send random information, and test different chatbot scenarios.
Drag the item "Random choice" element to the working area, connect it to the element you start branching the script from.
Learn more: How to Use the "Randomizer" Element.
Save and Launch Your Flow
When you finished creating your flow and have looked over all of the elements, save your flow before exiting. Click Save and send it to yourself to test the flow and check if everything is working correctly.
You can also save an updated version of the flow while leaving the current version unchanged. To do this, click Save as a new flow. The new flow will be saved in the "Flows" section.
Note: your flow must have at least one "Message" or "Action" element.
After that, you can exit your flow by clicking Save and exit.
Analyze Your Results
SendPulse allows you to track general statistics on a chatbot in the "Statistics" tab.
You can see the number of messages sent and read, redirects from the flow, both in total and separately for each message in the "Bot structure" tab.
Last Updated: 01.04.2024
or