How to Transfer Data from a Chatbot to Google Apps
The Integromat service has changed its website address, design and name to Make. The integration options remain the same, but the design may differ from the screenshots shown in the article.
Transfer data from your potential clients, gathered with chatbot flows for Telegram, Facebook, and WhatsApp with a webhook to other services and apps to manage them is easy to do and helps you stay organized.
We will show you how to filter client data using variables, save data to Google sheets, create an event in Google calendar, create a CSV file and save to Google drive, and send yourself an email notification each time a chatbot user moves through your bot.
This article covers integration with Google Sheets using Make (Integromat). Still, you can also get data from Google Sheets directly with only the Google Sheets API and SendPulse tools. Read more: "How to Transfer Data from Google Sheets to Chatbots."
Getting Started
To accomplish our goal of transferring data to other services we need to connect SendPulse with the desired service. Make sure that the service supports handling incoming webhooks and working with data from webhooks.
In this article we will show you how to connect Sendpulse to Integromat. We chose this service, because it includes integrations with the most amount of apps and services among CRM, CMS, mail, calendar, media files, maps, and list services. Integromat can also filter and edit data. With a free pricing plan you can send up to 1,000 operations, and most importantly it includes the support for webhooks that we need.
Sign in to your account in Integromat, and click on “Create a new scenario” to start creating a scenario.

You can choose which service to connect on the first page using the search field, or you can find and add apps and elements directly in the flow builder. Click “Continue” in the top right corner.

How to Create a Webhook
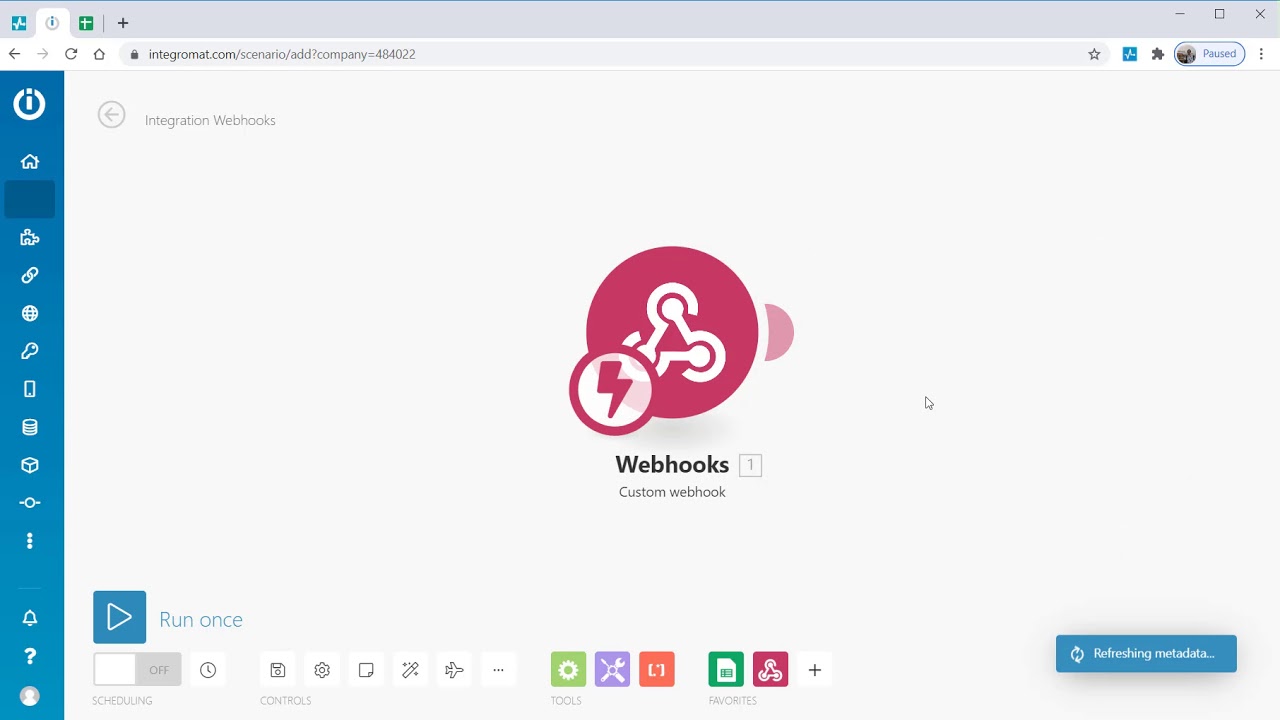
Click on the element in the center of the display and choose the “Webhooks” element - this will be the element that launches your flow.
You need to create a webhook, where data from your Sendpulse chatbot flow will be sent. Choose the “Custom webhook” element from the dropdown menu.

Click “Add” to create your new webhook.

Enter a name for the webhook and click “Save.”

Your webhook has been created. Copy the link - you will need to put it into your chatbot flow element.

Now Integromat is “listening” for data from the webhook to determine the data structure and understand which data to return in future elements.
How to Add a Link to your Webhook in a Chatbot Flow
Sign in to your Sendpulse account. Choose your bot, and open edit mode if you have already created a chatbot flow before.
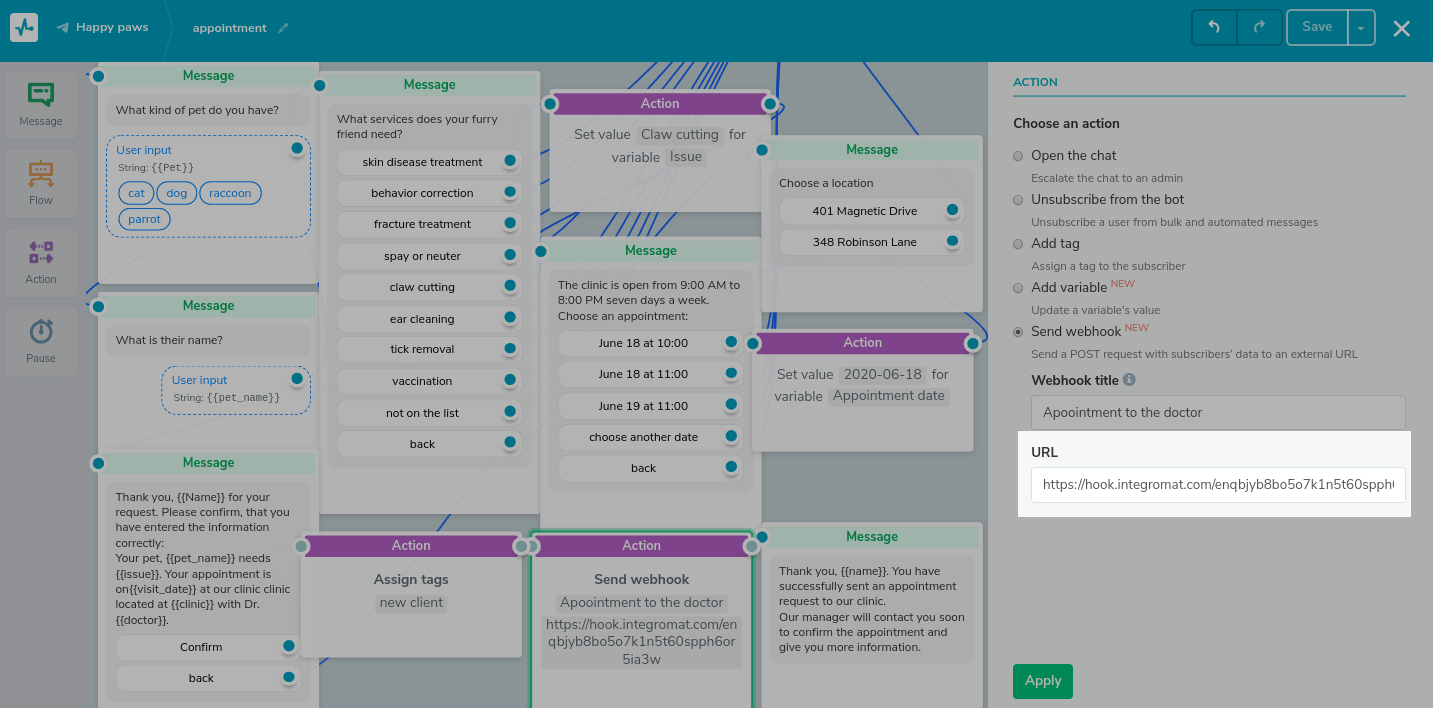
You can configure sending a request via the "Action: send webhook" element (in this case, the transmitted data is generated automatically) or via an "API Request" to create your own request format with variables.
Via the "Action: send webhook" element
Add an “Action element” right after the element where you want to send a webhook as an event.
In our case we used the chatbot flow for creating an appointment at a veterinary clinic. After a user fills in data using the chatbot and confirms its validity, webhook will be sent.
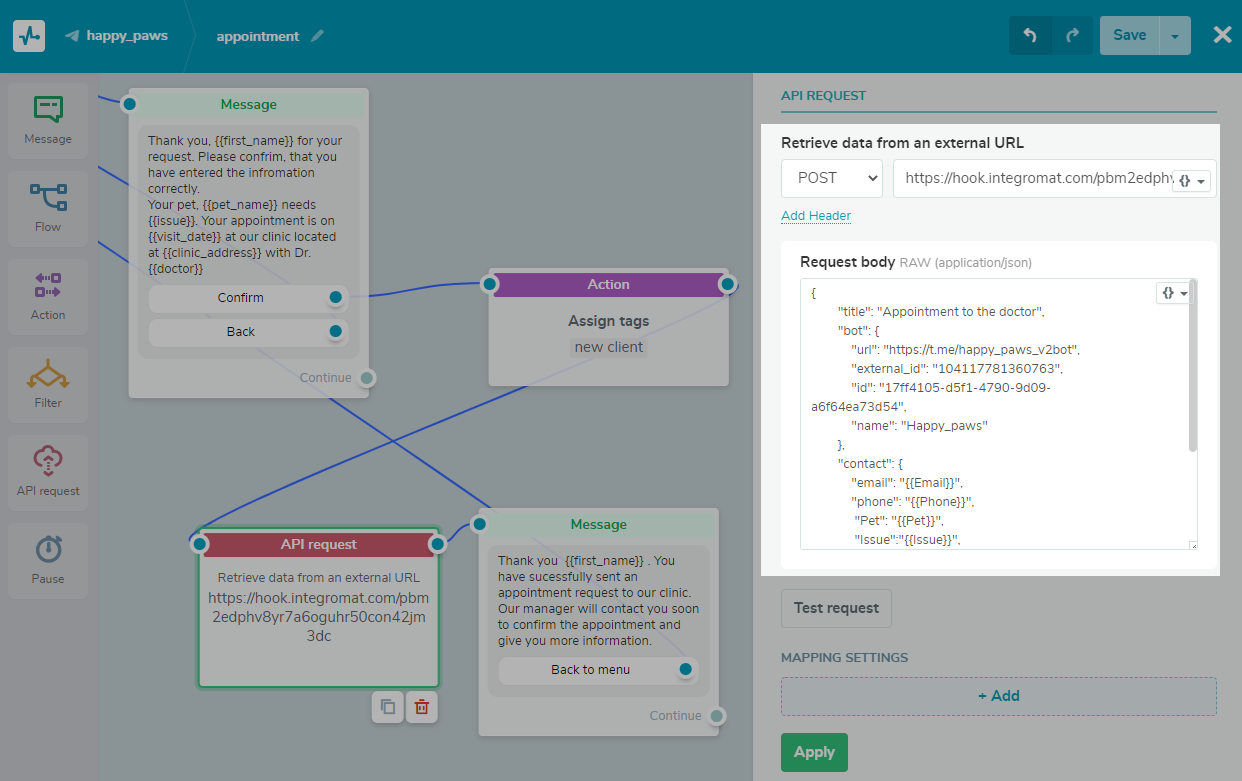
Via the "API Request" element
Add the "API Request" element right after the element after which you want to send the webhook. Select the "POST" request type and enter the URL you copied from Integromat. You can use your chatbot variables in the request.
Add the body of your custom request in JSON format. You can use your chatbot variables in the request.
Save the flow, send a test campaign to yourself to get your first webhook, that way it will be sent to Integromat.
When Integromat receives the webhook, you will see a “Successfully determined” message in your Integromat account.

Now you can add other elements.
How to Add a Record to Google Sheets
Click on “Add another module” beside the “Webhooks” element.

Choose the “Google Sheets” element.

Choose the “Add a Row” action.

To authorize and connect your Google account click on the “Add” button.

Choose which account to connect and allow Integromat access to read and write data. Then choose the sheet where you want to add data.

Map webhook variables to sheet cells. Also you can add your text, correct data or add conditions.

Click “Ok” to save the parameters.
Save and Launch
Before you save the scenario you need to check if everything is working correctly. Click “Run once” and send the webhook. If you set up everything correctly, under the “Webhook" and “Google sheet” elements you will see green check marks.

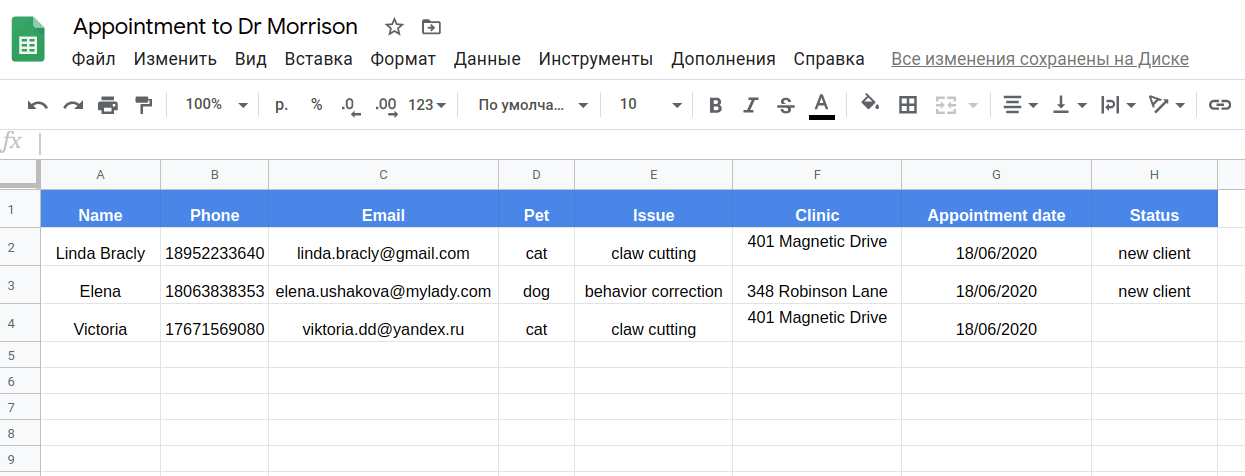
And our Google sheet receive a new string with data you filled in.
Now you can save the flow. Click on the panel icon to save it.

To activate the scenario, move the switch to the “On” position.

Choose how often your flow will execute. For our case we chose to execute the flow each time receive webhook - “Immediately”.

Additional features
Integromat has also various tools to automate the process. Discover some additional functions and elements.
How to Filter Data Using Variables
Integromat allows you to filter data. You can add filter data using the variables that the webhook receives and transfer it to different tables.
To distribute data, you need to use the “Router” tool. You can find it in the tool panel’s drop-down display. Choose this tool and connect it with the “Webhooks” element.

After the “Router” element, add elements with Google Sheets according to the previous instructions. Now click on the line between the “Router” and “Google sheet” elements to create a filter.

Enter the filter name and choose the variable, by which value you want to filter data and choose a condition operator. Enter the variable values, to which the conditions will apply.

You can add several conditions combining them with “and” and “or” operators. In our example we filtered by client issues related to a specific veterinarian doctor.

Also with this tool you can filter by a doctor - if you have this variable, filter by breed, and specific email addresses to track a specific client.
How to Add an Event to Google Calendar
You can add an event to your calendar. For example, if a client signed up for a specific date and you need to add the appointment to your calendar, Integormat makes it easy.
Add a “Google Calendar” element. Choose a “Create an event element”. Enter a name for the event — you can also add variables there.
While filling in data it’s important to add the correct date format to avoid confusion in the future. In the “Start date” and “End date” fields, navigate to “Date and time” fields, and choose the “formatDate” function.

Then choose the variable that stores date information, and drag it inside brackets as shown below.

Click “Ok” and your scenario to add an event to your calendar is ready to use.
How to Send Notifications to your Email with Data
You can add an “Email” element to send yourself an email after any executing any event. For example, each time a new record is added to your google sheet, or when a specific number of records have been added.
Choose the “Email” element and “Send an email” action and drag and drop it just after the element you want to receive email notification about.

Fill in fields - recipient, subject, content. Also you can add variables to a text message.

Also you can add attachments to the email. Click “Attachments” and choose the file you want and save your flow.
How to Review a Scenario’s History
Choose the scenario you need to see. You will see a diagram of all elements that have been executed. Click on the element you want to see detailed information about.

You can see all the information about that particular element: which values it collected and transferred.

If some of the elements did not execute - they will be highlighted in red and when you click on it you will see the cause of the error and recommendations for how to solve it.
Note! Before you fix the issue your scenario may stop working and not execute. Your operation will be stuck in the queue.
If you have any questions about creating your scenario or scenario glitches you can contact the Integromat support team.
The use cases for this service do not end here. Integromat will help you integrate diverse methods of transmitting and using data via webhooks.
Last Updated: 15.03.2023
or