According to Statista, 54.5% of emails sent in January 2018 contained spam. Internet service providers (ISPs) employ various means to protect users: spam traps, spam filters, and blacklists. The latter may be a big problem for active users, for whom a sudden decrease of delivery rate might be a sign that a sending domain or IP address has hit a blacklist. In case you’ve faced this problem or want to reduce the risks in the future, this entry will dot the i’s and cross the t’s.
What is an email blacklist and how does it work?
Email blacklist is a list of domains and IP addresses blocked as being suspected of sending out spam. The main goal of blacklists is to decrease the number of unwanted emails delivered to users.
There are two types of blacklists:
- Based on a sender domain;
- Based on a sender IP.
Blacklists function based on different kinds of identification algorithms, but the result is almost always the same — if a domain or an IP address gets blacklisted, emails coming from it won’t be delivered to users’ inboxes or will pass additional spam filters.
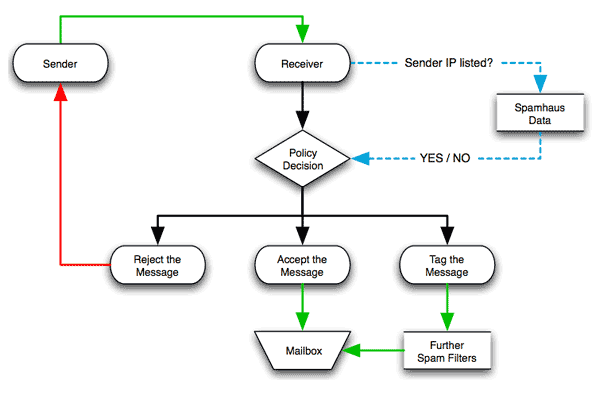
To get a better understanding of the process, take a look at a graph below:
 Email blacklist filtering process, Spamhaus
Blacklists may identify spammers with the help of spam complaints from users and spam traps — the email addresses used to catch spam senders.
There are two common types of them:
- Recycled spam traps, which are email addresses that have been inactive for a long time and now are used as traps by ISPs.
- Pristine spam traps, created by ISPs specifically for catching irresponsible senders.
Blacklist operators have a large network of spam traps. They locate them on popular forums and websites, track every IP address and domain hitting a spam trap, and get it blacklisted. Operators can also block an IP if a sender gets too many spam complaints.
The best way to avoid blacklists is to send emails to real email addresses gathered legitimately, by using subscription forms, for example.
How to check if your IP address or domain is blacklisted
Realtime Blackhole Lists (RBLs) or Domain Name System Blackhole Lists (DNSBLs) are dynamic software mechanisms that build databases of addresses known to be involved in spam activities. Email service providers use these lists to check if any particular incoming email is spam.
Among the most frequently used blacklists are the following:
- BRBL implements a standard DNSBL (Domain Name System Blackhole List) to identify IP addresses that have been involved in sending spam.
- MultiRBL looks up information on multiple DNSBLs as it is linked with other blacklists via IPV4, IPV6 or a domain.
- Spamhaus gathers data from several types of DNSBLs and has separate lookup tools for IPs and domains.
- Spamcop collects IP addresses marked by users as spam senders.
- SURBL is a list of websites linked to the emails which contain spam.
- DNSBL lets you search and check IP addresses among more than 50 active blacklists.
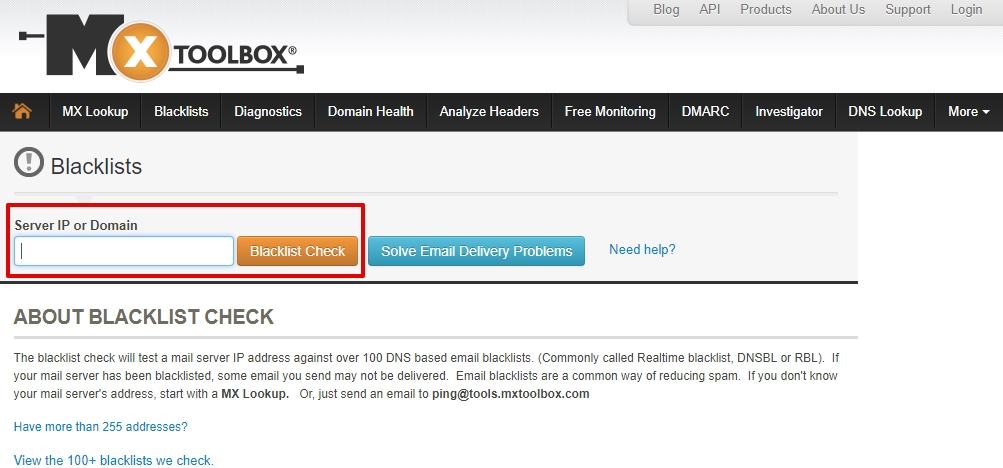
To check whether an IP or domain is blacklisted, you can also use MXToolbox:
1. Enter the domain or the IP and click “Blacklist Check.”
 Email blacklist check from MXToolbox
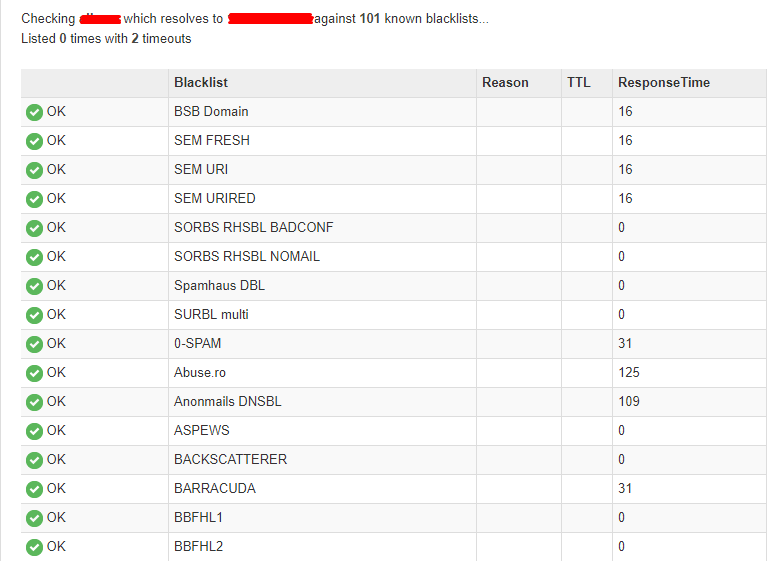
2. Analyze the results: a green checkmark means that your server hasn’t been found on a blacklist.
 Email blacklist check results from MXToolbox
How to avoid the risks of being blacklisted
It’s better to take action right away and make all needed arrangements to avoid being blacklisted.
Use double opt-in for new subscribers
With double opt-in, new subscribers receive subscription confirmation emails. This helps to protect mailing lists from spam traps and incorrect email addresses, increasing open and click rates and lowering the risks of unsubscribes and spam complaints.
Clean up your mailing list regularly
Loss of subscribers’ interest in your emails is a natural process. If you notice that a part of your audience neither opens nor clicks your emails, or sends them to spam, hold a reactivation campaign. Clean up your mailing list and delete anyone who hasn’t been reactivated to avoid messing up your sender reputation.
Use different IP addresses and domains for various email campaigns
Don’t send all emails from one domain or IP address. It’s better to use different ones for each type of email campaign. For instance, you can send promotional emails from one IP address and transactional emails from another.
Provide an easy way to unsubscribe
To reduce the number of spam complaints, make it easy to unsubscribe with no extra efforts. Place a large and visible unsubscribe button in every email you send. It is best if you always place the button in the same place, for instance, in the footer of your email.
How to remove your IP address or domain from a blacklist
Identify a reason
Check your open, opt-out, and spam complaint rates and delete inactive subscribers from your mailing list. Each blacklist has an FAQ section with all possible causes for blacklisting in it. Read it to eliminate every potential problem.
After manually removing all possible reasons mentioned in the FAQ, contact support, and explain your problem. But, remember that not every blacklist is ready to meet you halfway.
To sum up
To keep your sender reputation high, regularly check blacklists and analyze your metrics. We also recommend you to comply with SendPulse Anti-Spam Policy if you’re using our service.
Focus on the quality of your content to create value, always check technical settings of your campaigns, and use SendPulse to make your email marketing efforts effective.